Ahoy, and welcome to what is probably one of the more unique scripts on FiveM that you’ll run into for awhile.
GL-Go - A Pokemon Go-like Game.
(Note: I never actually played Pokemon Go, I based it off a quick youtube video I saw about it all).
Before jumping into the script, I will say that changing the default of what I have to, lets say “Pokemon”, is as easy as pie. Simply add your own images, and add the names to shared.lua
Interactive Menus
-
Begin by typing /mainmenu
-
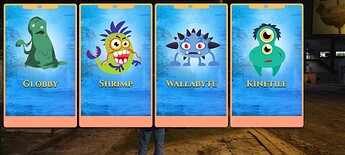
As a new player, you will get a choice of four different starter Companions
-
Once choosing your companion, type /mainmenu again to get started.
-
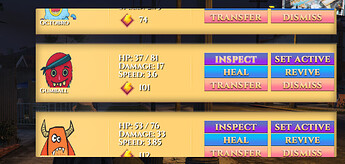
You can start fighting battles by Setting a Companion to Active in the Inspect List (Which displays all your companions)
-
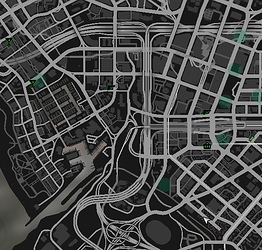
Once you have an active Companion, checking your Map will reveal blips of all the Zones
-
(I suggest setting them up at Points of Interest to draw Players to where others will be)
Companions
- Companions are what you “Capture” in gl-go.
- Add as Many Companions as you want to the script, by default I’ve included around 30 or so.
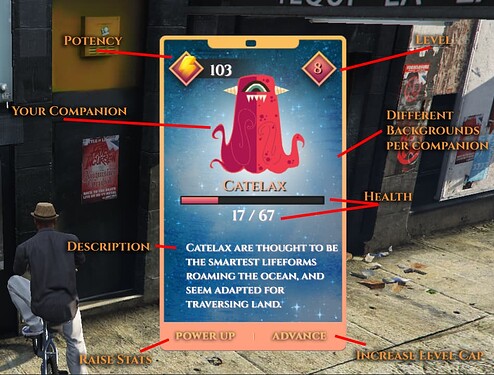
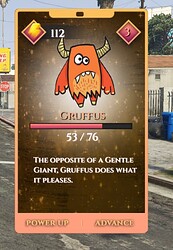
- You can increase the power of your companions (Inspect > Inspect > Power Up)
- Once the Companion is at it’s max power, you’ll need to increase their level cap (Advance)
- Level cap goes up by 10 for each level, so level 1 = 10, 2 = 20, etc.
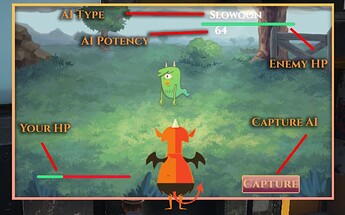
- You can view the current level in the Top Right, and Potency in the Top Left
Stat Break Down
- Potency: The Power of your Companion (It’s an accumulation of it’s Max Health, Speed, and Damage).
- Level: It’s current “Power” Level.
- Advancement: The Companions Level Cap (1 = 10, 2 = 20, etc.)
– When Powering up (Increasing Level) Your Companion will gain a random amount of Health, Speed, and Damage.
– When Advancing(Increasing Level CAP) Your Companion will gain a MUCH Bigger random amount of Health, Speed, and Damage.
Different Zones
- Each Zone you set up (The ones you will battle AI In) can have any set amount of Companions.
- Each zone can also have different min/max levels of companions.
– Ex; Zone 1 holds “Slowoon” at level 2-5, while Zone 2 also holds “Slowoon” at levels 3-9
The stats will be auto-calculated based on the base-stats set in shared.lua - Green Zones are Companion Battle Zones, Red Zones are Towers, more on this below.
Towers (Think Gyms like in Pokemon Go)
- Towers are a way to earn the other Currency (Bottles)
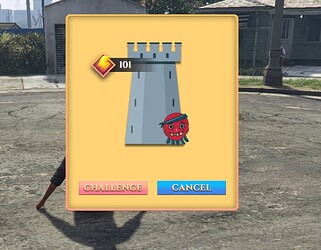
- Entering a Red Blip area will pull up the Tower UI.
- If the Tower is occupied, you’ll have the option to challenge whoever is occupying it.
- If the Tower is empty, you have the option of placing your active companion in the tower.
- When other players LOSE to your Towered Companion, you will GAIN Bottles. If they win, your Companion will be knocked out the tower and they can claim it.
Challenge Other Players
- You can freely fight other players with your Companions
- Simply goto the Main Menu > Challenge Player > Enter their Player ID
- You will fight with whatever your active Companion is, vs their active Companion.
Shop
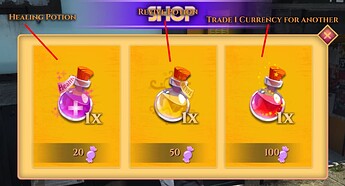
- Purchase helpful items from the shop using the main currency (Candy)
- Use Heals to heal any Companion that is not at 0 HP
- Use Revives to revive any Companion that IS at 0 HP
- Purchase Bottles (The other Currency) to use in upgrading your Companion
The Battle
- To Begin a battle, either use the Hotkey set up (G) or goto the Main Menu > Battle
- Battles in GL-Go happen automatically (So no dumb swiping or whatever).
- for AI Battles, your Companion will ALWAYS go First.
- For Battles against other players, it will be based on the Companions Speed
– It is possible to go twice before the opponent if your companions speed is high enough - During Battle, there is Battle Music as well. You can replace battlemusic.mp3 with your own music, or remove it.
- In AI Battles, you can freely try and capture the Enemy Companion at any time (But only once per battle).
- The lower the health the Companion has, the higher the chance of Capture. (Although it’s never higher than 70%).
Other Options
- Dismiss - Will Delete the Companion from your Roster for Good, cannot be undone.
- Transfer - Transfers the selected Companion to the Player ID you type in.
TO GO INACTIVE / Not trying to battle anymore, type /inactive and you will no longer see the Blips or Notifications
The Currencies
- Candy - The Main currency used to purchase from the Shop, and Increase the Power Level of your Companions
- Bottles - Earned from Competing in Tower Battles, or purchasing from the Shop these are used to Increase the Advancement Level of your Companion (But also used in increasing Power Level, although only a small amount)
If you’ve read this far, thank you even if you’re not interested in purchasing the script. A lot of work has gone into this, and I had a lot of help from
@SloppyShovel (Check him out at https://www.sloppydesigns.com/ You won’t be disapointed)
Some of my other scripts: Oxy/Deliveries 1 | Taco Job 1 | Meth Making 1 | Mechanic Job | BMX Comp Standalone 2 | Fitness, Group Yoga & More 1 | More Interactive Stores | Burgershot | Prison+ 1 | Underwater Salvage Job | Jewelry Store | Chop Shop 2 | The Best Trading Cards Script To Date 1 | Cluckin Bell | Chicken Job | Chicken Fighting 1 | Armored Truck Heist 1 | Baseball (Standalone) | Pizza Delivery | Crypto Currency | Garbage Collector | Used Car Dealership | Ambulance+ | Immersive Hunting
Important Attribution!
- Images were taken from https://www.freepik.com/ (Searching Vector Art > Monsters). They have a wide array of free assets that you can use (With Attribution) and are easy to edit.
Adding Your Own Images
- To Start, name the image the exact name of the new Companion
– (e.g pikachu would be pikachu) - You will also need a Back View and Portrait View (For when you’re fighting with him on your team, or viewing him in the menu).
- For the back view, it would be pikachuback, and portrait named the same, pikachuportrait.
- You can use BMPs, JPGs, Gifs, PNGS.
- You can change all of the menu images, as well as the backgrounds for the Cards in the Inspect Menu.
- I’ve included two static backgrounds (Blue / Green) as well as Three Animated Backgrounds (Blue / Red/ Purple)
| Code is accessible | Yes |
| Subscription-based | No |
| Lines (approximately) | Roughly near 3,000 |
| Requirements | For ESX nh-keyboard, PolyZone |
| Requirements | For QB, just base QB Stuff |
| Support | Yes |
I used swt_notifications in the script, but you can change them to ANYTHING you want.
