CS Styled Killfeed
Showcase
Click here if the video above doesn’t load. (Youtube)
About
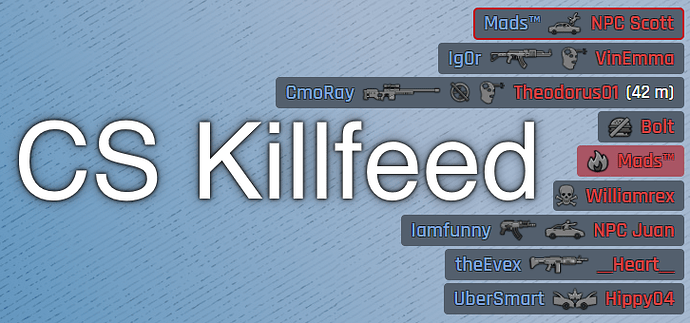
Does your server need a clean-looking, optimized, killfeed? Well, look no further! I’ve got you covered!
Killfeed is a standalone counter strike styled killfeed script, that includes over 100+ different weapon icons and 16 different custom icons. It is very optimized (0.00 idle, 0.02 on kill), and can be configured to your needs (see configuration). It includes a lobby and group system for devs who want to integrate it with their own framework or systems. The UI is also HTML-based, so you can change the looks however you want. And just like all of my scripts, you can freely edit the source code to your heart’s content (no encryption or obfuscation etc.).
Key Features
- Killfeed (duh)
- 100+ different weapon icons
- 16 custom icons
- HTML based
- Lobby and group system (for devs, see documentation)
- Highly configurable (see configuration)
- Low resmon (0.00 idle, 0.02 on kill)
- All of the code is accessible
Configuration
The script is highly configurable, click below to see the full config file.
Config.lua
Config = {}

Config.ShowTime = 8000 -- Time in milliseconds on how long the line should show in the killfeed before disappearing
Config.MaxLines = 5 -- The maximum number of lines the killfeed can show at any given time

Config.DisplayHeadshots = true -- Whether or not to show the headshot icon when someone was headshotted
Config.DisplayNoScopes = true -- Whether or not to show the noscope icon when someone was not no-scoped
Config.DisplayDriveByIcons = false -- Whether or not to show the driveby icons, sadly it only works 90% ish of the time

Config.DisplayJoinLeave = true -- Whether or not to display connections and disconnections in the killfeed
Config.JoinLeaveColour = { r = 30, g = 100, b = 210 } -- The colour of the name of the person who left/joined
Config.ShowLeaveReason = true -- If true, it will display the reason the player left (exit, disconnect, crash, kick, ban etc.), otherwise it'll just say 'NAME left the server' regardless of the reason

-- These are the default victim/killer colours (rgb)
Config.KillerColour = {
    Player = { r = 125, g = 160, b = 215 },
    NPC = { r = 125, g = 160, b = 215 },
}
Config.VictimColour = {
    Player = { r = 219, g = 66, b = 66 },
    NPC = { r = 219, g = 66, b = 66 },
}

Config.IncludeAI = true -- If set to true, it will include deaths and kills involving NPC's. If this is set to false and a player gets killed by an NPC it just shows the death without a killer.
Config.AddAIPrefix = true
Config.AIPrefix = "NPC "
Config.UseRandomAINames = true -- If this is set to false it will use the entity id. (example: 184578)

Config.IncludeAnimals = true -- Makes animals appear in the killfeed, only works if Config.IncludeAI is set to true
Config.AddAnimalPrefix = false
Config.AnimalPrefix = "[Animal] "
Config.AddAnimalSuffix = true -- example: Nilo the Dog, "the Dog" beeing the suffix

Config.Proximity = false -- Whether or not to use proximity checks (aka only show kills close by).
Config.ProximityRange = 424.0 -- The max distance in meters the player can be from the victim and it displaying the kill. 424 meters is the max extent of the default client scope/culling in onesync

Config.ShowKillDistance = 1 -- 0/false = don't show at all, 1 = show for weapons with the showDist option set to true (by default only snipers), 2 = show distance on every kill
Config.KillDistanceUnit = "meters" -- "meters" or "feet"
Config.KillDistanceColour = { r = 255, g = 255, b = 255 }

-- Whether or not to use ace permissions. When setting the permissions you should set the 'killfeed.display' ace to allow. If the Config.Proximity is set to true, then this will allow those with permissions to see all kills while regular players only see kills within the proximity range.
-- Example: `add_ace admin "killfeed.display" allow` in server.cfg or permissions.cfg or `ExecuteCommand('add_ace admin killfeed.display allow')` in a script that can change permissions (both without the ``)
Config.UsePermissions = false

Config.UseEasterEggs = true
Config.EasterEggs = { "blattersturm", "nihonium", "Disquse", "gottfriedleibniz", "PichotM", "LWSS", "Hellslicer", "TomGrobbe", "NCG", "Mads" } -- These are some of the top contributors to the fivem project on github (+ 2 others), you can replace them with your own if you desire.

Config.ToggleCommand = true -- Whether or not to add a command for the client to toggle the killfeed on/off

Config.UseGroups = false
Config.Groups = {
    -- This is just an example of a group/team/gang/whatever, you can add as many as you want, or even create them dynamically by calling the CreateGroup function (server export).
    --[[
    ['vagos'] = {
        tag = "[VAGOS] ",
        tagColour = { r = 150, g = 0, b = 150 },
        colour = { r = 250, g = 200, b = 10 },
        members = {}
    },
    ]]--
}

-- Read the documentation on how to utilize lobbies
Config.UseLobbies = false
Config.Lobbies = {
    -- Example:
    --[[
    ['general'] = {
        members = {}
    }
    ]]--
}
Documentation
The script included documentation for those who want to utilize the group/lobby system or any of the many exports.
Documentation.md
– Start of Documentation –
Killfeed
General Information
This file documents the core functionality of the script, for parts that are undocumented or for other questions, ask on the forum post.
There are 3 images that are included but not used. These are starvation.png, dehydration.png and bleeding.png. They can be used as described longer down in the document under examples of the OverwriteNextDeath function if you desire.
Groups
The group system can be used for almost anything. It does NOT have to be used strictly as “groups”. You can for example set it up so server donors get special tags or name colours, or even use it to display the level of the player, the options are endless. A player can only in practice be in one group at any given time, assigning more than one group will give odd results.
You don’t have to use the group system even though it is included, however, it will likely add to the experience. Remember to set Config.UseGroups to true if you are going to use them.
Lobbies
Lobbies allow you to separate players so they don’t see killfeeds from for example minigames utilising routing buckets. The system should be self-explanatory on how to use it, the exports are similar to the group exports.
Just as groups, you don’t have to use them, however, it can add to the experience. Remember to set Config.UseLobbies to true if you are going to use them.
Exports
Here is a list of all the available exports, they should cover most (if not all) of the necessary actions related to setting up and managing groups.
Client-Side
param weapon hash | string
OverwriteNextDeath(weapon)
You might want to use this when a player is getting killed by a script (when they starved to death for example).
param state boolean
IgnoreNextDeath(state)
Used if you want to ignore the next player’s death. Will automatically be reset when a death is ignored (aka this is not a toggle!).
Server-Side
Groups
param name string
param attributes table
return groupTable table
CreateGroup(name, attributes)
This is used to create a group after the initial start of the script.
param name string
return success boolean
DeleteGroup(name)
This is used to delete a group after the initial start of the script.
param name string
return exists boolean
DoesGroupExist(name)
Checks if the group exists.
param playerId int
param name string
return success boolean
AddPlayerToGroup(playerId, name)
Adds a player to the spesifed group.
param playerId int
param name string
return success boolean
RemovePlayerFromGroup(playerId, name)
Removes the player from the group.
param playerId int
return groupName string
GetPlayerGroup(playerId)
Gets the group the spesifed player is in.
param playerId int
param group string
return inGroup boolean
IsPlayerInGroup(playerId, group)
Check if the player is in the group.
param name string
param attributes table
param value any
SetGroupAttribute(name, attribute, value)
A setter for group attributes, you can also use this to remove any attributes by passing nil as an value.
param name string
param attributes table
return retval any
GetGroupAttribute(name, attribute)
A getter for group attributes.
Lobbies
param name string
param attributes table
return lobbyTable table
CreateLobby(name, attributes)
This is used to create a lobby after the initial start of the script.
param name string
return success boolean
DeleteLobby(name)
This is used to delete a lobby after the initial start of the script.
param name string
return exists boolean
DoesLobbyExist(name)
Checks if the specified lobby exists.
param playerId int
param name string
return success boolean
AddPlayerToLobby(playerId, name)
Adds a player to the spesifed lobby.
param playerId int
param name string
return success boolean
RemovePlayerFromLobby(playerId, name)
Removes the player from the lobby.
param playerId int
return groupName string
GetPlayerLobby(playerId)
Gets the lobby the specified player is in.
param name string
param attributes table
param value any
SetLobbyAttribute(name, attribute, value)
A setter for lobby attributes, you can also use this to remove any attributes by passing nil as a value.
param name string
param attributes table
return retval any
GetLobbyAttribute(name, attribute)
A getter for lobby attributes.
param lobby string
param group string
return success boolean
AddGroupToLobby(lobby, group)
Adds every member of a group to a lobby.
param lobby string
param group string
return success boolean
RemoveGroupFromLobby(lobby, group)
Removes every member of a group from a lobby.
Examples
Groups
Creating Groups
There are two ways to add groups, one is to add all the attributes on creation, and the other is to add/change them individually whenever needed.
exports.killfeed:CreateGroup("supporter", { colour = { r = 220, g = 180, b = 0 }, tag = "[SUPPORTER] ", tagColour = { r = 190, g = 160, b = 0 } })
This will do the same as above:
exports.killfeed:CreateGroup("supporter")
exports.killfeed:SetGroupAttribute("supporter", "colour", { r = 220, g = 180, b = 0 })
exports.killfeed:SetGroupAttribute("supporter", "tag", "[SUPPORTER] ")
exports.killfeed:SetGroupAttribute("supporter", "tagColour", { r = 190, g = 160, b = 0 } })
Adding Players
Adding players is pretty simple, just trigger the AddPlayerToGroup function.
AddEventHandler("framework:gangs:onGangChange", function(playerId, gang)
    exports.killfeed:AddPlayerToGroup(playerId, gang)
end)
Removing Players
Expanding on the previous example:
AddEventHandler("framework:gangs:onGangChange", function(playerId, gang)
    local group = exports.killfeed:GetPlayerGroup(playerId)
    if group then
        exports.killfeed:RemovePlayerFromGroup(playerId, group)
    end
    exports.killfeed:AddPlayerToGroup(playerId, gang)
end)
Using the OverwriteNextDeath function
OverwriteNextDeath is a client-side function that is used to overwrite the next death, this should be used when a script kills the player, for example when they starve to death etc.
If you don’t overwrite the next death and kill them through a script it’ll display as if they fell to death (GTA does this).
Example:
Citizen.CreateThread(function()
    while true do
        Citizen.Wait(1000)
        if hunger > 0 then
            hunger = hunger - 100
        else
            local playerPed = PlayerPedId()
            local health = GetEntityHealth(playerPed)
            if health <= 10 then
                exports.killfeed:OverwriteNextDeath('starvation')
                SetEntityHealth(playerPed, 0)
            else
                SetEntityHealth(playerPed, health - 10)
            end
        end
    end
end)
Adding Messages to the feed
You can add any message to the feed by triggering the killfeed:addMessage event. It has to params: id and message. The id must be a unique string/int. The message needs to be a string.
Weapons List / Death Reasons
In client.lua there is a table called “weapons”. This list contains the options for each weapon/death reason. This is where the script goes when it decides for example whether or not the weapon can show headshots, noscopes etc.
Options
Here is a list of all options available for weapon/death reasons. All of the following need to be boolean values. It will fall back to the default if it is not specified.
- image; the image of the death reason (image must be a .png file). (default: none, must be specified!)
- ignoreDeath; if true it will be ignored the death and not show it in the feed. (default: false)
- canHeadshot; if true it can show headshots (default: true)
- canDriveBy; if true, it can show the drive-by icon (default: false)
- canNoScope; if true, it can show the no-scope icon (default: false)
- showDist; if true, it shows the distance between the killer in meters or feet (see config file) (default: false)
- canSelf; if true, then the victim can also be displayed as the killer. (default: true)
Adding Custom Death Reasons
Adding custom death reasons is pretty easy. This can be used in combination with for example the OverwriteNextDeath function.
Example:
['starvation'] = { image = "starvation", canSelf = false },
canSelf in this example is used so it will show that you starved to death, rather than that you “killed yourself” with starvation.
You can also add custom weapons to the list.
Example:
[GetHashKey("WEAPON_HUNTINGRIFLE")] = { image = "hunting_rifle", canNoScope = true, showDist = true },
Changing the position if the killfeed
To change the position of the killfeed you’ll have to edit the style.css file and change the variables under #killfeed-container.
– End of Documentation –
Purchase on Tebex
You can purchase it here through Tebex. (5.00 USD + tax)
Some of my other scripts
[Standalone] [Paid] Sit Anywhere
[Standalone] [PAID] Slash Tires
[Release] No Exploding Pumps
[Release] Telescopes
[Standalone] Crutches
If you have any questions or suggestions feel free to post them below, I’ll answer them as soon as I can! ![]()
NOTE 19.01.2023: This script is designed to work for FiveM servers and it has to be downloaded through the FiveM keymaster, if you want to run it on something different, then you’ll have to convert it yourself.
| Code is accessible | Yes |
| Subscription-based | No |
| Lines (approximately) | 1050 |
| Requirements | None |
| Support | Yes |


