Even though there are more then enough sound effects available, no one seems to be using them. And instead opt for Interact-Sound which can be triggered by anyone to spam sounds to the whole server. Which of course can also be found in xSound because they provide the same events so the lazy people don’t need to change the one line that calls this event to an export.
Ultimately both of these options can’t benefit from the audio engine which can perfectly provide echo, suppression, decay, attackcurve, … . All depending on where you are in the world.
But in this tutorial I will only show you how to make SimpleSounds to help you on the way of replacing both the 2 resources above. Believe me there are so many thing you can do with this then only simple sound effects. I would highly suggest you stick with it and research this further ![]() .
.
Prerequisites
CodeWalker: CodeWalker GTA V 3D Map + Editor - GTA5-Mods.com
Audacity: https://www.audacityteam.org/
Template files you can play with: GitHub - ChatDisabled/nativeAudio
Software of choice where you can rerender audio files into a .wav file (I used Sony Vegas)
Basic understanding of CodeWalker usage 
To begin with we are going to create a `.awc` container which will hold all the audio files.
-
Gather all the sounds you want to use. This is obviously personal preference and this can be done though https://www.youtube.com/ or whatever. Preferably these sounds should be in the
Waveform Audio File Format | .wav for short. But these are hard to come by. Which is no problem as we can do this ourselves. -
Once you got everything you want, you will need to convert these sounds to
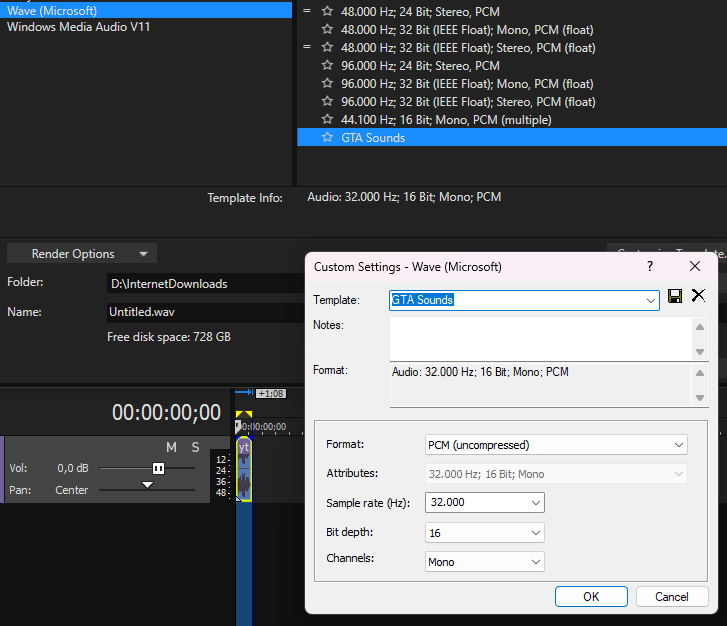
.wavfiles. This can be done however you want but I personally use Sony Vegas as that is what I am comfortable with. As long if you do what is written below there should be no problem whatever software you use.- Simply drag & drop one of the sounds in your software of choice, and render it back into a
.wavwith a sample rate (kHz) of 32.000, bit depth of 8 or 16 and it has to be in mono, not stereo. The format will bePCM. Do this for every sound you have.A sample rate of 32kHz mostly gets used for simple sound effects. 44.1 and 48kHz gets used for songs. And 24kHz gets used for speech interactions.
There seems to be some kind of limit on the size of the
.wavand even the.awc. Limit is unknown(?) but keep it under ~1.5MB. Knowing that the base game files exceed this there should be a way to counteract this “limit”.
- Simply drag & drop one of the sounds in your software of choice, and render it back into a
-
Now put all of these sound files in a folder. For the sake of this tutorial call this folder
custom_sounds. -
Using the template file included that is called
custom_sounds.awc.xml, I want you to edit this file in whatever IDE you use. I already included 2 example sounds in the template.-
Firstly change both the
<Name>and<FileName>entries.<FileName>is going to be the filename of your converted sound files which you put in the foldercustom_sounds.<Name>however can be anything you want but it is simply easier to keep this the same or rather similar. -
<Codec>will bePCMsince we converted the sounds into this format. -
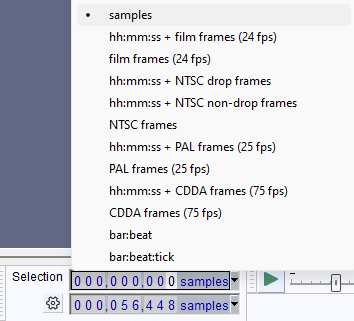
<SampleRate>will be<SampleRate value="32000" />because we used the 32kHz sample rate. The<Samples>value however needs to be calculated by you by doingaudio duration * sample rate. If you don’t know the exact duration I would highly advise you use Audacity for this part. Once Audacity is installed simply drag the sound into it, double click to select the whole clip. The samples value will be displayed below. Fill this in inside the.xmlfile.
- Now I’m no audio head, but there are other entries included which you can play with to prepare your sounds before use. But I would keep
<LoopPoint>at minus 1 because otherwise your sound will keep looping if this is set at 0 for example. Have fun and play around with these entries.
- Now I’m no audio head, but there are other entries included which you can play with to prepare your sounds before use. But I would keep
-
-
Once you have added all of your sound entries you can go ahead and open CodeWalker (I used dev44). Make sure both your folder containing the sounds and the
.xmlfile you just edited are on the same level so that wherever you put them you can see them both. Enable edit mode and right click to Import XML. Find your XML file and press done. Now you should have a working.awccontainer with all the sounds included. If you get"Object reference not set to an instance of an object"then your folder/file structure is wrong, the .xml and folder containing the sounds is named differently. Or you used a wrong name to get the sound in your.xmlfile.
Making the corresponding .dat54.rel file
-
Using the included template
audioexample_sounds.dat54.rel.xml. We are going to make 2SimpleSoundswhich will be usable through asoundset. You can however include as many simple sounds as you want of course. -
Editing a
.dat54.rel.xmlfile-
First we have the
<Name>entry. This name will be used later on in the file and can be named however you want. But again for simplicity just name it the same way you did your sound name. Rockstar however uses some internal naming scheme depending on which type of sound you are adding.MultitrackSoundfor example ends with_mt. -
<Header>. Here you can change a lot of attributes of the sound. Most flags have already been discovered and I would highly suggest you look at this GitHub repository to get an idea of which flags are available. In the template I am using0x00008004. This can be broken down to0x00000004for Volume and0x00008000to change the category (Category is very important if we want to use a sound in asoundset!!!. Please keep this at scripted) -
And finally the
<ContainerName>and<FileName>. These two are to locate the actual sound inside of your.awccontainer.<ContainerName>will start from wherever your resource that is streaming the sounds is located. Following the example below as structure with the resource namedresourceAudio. The entry in<ContainerName>should beaudiodirectory/custom_sounds.<FileName>should be the name you gave the sound in your.awc.xmlfile (The<Name>entry not<FileName>!).resourceAudio ├── audiodirectory │ └── custom_sounds.awc ├── data │ └── audioexample_sounds.dat54.rel ├── fxmanifest.lua ├── client.lua -
Once you have created all of your SimpleSounds you want. You will need to insert them all into a
SoundSetto actually use them in game. The 2 example sounds are already inside of the template. You simply need to add your sounds. The<Name>entry here can be whatever you want. You can add more sounds inside of the<SoundSets>entry.<ScriptName>will be the name of the sound that you call inside of scripts.<ChildSound>will be what you named yourSimpleSoundfrom before in the same file.
-
-
Now you are once again ready to simply Import XML inside of CodeWalker and you should have a valid
.dat54.relfile.
Following the same folder structure as mentioned above and a simple code snippet, you should now have working “native” sounds ![]() . Thanks to everyone making this possible and spreading information on this topic. And I highly suggest you use this repo. Thanks to everyone which I directly talked with and shared their insights as well. I just hope more people would use the actual audio engine instead of UI alternatives.
. Thanks to everyone making this possible and spreading information on this topic. And I highly suggest you use this repo. Thanks to everyone which I directly talked with and shared their insights as well. I just hope more people would use the actual audio engine instead of UI alternatives.
And hopefully the people who were talking about making automated tools for making the .awc and .dat54 files are almost done and will share this as well ![]() . If anything is wrong with the tutorial feel free to correct me.
. If anything is wrong with the tutorial feel free to correct me.