I’ve had a handful of requests and there’s been a lot of interest in what’s actually possible with Peds/MetaPeds/Creatures, primarily related to their visual configuration/manipulation. Can NPC assets be used on MP models? Yes, though it may not be flawless in many cases. Can horses and animals be modified beyond their presets to create “new” appearances? Yes, actually to a remarkable degree with horses since most textures are tintable. Can you change the tint of pre-existing shop items / assets? Yes. Can you add custom overlays, such as tattoos? Yes, even without much, if any, metadata changes/additions, just by streaming new textures (depends on the overlay type as shown below). Just specify whichever component category (e.g. bodies_upper instead of heads) when applying the overlay.
This will be a rather verbose overview and presumes at least a minimal understanding of peds and development. I will provide code examples of different ways peds can be modified at the end. However, this is not a full overview of every parameter and option available, but rather the intent is to give a general overview to aid others in starting/continuing their own research and experimentation. With the basic understanding of the metadata files and native functions, you can then do anything you wish from there (finding any specific asset or parsing the full files etc.). This will also be somewhat of a work in progress that I’ll update with continued research as well.
Update 1: Added section on Expression Sets
If you are not familiar with the following references, I highly recommend them. However, most of my reference for this overview will be the raw metadata files.
https://vespura.com/doc/natives/
https://alloc8or.re/rdr3/nativedb/
https://alexguirre.github.io/rage-parser-dumps/dump.html?game=rdr3&build=1491
Ped MetaData Overview
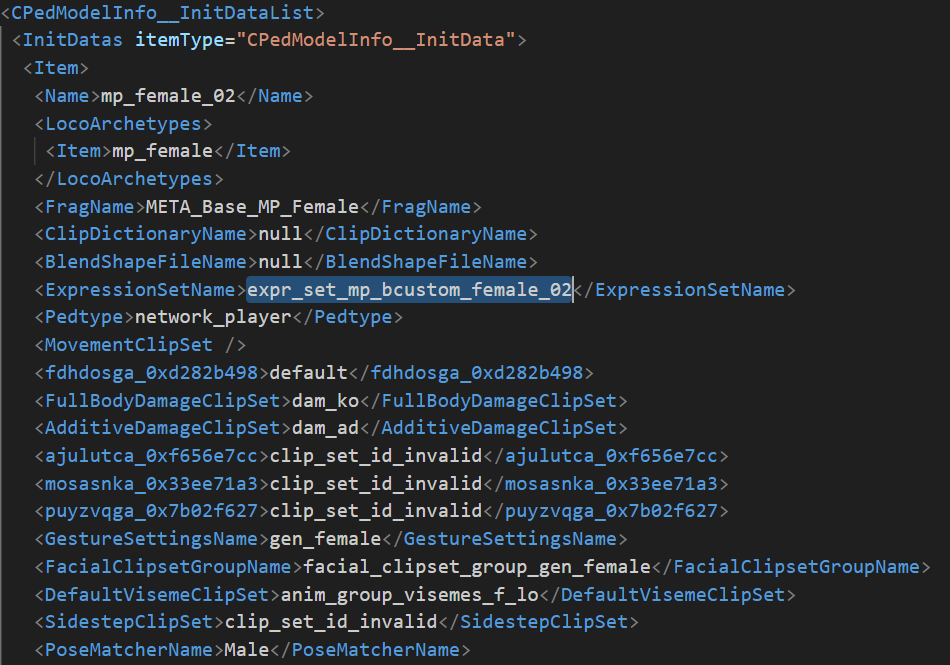
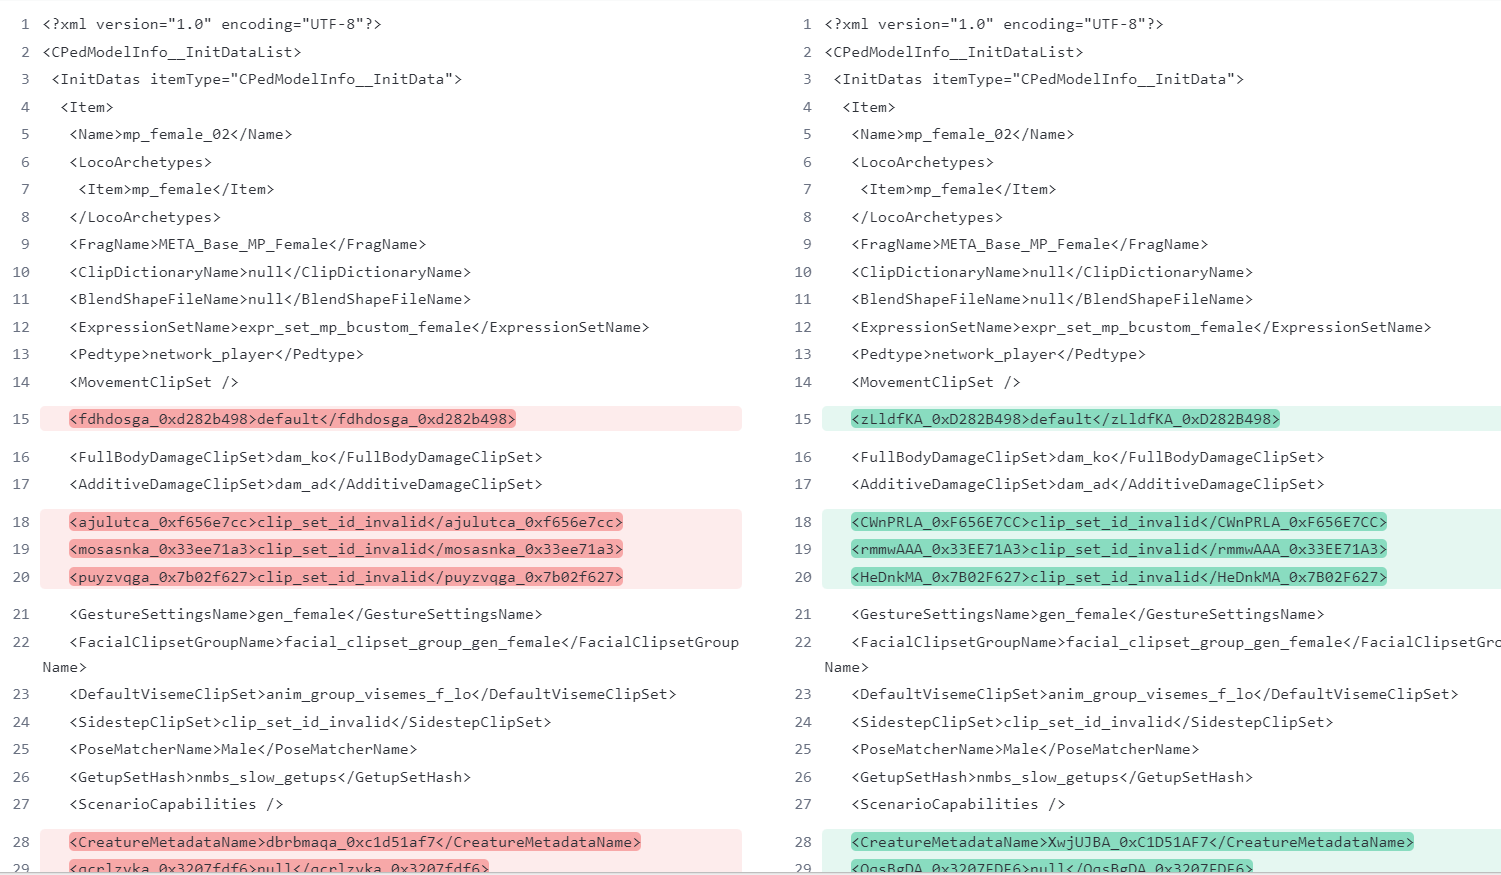
Peds are defined by metadata, starting in metapeds.ymt. Each ped has various parameters defined, including the base model (e.g. mp_female or p_c_horse_01 etc.), locomotion types, animations, voice, whistle, etc… There are also further references to other metadata files, such as CreatureMetadataName. CreatureMetaData defines expression, cloth, and shader drivers (these appear to be exposed controls for MetaPed assets to utilize). The most common references I’ve found have been expressions and I won’t go into cloth/shader stuff at this time. Ped models have hundreds of bones (both skeletal and many other kinds, think of them sorta like interface/attach/reference points for various things - such as how a holster knows to rest where it does or eyes in their sockets, etc.). MetaPed expressions allow for the various components/assets that make up the ped to move and interface in a more dynamic manner than just being rigidly attached to the bones of the base model and assets directly. Here’s part of the definition of mp_female and then its CreatureMetaData (mostly just to show a glimpse, as we’re still researching expressions extensively):


General MetaPed related settings are located in settings.ymt. MetaPed Category Tags (component categories) are defined here. There are MetaPed Expressions defined that appear to be what are exposed to the runtime, but there are many more expressions in creature metadata and assets not exposed/listed here. Palettes, overlays, and gore assets are also defined here. Asset Bundles define more complex assets, such as hats, saddles, etc. that are typically interacted with in unique ways. Global outfits define globally available outfits, such as hand/feet bindings. Animal pelt props are defined here as MetaPedSkinToPropDataSet. Also unique props such as MetaPedCategoryAsset in the case of s_hat_viking01x.
Outfits and MetaPed Assets
Peds have MetaPed Outfit metadata files (typically named after their ped model, such as mp_female.ymt) that define explicit assets (MetaPedDefExplicitAsset), what we know as components. I will continue to call them components so as to not confuse explicit assets with the MetaPed assets of which they are made. Outfits are the most common usage of MetaPed assets, but there are also Shop Items and Asset Bundles that I’ll talk about later. All components are defined by assets of types: drawable, albedo, normal, and/or material. Drawables are the 3D geometry models. Albedos are color related textures. Normals are height/bump map textures. Materials are material property textures, such as metalness, roughness, etc… Palettes and tint channel values are used for albedos marked as tintable (<useTintPalette value="True" />). These assets are defined in assets_drawable.ymt, assets_albedo.ymt, assets_normal.ymt, and assets_material.ymt. Here’s an example of an outfit preset with some components (explicitAssets) defined by their constituent MetaPed assets:

MetaPed assets (MetaPedAsset in assets_ YMTs) are defined with guids as the primary point of reference to the asset. They are grouped by MetaPed type: Male, Female, Teen, or Animal and therefore are only available to peds of that type (e.g. males cannot be equipped with female assets). They have various parameters, but the primary ones are tags: propertyTags and matchTags. propertyTags are, as you’d expect, properties of the asset. The category of the asset is defined as a property tag (i.e. the component category: bodies_upper, heads, etc.). There are many presently unknown property tags, but upon cursory research of a handful, they appear to often be things such as the type of asset (e.g. holsters usually share a common tag, no matter the component category, left, right, cross draw etc.). For albedo assets, if they are tintable, they often have a tint property tag as well.
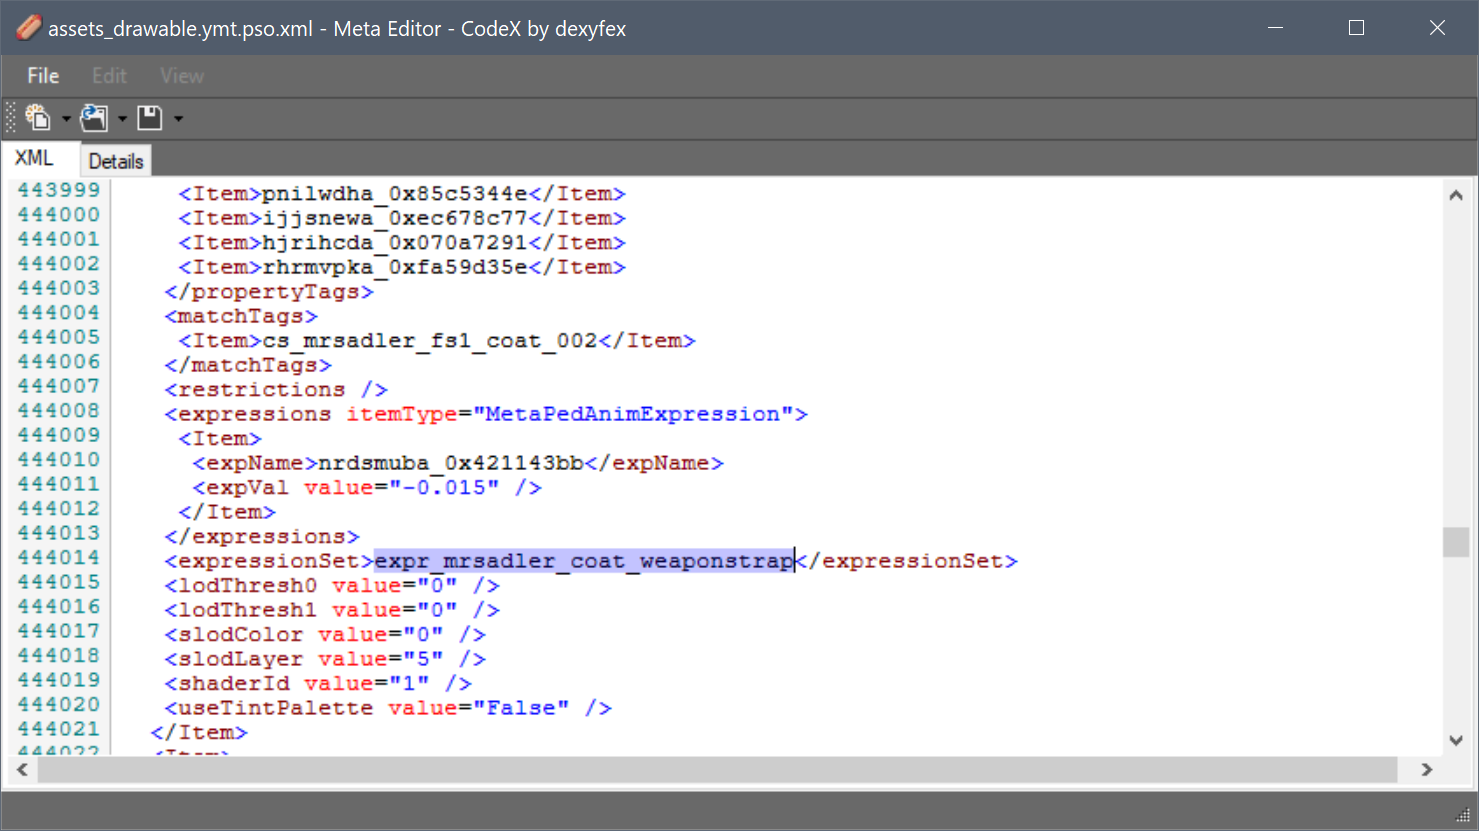
matchTags are used to create a relationship with other assets. Typically for drawables, this will be the guid and then albedo, normal, and material assets will have matchTags containing at least one of the drawable matchTags if they’re related. There is also a relationship between albedo, normal, and material assets defined based on these tags. However, it’s important to note that there’s a degree of variety in how these tags are used. Just due to the sheer number of assets, more research will be required. Assets also have restrictions, which strictly define what assets can be used together. If you set such a restricted asset, you should notice a change to another component category’s assets as well. However, restrictions are incredibly rarely used, though relevant. useTintPalette defines whether a palette and tint values will be used to render the albedo asset properly. While there is an assets_tint.ymt metadata file, I haven’t found it entirely necessary. Any palette and tint values can be used (whether they look “correct” or not is another matter), though these can be referenced as presets available. MetaPed tint palettes are named metaped_tint_*, such as metaped_tint_generic, and they are primarily sourced in graphics.ytd. Tint channels are referenced as tint0, tint1, and tint2, mapping to the Green, Red, and Blue channels of the albedo respectively. Acceptable tint values are 0-254 for valid color data in the palette and 255 to disable the channel. Not all tint channels are necessarily meant to be used in every case nor do they always have to be. Though typically at least tint0 is required when the albedo relies on palette/tints. Assets also have expressions related parameters that can tweak how the asset interacts with the ped model and other assets. I’ll show here one example of a drawable and albedo that match:


The following are two examples of tint palettes, metaped_tint_horse and metaped_tint_makeup. Exactly which column of pixels each tint channel uses depends on the channels in the albedo and the shader, but it seems to be left to right, linearly within each channel’s available selection at least. The Green channel seems to always be the primary and it seems to use the bulk of the palette width. With the secondary channel being Red and tertiary, Blue.


Shop Items
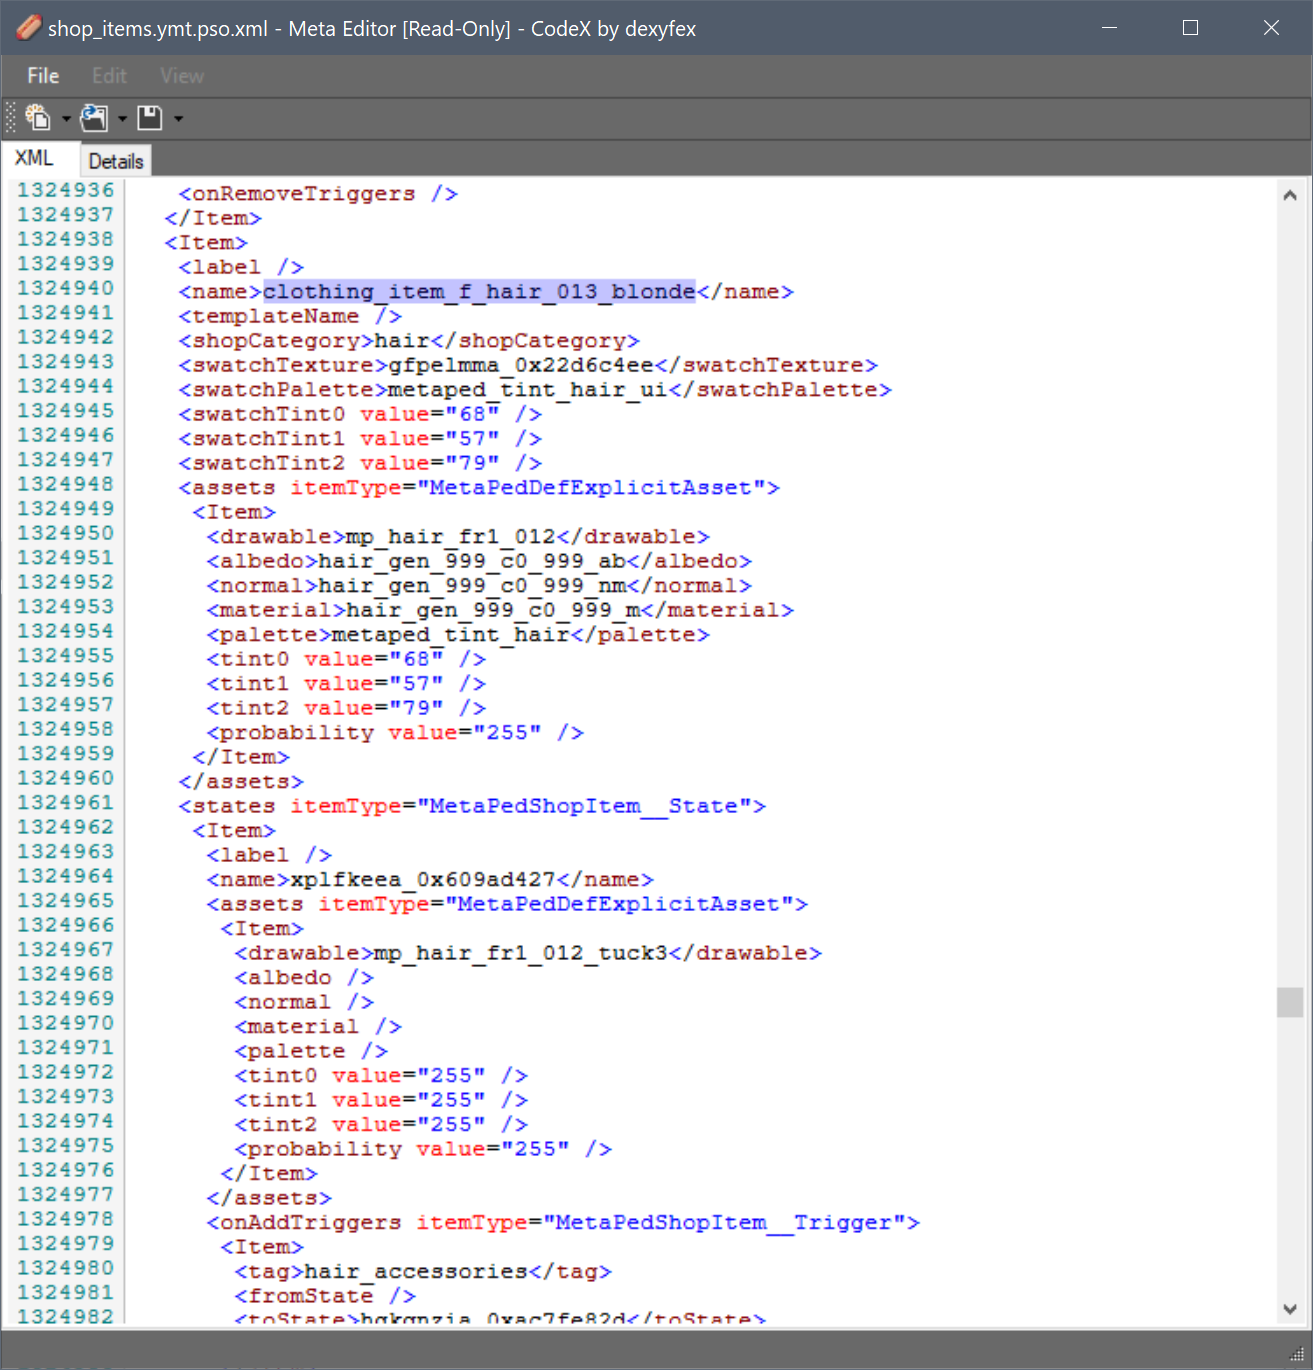
Shop items are essentially component definitions with extra metadata and functionality, primarily wearable states. They’re defined in shop_items.ymt. Wearable states allow the item to change between different assets, such as smaller pieces so assets don’t clip through each other. States also allow different configurations, such as a bandolier draped the opposite direction. They are primarily defining different drawable assets to give those smaller pieces or differing shapes etc… These states can be set by add and remove triggers for other component categories, such as if you add a coat and have a vest or shirt shop item equipped, it may change the vest or shirt to use an asset that doesn’t clip through the coat. It’s important to note that while shop items define components, components themselves are not shop items. So you shouldn’t expect that a component or category has the functionality of shop items, like wearable states. They need to be treated distinctly, checking if a shop item exists, if applicable, even though they are related. There are also several native function docs that need to be updated to reflect this distinction (specifying “component hash” as parameters when it’s really a shop item hash). Here’s a shop item and wearable states with triggers:

Overall, shop items and outfits are the most concise method to modifying peds. They define all of the assets and parameters and provide features such as wearable states (in the case of shop items), so that you don’t have to. However, manually setting those parameters and assets results in many more possibilities. Any palette and tint can be set for any albedo asset that uses them (useTintPalette = True). Almost any combination of assets can be used, whether they were intended to be or not (with the exceptions of those with restrictions). As well as assets intended for other models might work on mp_male or mp_female (many do, many don’t). This is entirely dependent on the model’s bones and expressions. There are not presently ways to fix these instances where assets are visually unusable, at least with the assets defined as is. However, further research into expressions and their exposure to the runtime may provide much more capability on this front. Overall, a mix between shop items, outfits, and explicitly defined assets / components is ideal when possible. I highly recommend using shop items and I still do whenever I can, because they have wearable states, a very powerful feature.
Overlays
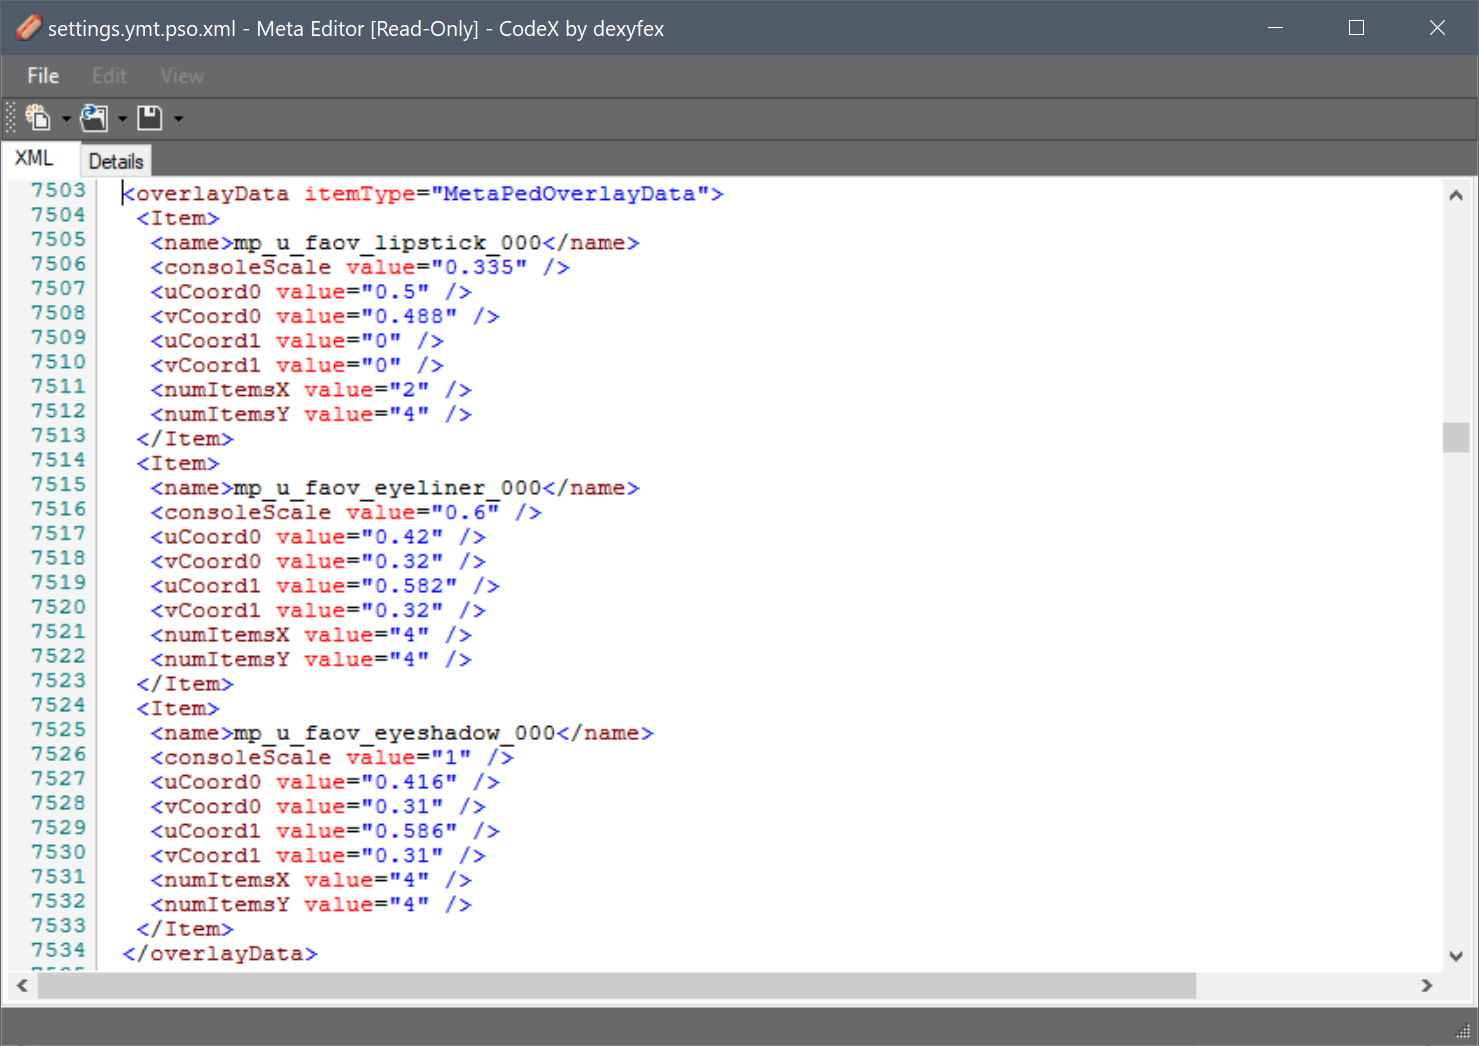
Overlays are layers of textures applied over base assets in any category. These are not MetaPed assets, just textures of type albedo, normal, and/or material. There can be metadata associated, such as defining a unique position/scale in the case of lipstick, eyeliner, and eyeshadow, as seen in settings.ymt here and I’ve included the mp_u_faov_eyeliner_000 albedo to show why positioning/splitting is needed (4 rows and 4 columns):

Examples of Ped Modification
As a preliminary note, native generation for RedM isn’t up to date with public native references, so third-party native doc names commonly do not match what is available in RedM. Therefore direct invocation by hash is often necessary as you’ll see, but I will define function wrappers for simplicity. All examples will be in Lua.
I’m going to approach this with the player model already set to mp_female since it has some unique implications. The default outfit applied for this model has parameter fullOutfit set to True and looks like this:
fullOutfits have a unique side effect that causes changes to expressions to not sync to remote players and therefore mp_female expressions just don’t sync unless you do some particular things different from the default conditions. First, an outfit needs to be set that isn’t a fullOutfit (False). For mp_female, we can use outfit preset 2 (indexed from 0, the third item) which is seen here in mp_female.ymt:
So let’s set the outfit preset to ensure fullOutfit is False, then we’ll wait until the ped is ready to render before continuing. When ready, we’ll reset the ped components to start fresh and update the ped variation to finalize our changes:

function EquipMetaPedOutfitPreset(ped, outfitPresetIndex)
    Citizen.InvokeNative(0x77FF8D35EEC6BBC4, ped, outfitPresetIndex, false)
end

function IsPedReadyToRender(ped)
    return Citizen.InvokeNative(0xA0BC8FAED8CFEB3C, ped)
end

function ResetPedComponents(ped)
    Citizen.InvokeNative(0x0BFA1BD465CDFEFD, ped)
end

function UpdatePedVariation(ped)
    Citizen.InvokeNative(0xAAB86462966168CE, ped, true) -- UNKNOWN "Fixes outfit"- always paired with _UPDATE_PED_VARIATION
    Citizen.InvokeNative(0xCC8CA3E88256E58F, ped, false, true, true, true, false) -- _UPDATE_PED_VARIATION
end

local playerPed = PlayerPedId()
EquipMetaPedOutfitPreset(playerPed, 2)
while not IsPedReadyToRender(playerPed) do
    Wait(0)
end
ResetPedComponents(playerPed)
UpdatePedVariation(playerPed)
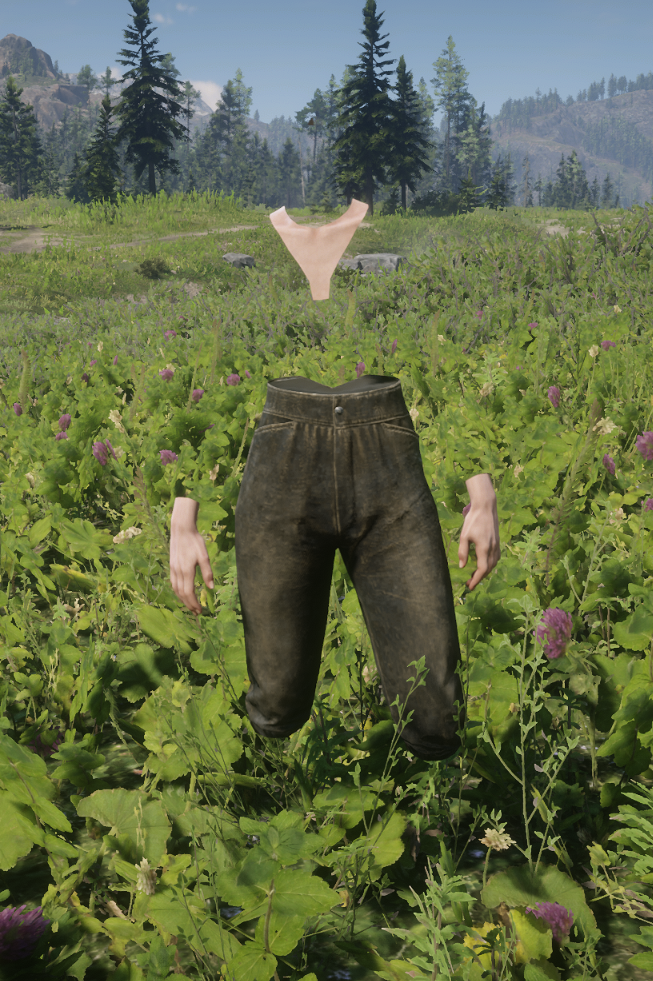
Now we should have a player ped that is invisible, free of any components, but ready to sync assets and expressions properly to remote players. One thing you’ll see repeatedly with each change made, we’re ensuring that the ped is ready to render prior to moving forward. If we’ve made prior changes, we want to make sure those have finished and we’re not making additional ped changes at the same time.
Let’s now add shop items for categories heads, eyes, hair, bodies_lower, and bodies_upper. Note that the default female drawable for these body shop items have “holes”/missing textures, but they can be overridden by streaming custom drawables/textures to make a completely visible body (as has been becoming more common). I’m going to be using modified drawables/textures, but they aren’t required (amazing tutorial from Pers and she also sells a finished version if you’d like, which is what I use).
function ApplyShopItemToPed(ped, shopItemHash, immediately, isMultiplayer)
    Citizen.InvokeNative(0xD3A7B003ED343FD9, ped, shopItemHash, immediately, isMultiplayer, false)
end

while not IsPedReadyToRender(playerPed) do
    Wait(0)
end
ApplyShopItemToPed(playerPed, `CLOTHING_ITEM_F_BODIES_LOWER_001_V_001`, true, true)
ApplyShopItemToPed(playerPed, `CLOTHING_ITEM_F_BODIES_UPPER_001_V_001`, true, true)
ApplyShopItemToPed(playerPed, `CLOTHING_ITEM_F_HEAD_001_V_001`, true, true)
ApplyShopItemToPed(playerPed, `CLOTHING_ITEM_F_EYES_001_TINT_001`, true, true)
ApplyShopItemToPed(playerPed, `CLOTHING_ITEM_F_HAIR_013_BLONDE`, true, true)
UpdatePedVariation(playerPed)
Now let’s get the MetaPed assets and tint parameters for the hair category and then reapply them with different tint values:
function GetNumComponentsInPed(ped)
    return Citizen.InvokeNative(0x90403E8107B60E81, ped, Citizen.ResultAsInteger())
end

function GetCategoryOfComponentAtIndex(ped, componentIndex)
    return Citizen.InvokeNative(0x9b90842304c938a7, ped, componentIndex, 0, Citizen.ResultAsInteger())
end

function GetComponentIndexByCategory(ped, category)
    local numComponents = GetNumComponentsInPed(ped)
    for i=0, numComponents-1, 1 do
        local componentCategory = GetCategoryOfComponentAtIndex(ped, i)
        if componentCategory == category then
            return i
        end
    end
end

function GetMetaPedAssetGuids(ped, index)
    return Citizen.InvokeNative(0xA9C28516A6DC9D56, ped, index, Citizen.PointerValueInt(), Citizen.PointerValueInt(), Citizen.PointerValueInt(), Citizen.PointerValueInt())
end

function GetMetaPedAssetTint(ped, index)
    return Citizen.InvokeNative(0xE7998FEC53A33BBE, ped, index, Citizen.PointerValueInt(), Citizen.PointerValueInt(), Citizen.PointerValueInt(), Citizen.PointerValueInt())
end

function SetMetaPedTag(ped, drawable, albedo, normal, material, palette, tint0, tint1, tint2)
    Citizen.InvokeNative(0xBC6DF00D7A4A6819, ped, drawable, albedo, normal, material, palette, tint0, tint1, tint2)
end

while not IsPedReadyToRender(playerPed) do
    Wait(0)
end
local componentIndex = GetComponentIndexByCategory(playerPed, `hair`)
local drawable, albedo, normal, material = GetMetaPedAssetGuids(playerPed, componentIndex)
local palette, tint0, tint1, tint2 = GetMetaPedAssetTint(playerPed, componentIndex)
SetMetaPedTag(playerPed, drawable, albedo, normal, material, palette, 10, 10, 255) -- 10 is black in the case of this asset's palette
UpdatePedVariation(playerPed)

Now let’s add an explicitly defined asset (component) of our own (not a shop item and not applied from an outfit):
local drawable = `dress_fr1_002`
local albedo = `dress_fr1_002_c1_999_ab`
local normal = `dress_fr1_002_c1_000_nm`
local material = `dress_fr1_002_c1_000_m`
local palette = `metaped_tint_generic_clean`
local tint0 = 50
local tint1 = 255
local tint2 = 255
while not IsPedReadyToRender(playerPed) do
    Wait(0)
end
SetMetaPedTag(playerPed, drawable, albedo, normal, material, palette, tint0, tint1, tint2)
UpdatePedVariation(playerPed)

If you are using modified female/drawable textures, as I am here, you may notice that the bodies_upper chest is clipping through the dress. If this is the case, you can set the wearable state for the shop item in bodies_upper to chemise as follows and it should remove the chest from clipping through the dress:
function UpdateShopItemWearableState(ped, shopItemHash, wearableStateHash, isMultiplayer)
    Citizen.InvokeNative(0x66B957AAC2EAAEAB, ped, shopItemHash, wearableStateHash, 0, isMultiplayer, 1)
end

while not IsPedReadyToRender(playerPed) do
    Wait(0)
end
UpdateShopItemWearableState(playerPed, `CLOTHING_ITEM_F_BODIES_UPPER_001_V_001`, `chemise`, true)
UpdatePedVariation(playerPed)

We can also set some expressions (full list) to change the shape/morph of the ped components and can confirm with a remote player that they sync:
function SetCharExpression(ped, expressionId, value)
    Citizen.InvokeNative(0x5653AB26C82938CF, ped, expressionId, value)
end

while not IsPedReadyToRender(playerPed) do
    Wait(0)
end
SetCharExpression(playerPed, 18046, 0.5) -- shoulder blades / back
SetCharExpression(playerPed, 41478, 0.5) -- shoulder thickness
SetCharExpression(playerPed, 27779, 0.5) -- chest
SetCharExpression(playerPed, 34006, 0.5) -- head
SetCharExpression(playerPed, 41396, -0.5) -- face
SetCharExpression(playerPed, 7010, 0.5) -- shoulders
SetCharExpression(playerPed, 50039, 0.5) -- shoulder thickness
SetCharExpression(playerPed, 13425, 0.5) -- back/chest width
SetCharExpression(playerPed, 50039, 0.5) -- nose size
SetCharExpression(playerPed, 61782, 1.0) -- nose curvature
SetCharExpression(playerPed, 46661, 1.0) -- mouse corner left height
UpdatePedVariation(playerPed)

Now let’s set an overlay for the bodies_upper category using custom overlay textures. Here’s the YTD: overlay_hand_coyote.ytd (75.4 KB) Also, I’m not going into too much detail here, as overlays are already covered in the rdr3_discoveries as well. Someone might share a video tutorial on creating custom overlay textures at a later date, as that’s more than I want to dive into in text here. Note that only the first category of overlays set appears to sync to other players, unfortunately (i.e. you can’t have heads and bodies_upper syncing). Also, only 32 textures can be used (albedo, which is found via the texture dict hash, normal, and material - this commonly results in about 16 layers available, considering an average of two textures for each layer).
function SetPedOverlay(ped, category, overlay)
    if not ped or not category or not overlay then
        print("invalid parameters for overlay")
        return
    end
    if AppliedPedOverlays then
        if AppliedPedOverlays[category] then
            if AppliedPedOverlays[category].TextureId ~= nil then
                Citizen.InvokeNative(0xB63B9178D0F58D82, AppliedPedOverlays[category].TextureId) -- _CLEAR_PED_TEXTURE
                Citizen.InvokeNative(0x6BEFAA907B076859, AppliedPedOverlays[category].TextureId) -- _RELEASE_TEXTURE
            end
        else
            AppliedPedOverlays[category] = {}
        end
    else
        AppliedPedOverlays = {}
        AppliedPedOverlays[category] = {}
    end
    AppliedPedOverlays[category].BaseParameters = {}
    if overlay.baseAlbedo and overlay.baseNormal and overlay.baseMaterial then
        AppliedPedOverlays[category].BaseParameters.albedo = overlay.baseAlbedo
        AppliedPedOverlays[category].BaseParameters.normal = overlay.baseNormal
        AppliedPedOverlays[category].BaseParameters.material = overlay.baseMaterial
    else
        print("no base ped overlay parameters")
        return
    end
    AppliedPedOverlays[category].TextureId = Citizen.InvokeNative(0xC5E7204F322E49EB, AppliedPedOverlays[category].BaseParameters.albedo, AppliedPedOverlays[category].BaseParameters.normal, AppliedPedOverlays[category].BaseParameters.material) -- _REQUEST_TEXTURE
    overlayIndex = Citizen.InvokeNative(0x86BB5FF45F193A02, AppliedPedOverlays[category].TextureId, overlay.textureDict, overlay.normal, overlay.material, overlay.colorType, overlay.opacity, 0) -- _ADD_TEXTURE_LAYER
    if overlay.colorType == 0 and overlay.palette ~= nil then
        Citizen.InvokeNative(0x1ED8588524AC9BE1, AppliedPedOverlays[category].TextureId, overlayIndex, overlay.palette) -- _SET_TEXTURE_LAYER_PALLETE
        Citizen.InvokeNative(0x2DF59FFE6FFD6044, AppliedPedOverlays[category].TextureId, overlayIndex, overlay.tint0, overlay.tint1, overlay.tint2) -- _SET_TEXTURE_LAYER_TINT
    end
    Citizen.InvokeNative(0x3329AAE2882FC8E4, AppliedPedOverlays[category].TextureId, overlayIndex, overlay.variant) -- _SET_TEXTURE_LAYER_SHEET_GRID_INDEX
    Citizen.InvokeNative(0x6C76BC24F8BB709A, AppliedPedOverlays[category].TextureId, overlayIndex, overlay.opacity) -- _SET_TEXTURE_LAYER_ALPHA
    local timer = GetGameTimer()+5000
    while not Citizen.InvokeNative(0x31DC8D3F216D8509, AppliedPedOverlays[category].TextureId) do -- _IS_TEXTURE_VALID
        Wait(50)
        if timer < GetGameTimer() then
            break
        end
    end
    if Citizen.InvokeNative(0x31DC8D3F216D8509, AppliedPedOverlays[category].TextureId) then -- _IS_TEXTURE_VALID
        Citizen.InvokeNative(0x0B46E25761519058, ped, category, AppliedPedOverlays[category].TextureId) -- _APPLY_TEXTURE_ON_PED
        Citizen.InvokeNative(0x92DAABA2C1C10B0E, AppliedPedOverlays[category].TextureId) -- _UPDATE_PED_TEXTURE
    else
        print("Couldn't apply texture for overlay:", AppliedPedOverlays[category].TextureId)
    end
    UpdatePedVariation(ped)
end

local overlay = {
    baseAlbedo = `mp_hand_fr1_000_c0_008_ab`,
    baseNormal = `mp_hand_fr1_000_c0_002_nm`,
    baseMaterial = `mp_hand_fr1_000_c0_000_m`,
    textureDict = `overlay_hand_coyote`,
    normal = 0,
    material = `overlay_hand_coyote_ma`,
    opacity = 1.0,
    colorType = 0,
    palette = `metaped_tint_makeup`,
    tint0 = 20,
    tint1 = 255,
    tint2 = 255,
    variant = 1,
}

while not IsPedReadyToRender(playerPed) do
    Wait(0)
end
SetPedOverlay(playerPed, `bodies_upper`, overlay)

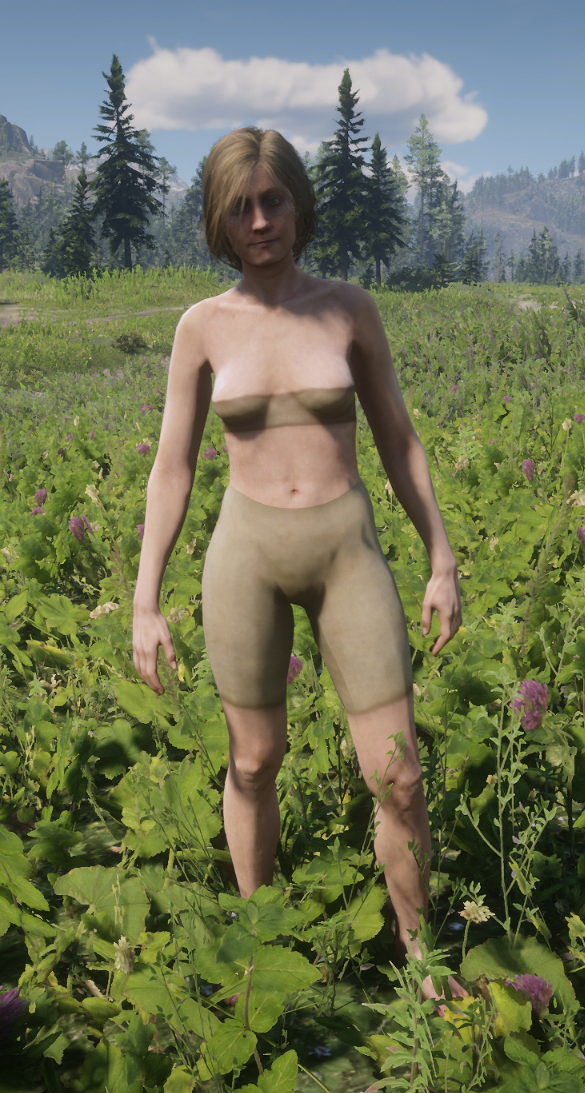
There ya have it ![]() Setting up an
Setting up an mp_female ped with shop items, a custom tinted shop item, a custom component with fully defined assets, expressions that sync to remote players properly, and a custom overlay on the forearm. This is still somewhat just scratching the surface and I didn’t cover a lot of the pre-existing research. That’s where I do recommend that if you’re not familiar with the references at the beginning (especially rdr3_discoveries), do check them out.
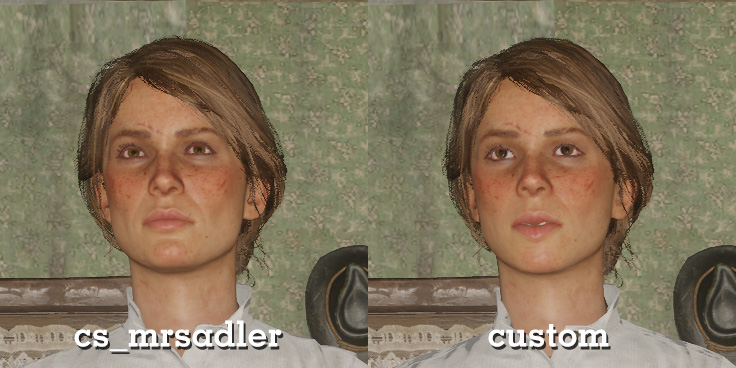
Also, these concepts discussed above, while we used an mp_female model, they generally apply to any other ped model (with the exception of shop items, as those should all be player/horse model specific). This means that yes, you can tint horses, cows, and customize all kinds of peds (including NPC assets on MP player models as seen above). For a dev tool, my recommended method is to parse the assets_ YMTs at least, trim them down to just the relevant fields (guid, propertyTags, and matchTags at least), use the matchTags to match relevant assets, and then build a simple UI sorted by category, with sliders for all the assets/parameters. I’ll share my dev tool once it’s been cleaned up (it was quick and it’s filled with too many bad practices to share currently). However, I’ll share a rough, early example with horses and then the current implementation with male/female to give an idea of what someone could do (this is very basic and could be significantly optimized):
https://youtu.be/kG5u11oy9Nk
https://youtu.be/e438kNH_WFE
Have fun y’all! Feel free to contribute further research here and ask questions. The only thing I ask is: please don’t ask someone else to find assets for you. The metadata files are known and any wanted asset can be found there. The only exception to this I would say is if you can’t find a particular metadata file or if you’ve already searched for it and aren’t sure. It will take time and effort, so please don’t put that on others without at least trying first yourself. Surely there will be paid resources soon enough for those that do not wish to do the development and further research, which is fine.
Credits
- dexyfex for their CodeX tool which has made this research possible, big thanks here!
- Disquse who discovered the cause of the issue with
mp_femaleexpressions not syncing to remote players. - Disquse and Ktos for their expression / face feature research in the past as well.
- CP and Alex Guirre for their research and sources of parsed/found strings for hash reversal.
- Femga, Halen84, fingaweg, alloc8or, and many others for their contributions to RDR3 research.
- Pers for the
mp_femalemod I’m using. - And to everyone who contributes to sharing research, you are very appreciated!