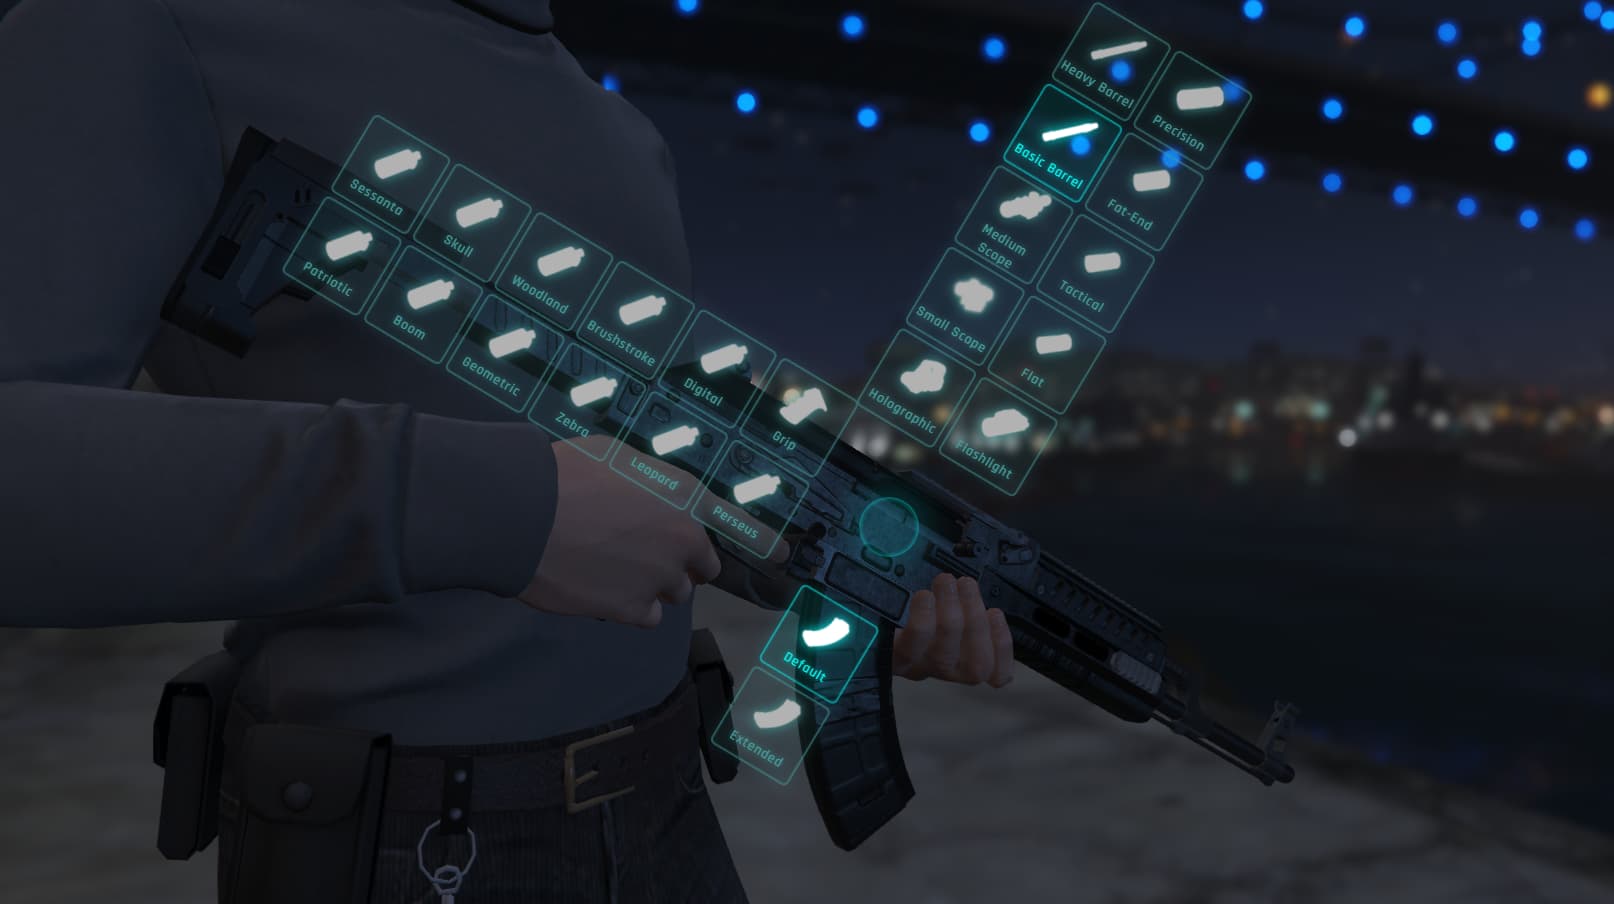
Interactive Weapon Customizer
Customize any weapon at any time, altering weapon attachments right in the heat of the moment. Inspired by the weapon customization of modern day shooters, this interactive overlay might just be the addition you’re looking for to further enhance immersion in your roleplay or combat server.
 Get it here: gamzkystore.com
 Support: Discord
 Detailed preview: Youtube

Features
- Configure any weapon with the desired attachments and optional item-requirements/job-restrictions.
- Works as a s̲t̲a̲n̲d̲a̲l̲o̲n̲e̲ script without any requirements, but it is also configured and tested for o̲x̲, e̲s̲x̲ and q̲b̲-inventory systems. O͟r͟i͟g͟e͟n͟-inventory is also supported (as of update 1.2.0).
- The components are saved through the respective inventory systems for seamless integration into your existing server.
- All default GTA-5 weapons and their components have already been configured.
- Addon-weapons can also be added and configured.
- The animations, overlay images, user-interface colours, labels, sound effects, component locations and much more are all configurable (see some of the code snippets below).
Resmon: Idle: 0.00ms - When customizing: 0.01ms
Core/framework related functions are still accessible in the encrypted version, feel free to create a support ticket in our Discord in case of questions.
Config
Config = {}
Weapons = {}
Items = {}

Config.InteractionKey = 58                        -- G (see https://docs.fivem.net/docs/game-references/controls/ if you want to change the key)
Config.InteractionKeyLabel = 'g'                  -- The key used to cancel the interaction (Backspace/Escape will always cancel the interaction). You can use this tool: https://www.toptal.com/developers/keycode and write down the key as stated in 'event.key'
Config.CameraTransformationTime = 1000            -- The time it takes to transform the camera to the weapon in milliseconds
Config.ShowLabelsInOverlay = true                 -- If true, labels will be shown in the overlay. Set to false to only display the component images.
Config.OverlayUpdateInterval = 50                 -- The interval in milliseconds at which the overlay position is updated, lower values will result in a more accurate overlay position but will increase the resmon.
Config.MaximumLeftOrRightComponentsBeforeWrap = 6 -- The maximum number of components that can be displayed to the left or right of the weapon before the overlay wraps to the next row.
Config.MaximumTopOrBottomComponentsBeforeWrap = 4 -- The maximum number of components that can be displayed to the top or bottom of the weapon before the overlay wraps to the next column.
Config.DisableAllItemRequirements = true          -- If true, all item requirements for components will be disabled. This will make it easier to test the weapon customization.
Config.EnableErrorMessages = false                -- If true, error messages will be shown in the console when something goes wrong. Usefull for debugging.

-- Enable/disable depth of field when customizing weapons
Config.CameraDepthOfField = {
    Enabled = true,
    NearDof = 0.25,
    FarDof = 1.0,
}

-- Config.UsedComponentSystem should be either 'ox', 'esx' or 'qb' depending on the resource you are using. This is automatically configured so no need to do anything if you are using ox-inventory, esx or qb-core (without a custom inventory)
-- If you are using a standalone server, you can ignore this parameter and simply set Config.DisableAllItemRequirements to true.
-- If you use a different system that handles components, you will have to add the item definitions by replacing either items/ox.lua, items/esx.lua or items/qb.lua with your own item definitions.
if (GetResourceState('ox_inventory') == 'started') then
    Config.UsedComponentSystem = 'ox'
elseif (GetResourceState('es_extended') == 'started') then
    Config.UsedComponentSystem = 'esx'
elseif (GetResourceState('qb-core') == 'started') then
    Config.UsedComponentSystem = 'qb'
else
    Config.UsedComponentSystem = 'ox'
end
Weapon configuration example
['weapon_pistol'] = {                                  -- The weapon name.
    WeaponName = 'Pistol',
    CamCenterOffset = vector3(0.0, 0.5, -0.15),        -- The offset of the camera with respect to the weapon. If the weapon is not entirely on screen, tweak these values.
    WeaponCenterOffset = vector3(-0.05, 0.0, 0.02),    -- The offset of the custimization overlay with respect to the center of the weapon. Tweaking this will move the overlay around.
    AdditionalOverlayRotation = -16.0,                 -- An additional rotation of the custimization overlay. If the overlay is not nicely aligned with the weapon, tweak this value.
    RequiredJobs = nil,                                -- The jobs that are required to customize the weapon. nil means that all jobs can customize the weapon. (you can replace this with { 'police', 'ambulance' } for example to allow police and ambulance)
    Animation = {                                      -- This is an optional variable, you can also remove this completely.
        Dictionary = 'random@arrests',                 -- The animation dictionary on customizing the weapon.
        Name = 'cop_gunaimed_door_open_idle',          -- The animation name on customizing the weapon.
        Flag = 1,                                      -- The animation flag on customizing the weapon.
    },
    Components = {                                     -- The list of components that can be added to the weapon, the components are defined in the components.lua file.
        bottom = {                                     -- The components in the bottom direction.
            [1] = Components.COMPONENT_PISTOL_CLIP_01, -- The first component in the bottom direction, the default pistol clip in this case.
            [2] = Components.COMPONENT_PISTOL_CLIP_02, -- The second component in the bottom direction, an extended pistol clip in this case.
        },
        left = {},                                     -- The components in the left direction.
        top = {},                                      -- The components in the top direction.
        right = {                                      -- The components in the right direction.
            [1] = Components.COMPONENT_AT_PI_FLSH,     -- The first component in the right direction, a flash light in this case.
            [2] = Components.COMPONENT_AT_PI_SUPP_02,  -- The second component in the right direction, a suppressor in this case.
        },
    },
},
| Code is accessible | Partially (config/framework/ui related code is accessible) |
| Subscription-based | No |
| Lines (approximately) | ~1200 excluding config |
| Requirements | None |
| Support | Yes |