C# development is now officially covered in the documentation of FiveM;
http://docs.fivem.net/scripting-manual/runtimes/csharp/
But feel free to use the old guide, keep it mind that this is no longer maintained and potentially might not work anymore.
Old guide
Since I havent found any guides on how to create a resource using C# (on this forum atleast) I’ve decided to pass on the knowledge on how to properly setup the C# environment and create a simple script with it. Not that it’s hard to do so.
My goal is to cover as much of the C# basics, if something is unclear or lacking, please let me know.
Before we get into this, consider some pros and cons from using C#;
Pros:
- Automatic autocomplete
- Powerful C# features
- Nuget goodies (Libraries for Unit testing, for JSON, etc…)
Cons:
- Extra work to setup
- Harder to get into when not having prior programming experience.
Using C# has some difference than using lua, the key differences are:
- C# uses delegates.
- BaseScript allows us to subscribe to the Tick event
- Event handlers are also delegates.
- No “magic” native functions.
- We can call using Function.Call(hash, arguments)
- Circumvented by making a static directive (see 1)
- Datatypes for common entities and more in the C# api.
- Includes peds, players and more
- Object have their own predefined functions, might be useful.
- Adding
using static CitizenFX.Core.Native.API;at the top of you script you can access the native function like you would in Lua.
Prerequisites
- Access to server and client files.
- An installation of Visual Studio ( Visual studio 2017 recommended).
Setting up
1) Obtaining libraries
First of all we need two libraries, the first library is located in the server files (in the artifacts):
[server-path]/citizen/clr2/lib/mono/4.5/CitizenFX.Core.dll
Copy the file to a place where you can find it back and rename it to CitizenFX.Server.dll
The library contains all the server specific functions.
Second file is located in the client:
%localappdata%/FiveM/FiveM Application Data/citizen/clr2/lib/mono/4.5/CitizenFX.Core.dll
Copy the file to a place where you can find it back and rename it to CitizenFX.Client.dll
The library contains all the client specific functions.
2) Creating a project in Visual Studio
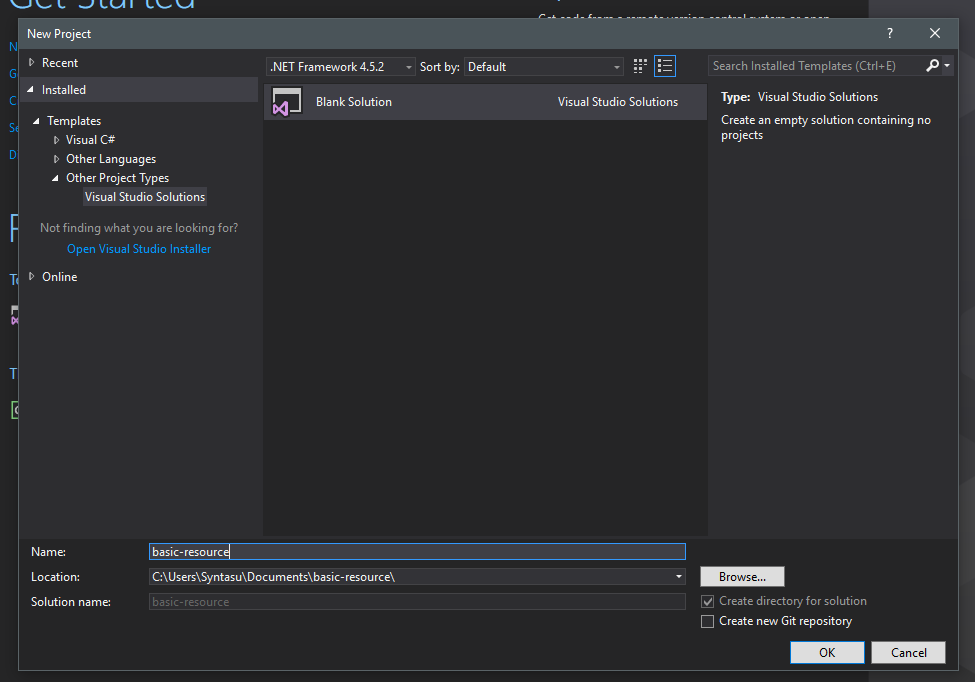
Now we need to make our own libraries in Visual Studio, we will be making an empty solution and add the projects by ourselves. First of all, click “Create new project” in the Visual studio start page and select “Blank solution”.
Personally I like to put my project files in the resource folder (i.e. /resources/basic-resource/source/[project-files], this way you can build the dll directly to the correct folder without any hardcoded paths )
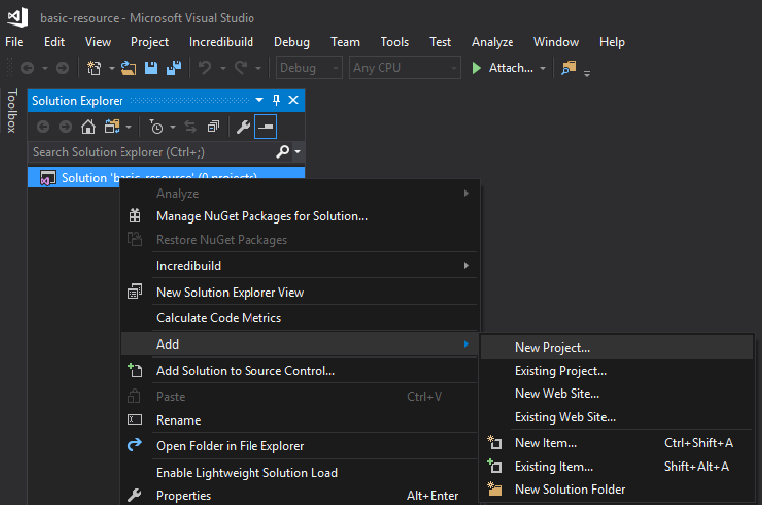
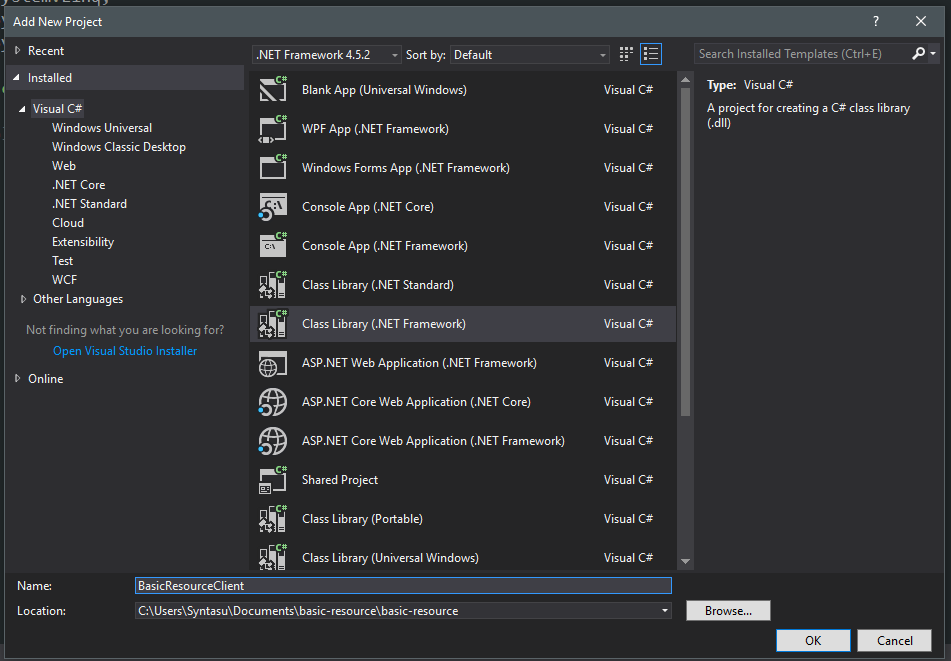
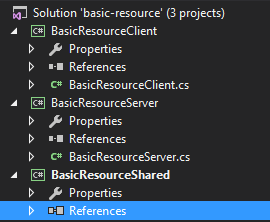
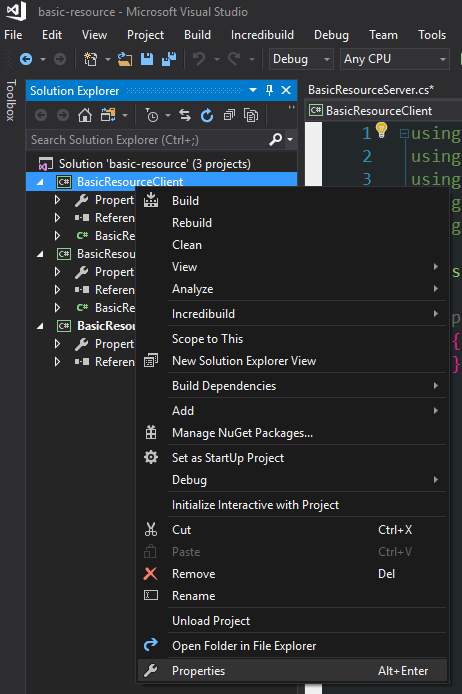
Hit ok to continue. A new screen should pop up. Now right click the Solution [solution-name] → Add → New Project (see image below). Now we want to make 3 projects (or only two, up to you). All three projects must be “Class Library (.NET Framework)” and name it as the following (replace BasicResource with your own name):
- BasicResourceShared
- BasicResourceClient
- BasicResourceServer
BasicResourceShared project will hold all the code shared between client and server.
BasicResourceClient will hold all client specific code
BasicResourceServer will hold all server specific code.
3) Configuring the projects
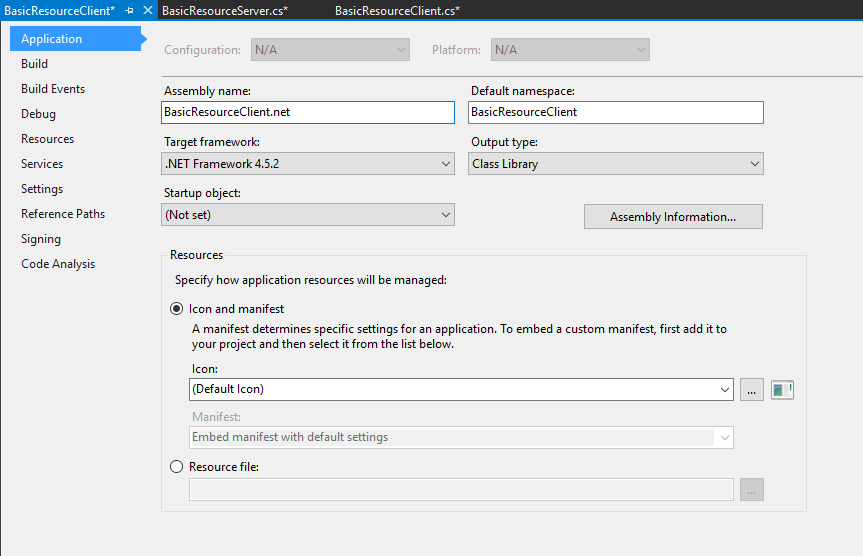
In order for FX server to load the libraries, the assembly name must be prefixed with “.net”. This can be done by going into the properties of a project and suffixing .net after the assembly name. You need to do this for all 3 projects!
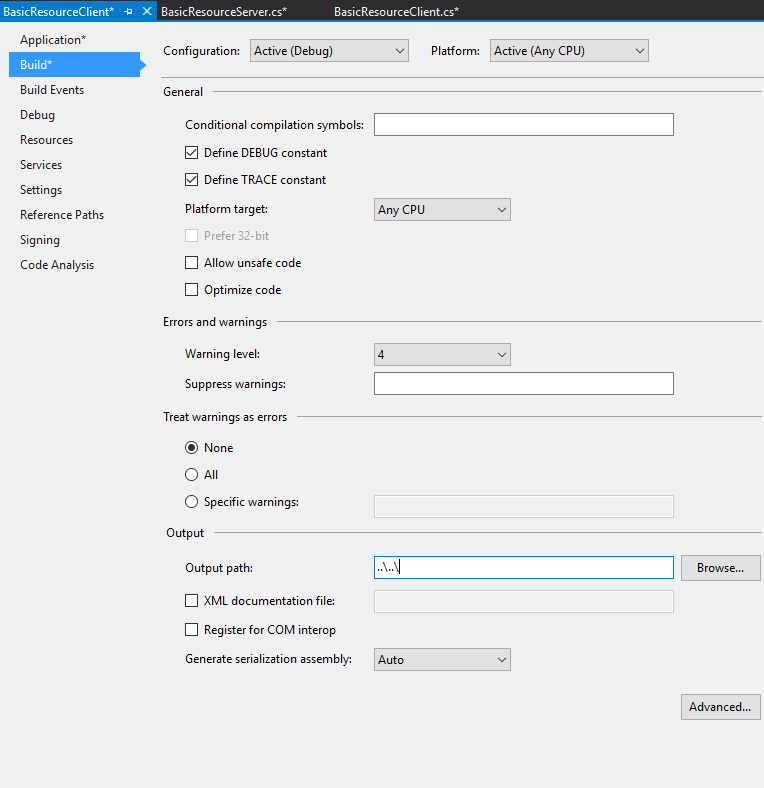
Optional: If you have the source code inside the resource folder, then you can directly build the libraries into the correct location. You can also do this with absolute paths, but I strongly advice not doing do since it will break when you put it onto a source control or share the project with someone else.
Now assuming you are already in the properties, hit the “build” tab. On the bottom you see a section “output” and output path. Change the path to: ..\..\
This basically means “go back two folders”.
Don’t forget to save the properties ![]()
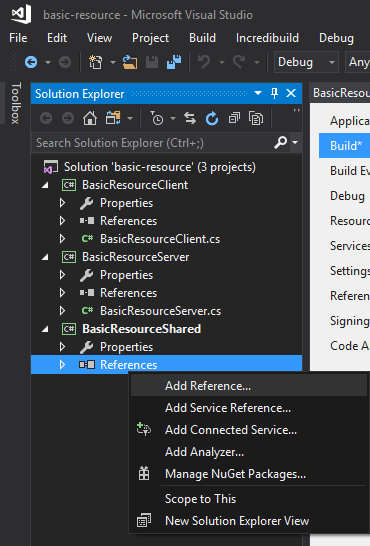
4) Adding references
The references are the libraries we extracted from client and server folder. To add a reference you can open the project and right click the “Reference item” and select “Add Reference”.
Now hit the browse tab and click the Browse… button and add the two libraries. Make sure they arent checked.
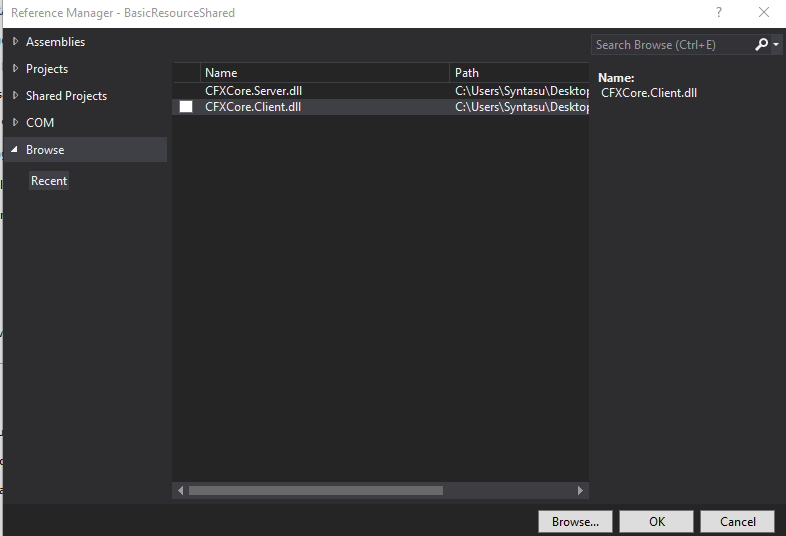
Now for the client you want to add the CitizenFX.Client.dll.
For the server you want to add CitizenFX.Server.dll.
This is done by Add Refence → Check the checkbox of the library you want to include. The shared project should have neither. In the server and client project you also want to add the shared library (The BasicResourceShared project library file).
Creating a basic resource
1) Basic script
To create anything with C#, we first must derrive from the BaseScript. This script is in the namespace “CitizenFX.Core”.
The script would look something like this:
using CitizenFX.Core;

namespace BasicResourceClient
{
    public class BasicResourceClient : BaseScript
    {
    }
}
Both server and client must derrive from the BaseScript. The base script add functionality like listening for a server “tick”. This can be done by adding a constructor and subscribing to the tick delegate:
using CitizenFX.Core;
using System.Threading.Tasks;

namespace BasicResourceClient
{
    public class BasicResourceClient : BaseScript
    {
        public BasicResourceClient()
        {
            Tick += OnTick;
        }

        private async Task OnTick()
        {
            await Delay(100);
        }
    }
}
Since on tick is delegate is a Task, it must be treated asynchrounous. By adding await Delay(1000); we tell it to wait a 1000 milliseconds before resuming.
2) A message of the day
Now let’s make a simple motd system. The server will send the message of the day to the client that is connecting to the server. The server we will add an “event handler” to listen for any player that is connecting.
The EventHandlers class will call the callback when the event is called, also passing arguments.
The implementation on the server will like something like this:
    public class BasicResourceServer : BaseScript
    {
        public static string Motd = "Cake is a lie";

        public BasicResourceServer()
        {
            EventHandlers.Add("playerSpawned", new Action<Vector3>(OnPlayerSpawned));
        }

        private void OnPlayerSpawned([FromSource]Vector3 pos)
        {
            TriggerClientEvent(player, "sendMotd", Motd);
        }
    }
You can see in the constructor we add a new handler and tell it what callback to call when the event is received. playerConnecting is an internal event in the server code and should be called when someone connects (duuh)
In the constructor we register the EventHandler and make a callback with several arguments, The callback points towards the OnPlayerConnecting function with the same arguments. You might noticed the [FromSource] attribute, this is added so the system knows what parameter to fill in. The player variable is the Player object who called the event. Every event called will have the player object available, if you do not need it you can ommit like so:
    public class BasicResourceServer : BaseScript
    {
        public static string Motd = "Cake is a lie";

        public BasicResourceServer()
        {
            EventHandlers.Add("playerSpawned", new Action<Vector3>(OnPlayerSpawned));
        }

        private void OnPlayerSpawned([FromSource]Vector3 pos)
        {
            TriggerClientEvent(player, "sendMotd", Motd);
        }
    }
This code should still work fine.
On the client we can do the exact same to listen for any incoming motd events:
    public class BasicResourceClient : BaseScript
    {
        public bool hasReceivedMotd = false;

        public BasicResourceClient()
        {
            EventHandlers.Add("sendMotd", new Action<string>(ReceivedMotd));
        }

        private void ReceivedMotd(string motd)
        {
            if(!hasReceiveMotd)
            {
                TriggerEvent("chatMessage", "SYSTEM", new[] { 255, 0, 0 }, motd);
                hasReceiveMotd = true;
            }
        }
    }
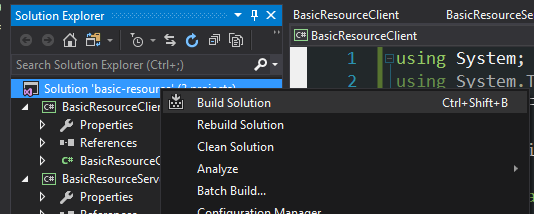
Now we need to build the code, you can press Ctrl+Shift+B to compile all solutions or right click the solution and select Build solution
3) Setting up the resource
To make everything work we simply need to add the __resource.lua. Instead of saying the script names, we want to include the assembly name + extension. In my case it looks something like this:
client_script {
	"BasicResourceShared.net.dll",
	"BasicResourceClient.net.dll"
}
server_script {
	"BasicResourceShared.net.dll",
	"BasicResourceServer.net.dll"
}
And adding the start command in the server.cfg:
start basic-resource
Note: Use the name of the folder, not the name of the libraries.
You should be all set right now, to verify it’s working you can look in the server console to see if your library is injected in the script domain:
The end
Hopefully this guide has proven to be of use to you. There are some topics left out because i’ve not had the chance to try them out. I would be glad to get some feedback on this guide.
Missing topic(s):
- Exports
- Debugging?
Frequently asked question
- None as of yet

 Anyway, great tutorial, really makes life easier for people trying to start with this stuff.