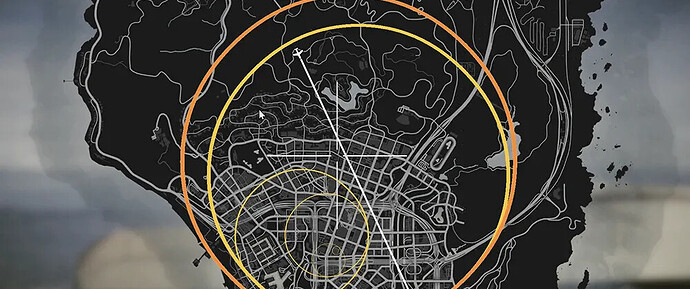
This post is the first of a series about common technical challenges you may face while developing a battle royale game mode.
Safe zones are one of the most fundamental concepts of the battle royale genre. They dictate the rhythm of the match, force players into combat, and can make things very stressful, especially when they are right behind your back.
So, what are the challenges involved in creating a system like that?
Generating random safe zones
From the adrenaline rush of crossing the map to enter the safe area to the calming moments of searching for a good spot inside, the randomness of the safe zones is what makes this system special.
Lucky for us, we can use some basic trigonometry to calculate a new safe zone inside an existing one:
local function degreesToRadians(value)
    return (value * math.pi) / 180
end

local function getNextSafeZone(safeZone, radius)
    assert(safeZone.radius > radius, "Next safe zone radius must be smaller than the current one!")

    local auxiliar = { center = safeZone.center, radius = safeZone.radius - radius }

    local degrees = math.random(0, 360)

    local x = auxiliar.center.x + math.cos(degreesToRadians(degrees)) * auxiliar.radius
    local y = auxiliar.center.y + math.sin(degreesToRadians(degrees)) * auxiliar.radius

    return { center = vector3(x, y, 0.0), radius = radius }
end
The code above selects a random point on an auxiliary circumference with a radius equal to the difference between the radiuses of the current and the next safe zone to be the center of the next one. The following not-so-accurate scheme represents this logic.

Network sync
As a crucial gameplay feature, we must sync the safe zone with all the clients of the match. Otherwise, some players would have an unfair advantage over others.
How do we achieve that, considering network latency and players using different hardware setups?
Low-level or manual sync, using a time factor, is our answer. The technique is very straightforward: Given two subsequent server states, the client performs a smooth transition between those states, respecting the moment each one of these states occurred.
onStartSafeZone
A safe zone is essentially a circumference that transitions its center x and y coordinates and radius from an initial value to a final one. This behavior can be easily replicated with the following information:
- Safe zone start timestamp
- Safe zone duration
- Safe zone initial state
- Safe zone final state
Here is an implementation of the start safe zone handler, where we receive the server signal telling the client to start the safe zone locally.
local function onStartSafeZone(networkStartTimestamp, durationInMs, start, target)
    if safeZone then return end

    -- Use local timestamp
    safeZoneStartTimestamp = GetGameTimer() + (networkStartTimestamp - GetNetworkTime())
    safeZoneDurationInMs = durationInMs

    safeZone = start
    safeZoneTarget = target

    -- Creates the safe zone minimap indicator
    safeZoneBlip = AddBlipForRadius(safeZone.center.x, safeZone.center.y, safeZone.center.z, safeZone.radius)
    SetBlipColour(safeZoneBlip, 1)
    SetBlipAlpha(safeZoneBlip, 128)

    -- Similiar to StartCoroutine in Unity
    Citizen.CreateThread(onSafeZoneTick)
end
The onSafeZoneTick function is responsible for performing all the calculations and rendering the safe zone. It’s where the “magic” happens.
Clamp and Lerp
Before talking about the onSafeZoneTick function, I must introduce you to clamp and lerp, which stands for linear interpolation. Both are very useful concepts in game development. If you’re already familiar with them, you can skip this section.
The clamp function limits a value to the range defined by the min and max values, while lerp interpolates two values given some factor.

Here is an example of their implementation:
local function clamp(number, min, max)
    return math.min(math.max(number, min), max)
end

local function lerp(a, b, t)
    return (1 - t) * a + t * b
end
onSafeZoneTick
All right, now let’s break the “magic” down:
local function onSafeZoneTick()
    while safeZone do
        local interpolation = clamp((GetGameTimer() - safeZoneStartTimestamp) / safeZoneDurationInMs, 0.0, 1.0)

        local x = lerp(safeZone.center.x, safeZoneTarget.center.x, interpolation)
        local y = lerp(safeZone.center.y, safeZoneTarget.center.y, interpolation)
        local radius = lerp(safeZone.radius, safeZoneTarget.radius, interpolation)

        -- Render the safe zone
        SetBlipCoords(safeZoneBlip, x, y, 0.0)
        SetBlipScale(safeZoneBlip, radius)
        DrawMarker(1, x, y, 0.0, 0.0, 0.0, 0.0, 0.0, 0.0, 0.0, radius * 2, radius * 2, 400.0, 255, 0, 0, 128, false,
            false, 2, false, nil, nil, false) ---@diagnostic disable-line

        -- Yields the coroutine for ... seconds
        Citizen.Wait(0)
    end
end
- First, we calculate the “progress” of the safe zone by dividing the amount of time past the start by its duration;
- The progress is then clamped between 0.0 and 1.0 because we want the safe zone to stop when it reaches the final state;
- Next, we use the clamped progress to interpolate the initial and final values of the safe zone’s parameters;
- The last step is to use the interpolated values. They represent the safe zone at that specific moment. In our case, we are using the values just for rendering.
Security
When developing a multiplayer game mode, you must protect it from bad actors, especially if it’s competitive.
We could talk here about different anti-cheat software options, but we would rather discuss how to design your game’s systems to reduce cheaters’ impact on the general player experience.
The most valuable lesson we can give you is never to trust the client. That’s it.
For example, don’t tell the client about all of the game’s safe zones in advance. Send only the relevant data, which is the current or next safe zone, to the client.
Details
There is a ton of things you could do to make safe zones more immersive or visually compelling. It’s really up to you and what you want for your game.
Here is an unpolished example using screen effects (timecycles) and animations.

In the next post, we will talk about UI and the math behind a battle royale compass. Stay tuned!
This post is adapted from the personal blog of one of our team members, in case you see this online.
