 Advanced Vehicle Trunk
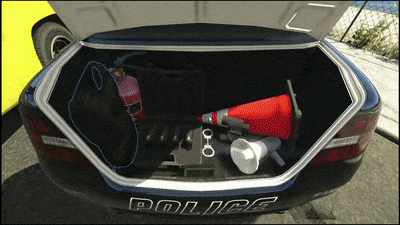
Transform any vehicle trunk into an interactive layout for players to access, seamlessly integrating unique features into a single vehicle trunk for a realistic experience. Pickup items/weapons, place props, change clothes and much more, all within a realistic user-interface that actually visualizes the content of the trunk. A great addition for any server utilizing police departments, fire departments, ems, or just ordinary civilian vehicles in need of some extra features.
 Get it here: gamzkystore.com
 Support: Discord
 Detailed preview: Youtube

Features
- Easily add unique trunk layouts to any vehicle via the configuration; here you define the visualized props, their locations in the trunk, the corresponding actions and more.
- You can grant items/weapons, take deployable props, change clothes or assign your own unique actions when selecting a trunk-item, the possibilities are endless.
- Use any third-eye system to interact with a trunk, ox-target and qb-target are supported by default, but the code can be edited to any other target system.
- Highly configurable (the config file is shared at the bottom), it is also possible to add job restrictions to specific vehicle trunks or specific trunk-actions.
- Use either keyboard and/or mouse to move between selected props in the trunk.
- A debug-mode enables you to easily configure new trunks and precisely define prop coordinates.
- The script detects most methods of vehicle spawning, automatically creating the props in the trunks. There is also a server-sided export available to spawn the props in yourself.
- Fully synchronized between clients.
Resmon: Idle: 0.00ms - Using trunk: 0.03ms
Core/framework related functions are still accessible in the encrypted version, feel free to create a support ticket in our Discord in case of questions.
Config
Config = {}

-- Adjust any target-related options for the trunk/props
Config.Target = {
    Trunk = {
        InteractDistance = 3.0,  -- The distance at which the trunk can be interacted with
        Label = 'View trunk',    -- The label shown using the third-eye system
        GlobalJobRequirement = { -- If you want to restrict the trunk actions to a certain job, you can define them here.
            Enabled = false,     -- If you want to disable the global job requirement, set this to false
            Names = { 'police', 'ambulance' },
        }
    },
    Object = {
        InteractDistance = 1.5,        -- The distance at which placed objects can be interacted with
        LabelRemove = 'Remove object', -- The label shown using the third-eye system when removing the object
        LabelPickup = 'Pickup object', -- The label shown using the third-eye system when picking up the object
    }
}

Config.UseMouseForSelection = true     -- If true, you can also use the mouse to select the prop in the trunk. If false, be sure to set Config.UseKeyboardForSelection to true for selection. (If you enable UseMouseForSelection, all props in vehicle trunk must have valid collisions!)
Config.UseKeyboardForSelection = false -- If true, you can use the A/D keybinds to select the prop in the trunk. If false, be sure to set Config.UseMouseForSelection to true for selection.

-- You can change keybinds below. When using ox_lib, also adjust the help-text (showTextUI) in cl_bridge.lua to match the keybinds
Config.Keys = {
    MoveSelectionLeft = 34,    -- A
    MoveSelectionRight = 35,   -- D
    ConfirmSelection = 191,    -- ENTER
    ExitTrunk = 177,           -- BACKSPACE / ESC / RIGHT MOUSE BUTTON
    PlaceProp = 191,           -- ENTER
    CancelPropPlacement = 177, -- BACKSPACE / ESC / RIGHT MOUSE BUTTON
}

Config.HighlightMode = 'outline'                              -- Define the used mode to highlight the prop ('outline' or 'lightup')
Config.LightupSize = 0.25                                     -- The size of the lightup effect (only applicable if HighlightMode is set to 'lightup')
Config.LightupIntensity = 100.0                               -- The intensity of the lightup effect (only applicable if HighlightMode is set to 'lightup'), at night this value is multiplied by 0.02 to reduce intensity
Config.HighlightColor = { r = 66, g = 135, b = 245, a = 255 } -- The color of the highlight, alpha (a) is only used in outline mode

-- Configure the vehicles and their corresponding trunk setup.
Config.Vehicles = {
    [`police3`] = 'showcase_police',
    [`lguard`] = 'showcase_ambulance',
}

-- Define the trunk variants
Config.Trunks = {
    ['example'] = {
        [1] = {                                                     -- Make sure to correctly order the props in this list, switching the selected prop via keyboard will follow the order of this list
            PropName = 'prop_fire_exting_1b',                       -- The prop hash of the prop you want to spawn in the trunk
            Position = vector3(-0.1, 0.25, 0.0),                    -- The position of the prop in the trunk (x, y, z) relative to bone position defined under RelativeToBone
            Rotation = vector3(90.0, 90.0, 15.0),                   -- The rotation of the prop in the trunk (x, y, z)
            RelativeToBone = 'bumper_r',                            -- The earlier defined Position is relative to this bone position
            RequiredJobs = { 'police', 'ambulance' },               -- If you want to restrict the action to a certain jobs, you can define them here. Leave empty or remove the line if you want to allow all jobs
            CloseTrunkOnAction = true,                              -- If true, the trunk will close after finishing the Action defined below
            Action = function()                                     -- The corresponding action which is executed when the prop is selected
                CreateThread(function()
                    Actions.PlayAnimation('pick_object_from_trunk') -- This is an example of an action which plays an animation defined in Config.Animations
                    Actions.GiveItem('weapon_fireextinguisher', 1)  -- This is an example of an action which gives the player a fire extinguisher (BE SURE TO ADD WEAPONS/ITEMS TO server/sv_config.lua AS WELL!)
                end)
            end,
        },
        [2] = {
            PropName = 'prop_ballistic_shield',
            Position = vector3(-0.2, 0.7, 0.4),
            Rotation = vector3(-20.0, 0.0, 35.0),
            RelativeToBone = 'bumper_r',
            CloseTrunkOnAction = true,
            Action = function()
                CreateThread(function()
                    Actions.PlayAnimation('pick_object_from_trunk')
                    if (GetResourceState('gs_policeshield') == 'started') then
                        exports.gs_policeshield:ActivateShield('ballistic') -- You can call exports from other resources, this is an example of activating the ballistic shield from the gs_policeshield resource available here: https://gamzkystore.com/package/advanced-police-shield
                    end
                end)
            end,
        },
        [3] = {
            PropName = 'prop_roadcone02a',
            Position = vector3(0.2, 0.7, -0.05),
            Rotation = vector3(0.0, 0.0, 0.0),
            RelativeToBone = 'bumper_r',
            CloseTrunkOnAction = true,
            Action = function()
                CreateThread(function()
                    Actions.PlayAnimation('pick_object_from_trunk')
                    Actions.WalkWithProp('prop_roadcone02a') -- If you want to walk with the prop and place it on the ground somewhere, you can use the WalkWithProp function. This will automatically attach the prop to the player and use the configuration in Config.WalkWithProp
                end)
            end,
        },
        [4] = {
            PropName = 'prop_bodyarmour_06',
            Position = vector3(0.6, 0.7, 0.6),
            Rotation = vector3(0.0, 0.0, -45.0),
            RelativeToBone = 'bumper_r',
            CloseTrunkOnAction = true,
            Action = function()
                CreateThread(function()
                    Actions.PlayAnimation('pick_object_from_trunk')
                    Actions.PlayAnimation('change_vest_clothing')
                    if (GetResourceState('skinchanger') == 'started') then -- You can also change the skin of a player, here is an example using skinchanger but you can change this to any skin changing resource you want
                        TriggerEvent('skinchanger:getSkin', function(skin)
                            skin.bproof_1 = 1
                            skin.bproof_2 = 0
                            TriggerEvent('skinchanger:loadSkin', skin)
                        end)
                    end
                end)
            end,
        },
    },
    -- The trunks from the showcase video are also present, but left out of the code here for clarity.
}

-- You can define animations here which you can use through Actions.PlayAnimation(animation_name)
Config.Animations = {
    ['pick_object_from_trunk'] = {               -- This is a name you choose yourself to access the animation through Actions.PlayAnimation('pick_object_from_trunk')
        AnimDict = 'rcmepsilonism8',             -- The animation dictionary
        AnimName = 'bag_handler_grab_walk_left', -- The animation name
        AnimationStart = 0.41,                   -- The animation start time (0.0 - 1.0 where 0.0 is the start of the animation and 1.0 is the end of the animation). Most of the time you can just pick 0.0 or leave remove this variable
        Duration = 1250,                         -- The duration of the animation in milliseconds, after which it is stopped. If you remove this variable, the animation will play until it is finished
        Flag = 1,                                -- The animation flag
    },
    ['change_vest_clothing'] = {
        AnimDict = 'oddjobs@basejump@ig_15',
        AnimName = 'puton_parachute',
        Duration = 2500,
        Flag = 51,
    }
}

-- You can configure the props which can be placed on the ground and walked with below. You can also configure the animation and position of the prop when placing it on the ground.
Config.WalkWithProp = {
    ['prop_roadcone02a'] = {                                                           -- The name of the prop
        CanPlace = true,                                                               -- If true, you can place the prop on the ground.
        CanPickUp = true,                                                              -- If true, you can pick up the prop from the ground (if CanPlace is true), otherwise you can only delete the prop
        CanPlaceMultiple = true,                                                       -- If true, you can place multiple props on the ground. If false, the prop in your hand will be removed after placing the prop
        ShowTransparentProp = true,                                                    -- If true, a transparant prop is shown when walking with the prop on the position where the prop will be placed according to the players position
        PropPlaceLocation = vector3(0.0, 0.75, -0.95),                                 -- The offset with respect to the player, where the prop will be placed
        PropPlaceHeading = 0.0,                                                        -- The heading of the prop when placed on the ground (0.0 - 360.0 degrees) with respect to the player heading
        FreezePlacedProp = false,                                                      -- If true, the prop will be frozen in place and cannot be moved
        RequiredJobsToPickupOrRemove = { 'police', 'ambulance' },                      -- The jobs which are allowed to remove the prop from the ground. Leave empty or remove the line if you want to allow all everyone
        CarryAnimDict = 'anim@heists@narcotics@trash',                                 -- The animations dictionary for carrying the prop
        CarryAnimName = 'walk',                                                        -- The animations name for carrying the prop
        CarryAnimFlag = 51,                                                            -- The animation flag for carrying the prop
        CarryAttachBonePed = 28422,                                                    -- The bone INDEX of the player where the prop is attached to when carrying it
        CarryPosition = { x = -0.1, y = 0.1, z = 0.1, rx = 90.0, ry = 0.0, rz = 0.0 }, -- The position of the prop (with respect to the position of CarryAttachBonePed) when carrying it (x-y-z positions) and (rx-ry-rz rotations)
        PlaceAnimDict = 'anim@heists@money_grab@briefcase',                            -- The animation dictionary for placing the prop
        PlaceAnimName = 'enter',                                                       -- The animation name for placing the prop
        PlaceAnimFlag = 1,                                                             -- The animation flag for placing the prop
        PlaceAnimTime = 1500,                                                          -- The duration of the place animation in milliseconds
        PlaceAttachBonePed = 6286,                                                     -- The bone INDEX of the player where the prop is attached to when placing it
        PlacePosition = { x = 0.0, y = 0.0, z = 0.0, rx = 0.0, ry = 0.0, rz = 0.0 },   -- The position of the prop (with respect to the position of PlaceAttachBonePed) when placing it (x-y-z positions) and (rx-ry-rz rotations)
        PickupAnimDict = 'anim@heists@money_grab@briefcase',                           -- The animation dictionary for picking up the prop
        PickupAnimName = 'exit',                                                       -- The animation name for picking up the prop
        PickupAnimTime = 1600,                                                         -- The duration of the pickup animation in milliseconds
    },
    ['prop_megaphone_01'] = {
        CanPlace = false,
        CarryAnimDict = 'amb@world_human_mobile_film_shocking@female@base',
        CarryAnimName = 'base',
        CarryAnimFlag = 51,
        CarryAttachBonePed = 28422,
        CarryPosition = { x = 0.02, y = 0.00, z = -0.00, rx = -0.50, ry = 0.00, rz = 79.00 },
    },
    ['m23_2_prop_m32_lgstretcher_01a'] = {
        CanPlace = true,
        CanPickUp = true,
        ShowTransparentProp = true,
        PropPlaceLocation = vector3(0.5, 0.0, -0.95),
        PropPlaceHeading = 0.0,
        RequiredJobsToPickupOrRemove = { 'ambulance' },
        CarryAnimDict = 'move_weapon@jerrycan@generic',
        CarryAnimName = 'idle',
        CarryAnimFlag = 51,
        CarryAttachBonePed = 6286,
        CarryPosition = { x = -0.13, y = 0.11, z = -0.06, rx = 13.75, ry = -6.00, rz = -8.50 },
        PlaceAnimDict = 'missheist_agency2aig_13',
        PlaceAnimName = 'pickup_briefcase',
        PlaceAnimFlag = 1,
        PlaceAnimTime = 1500,
        PlaceAttachBonePed = 6286,
        PlacePosition = { x = 0.0, y = 0.0, z = 0.0, rx = 0.0, ry = 0.0, rz = 0.0 },
        PickupAnimDict = 'missheist_agency2aig_13',
        PickupAnimName = 'pickup_briefcase',
        PickupAnimTime = 1600,
    },
    ['xm_prop_x17_bag_med_01a'] = {
        CanPlace = true,
        CanPickUp = true,
        ShowTransparentProp = false,
        PropPlaceLocation = vector3(0.6, 0.0, -0.95),
        PropPlaceHeading = 90.0,
        RequiredJobsToPickupOrRemove = { 'ambulance' },
        CarryAnimDict = 'move_weapon@jerrycan@generic',
        CarryAnimName = 'idle',
        CarryAnimFlag = 51,
        CarryAttachBonePed = 57005,
        CarryPosition = { x = 0.40, y = -0.08, z = -0.05, rx = 41.50, ry = -43.25, rz = -107.75 },
        PlaceAnimDict = 'anim@heists@money_grab@briefcase',
        PlaceAnimName = 'put_down_case',
        PlaceAnimFlag = 1,
        PlaceAnimTime = 1500,
        PlaceAttachBonePed = 57005,
        PlacePosition = { x = 0.36, y = 0.10, z = -0.10, rx = 19.00, ry = -81.75, rz = 45.00 },
        PickupAnimDict = 'anim@heists@money_grab@briefcase',
        PickupAnimName = 'exit',
        PickupAnimTime = 1600,
    },
    ['xm_prop_smug_crate_s_medical'] = {
        CanPlace = true,
        CanPickUp = true,
        ShowTransparentProp = false,
        PropPlaceLocation = vector3(0.6, 0.0, -0.95),
        PropPlaceHeading = 90.0,
        RequiredJobsToPickupOrRemove = { 'ambulance' },
        CarryAnimDict = 'move_weapon@jerrycan@generic',
        CarryAnimName = 'idle',
        CarryAnimFlag = 51,
        CarryAttachBonePed = 57005,
        CarryPosition = { x = 0.27, y = -0.04, z = -0.04, rx = -83.75, ry = -171.25, rz = 278.50 },
        PlaceAnimDict = 'anim@heists@money_grab@briefcase',
        PlaceAnimName = 'put_down_case',
        PlaceAnimFlag = 1,
        PlaceAnimTime = 1500,
        PlaceAttachBonePed = 57005,
        PlacePosition = { x = 0.26, y = -0.05, z = -0.15, rx = -42.00, ry = -19.00, rz = 77.50 },
        PickupAnimDict = 'anim@heists@money_grab@briefcase',
        PickupAnimName = 'exit',
        PickupAnimTime = 1600,
    },
}

-- If you want to adjust the default camera position when viewing the trunk, you can adjust x-y-z positions and x-y-z rotations below.
Config.DefaultCameraOffset = {
    x = 0.0,  -- The default camera position x offset
    y = -0.2, -- The default camera position y offset
    z = -0.1, -- The default camera position z offset
    rx = 0.0, -- The default camera rotation x offset (degrees)
    ry = 0.0, -- The default camera rotation y offset (degrees)
    rz = 0.0, -- The default camera rotation z offset (degrees)
}

-- If for some reason the camera position is not correct for a specific vehicle, you can adjust it here with an additional offset (x-y-z positions) and (rx-ry-rz rotations)
Config.AdditionalCameraOffsets = {
    -- [`warrener`] = { x = 0.0, y = 0.0, z = 0.5, rx = -10.0, ry = 0.0, rz = 0.0}, -- This is an example which increases the camera height by 0.5 and rotates it down by 10 degrees
    [`lguard`] = { x = 0.0, y = -0.5, z = -0.75, rx = 20.0, ry = 0.0, rz = 0.0 },
}

-- If you want to change notification text, you can do it here.
Config.Locales = {
    ['missing_required_job'] = 'You do not have the required job to use this item.',
    ['prop_cannot_be_placed'] = 'This object cannot be placed on the ground.',
}

-- Enables two debug commands, read the information below if you want to use these
Config.Debug = false

-- !!! CREATING TRUNKS !!!
-- In debug mode, you can use the commands "/toggle_trunk" and "/trunk_prop <propName> <RelativeToBone>".
-- /toggle_trunk opens or closes the trunk of the vehicle you are currently DRIVING.
-- /trunk_prop [propName] [RelativeToBone] spawns a prop in the trunk of the vehicle at the RelativeToBone position (if not defined it uses "bumper_r" by default).
-- You can spawn multiple props in the trunk, and switch between them like you would do normally in a trunk (A/D by default, unless changed in Config.Keys.MoveSelection).
---
-- The selected prop can be moved around, after which the position and rotation can be copied to your clipboard by pressing ENTER (by default, unless changed in Config.Keys.ConfirmSelection).
-- This makes configuration of a trunk a lot easier, as you can use the copied position and rotation in the Config.Trunks table to easily configure the prop positions.
-- You can move this prop using the following keys:
-- NUMPAD-RIGHT (6)                 = Positive translation of prop over X-axis
-- NUMPAD-RIGHT (6) + L-SHIFT       = Positive Rotation of prop over X-axis
-- NUMPAD-LEFT (4)                  = Negative translation of prop over X-axis
-- NUMPAD-LEFT (4) + L-SHIFT        = Negative Rotation of prop over X-axis
-- NUMPAD-UP (8)                    = Positive translation of prop over Y-axis
-- NUMPAD-UP (8) + L-SHIFT          = Positive Rotation of prop over Y-axis
-- NUMPAD-CENTER (5)                = Negative translation of prop over Y-axis
-- NUMPAD-CENTER (5) + L-SHIFT      = Negative Rotation of prop over Y-axis
-- NUMPAD-TOP-LEFT (7)              = Positive translation of prop over Z-axis
-- NUMPAD-TOP-LEFT (7) + L-SHIFT    = Positive Rotation of prop over Z-axis
-- NUMPAD-TOP-RIGHT (9)             = Negative translation of prop over Z-axis
-- NUMPAD-TOP-RIGHT (9) + L-SHIFT   = Negative Rotation of prop over Z-axis
-- Use Config.Keys.MoveSelection (default A/D) to change between spawned props
-- Use Config.Keys.ConfirmSelection (default ENTER) to copy the position and rotation of the selected prop
-- Use Config.Keys.ExitTrunk (default BACKSPACE) to despawn the currently selected prop
-- USE /toggle_trunk again to despawn all the props in the trunk and close the trunk.

-- !!! SETTING UP PROP ANIMATIONS !!!
-- You can also use the command "/carry_prop <propName> <pedBoneIndex> <animDict> <animName> <animFlag>"
-- This spawns the propName attached to the pedBoneIndex, whilst playing the animation defined by animDict, animName and animFlag.
-- You can then use the same keys as described above (NUMPAD) to move the prop around and copy the position and rotation to your clipboard using ENTER (unless changed in Config.Keys.ConfirmSelection).
-- This can be usefull to define the position of the prop when carrying it, as well as the animation to play when carrying it in Config.WalkWithProp.
| Code is accessible | No |
| Subscription-based | No |
| Lines (approximately) | ~2000 |
| Requirements | A target script |
| Support | Yes |