Welcome to AnimKit 's tutorial!
What do I need to start?
- This, AnimKit, of course.
- OpenIV to export peds and skeletons.
- 3ds Max with GIMS Evo plugin installed.
- CodeWalker for animation browsing and previewing.
- Some spare time and patience.
Preparing and creating a rig
At this point we expect you to have 3ds Max, GIMS and OpenIV installed. We also assume you have some minimal modding knowledge.
1. Installing AnimKit and our 3ds Max plugin.
Download and start AnimKit.UI. This tool provides a user-friendly UI that is meant to help across the whole animation creation process. We will talk about its functionality in the tutorial.
You will see this window after a short splash screen. We’re going to install our 3ds Max plugin that is distributed as a part of AnimKit projects. To not make this process tedious, we made a plugin management window. In the AnimKit menu click the “MANAGE PLUGIN” button.

Now you will see a window with 3ds Max installation path input and plugin status. If you have any missed updates for the plugin - come back here.
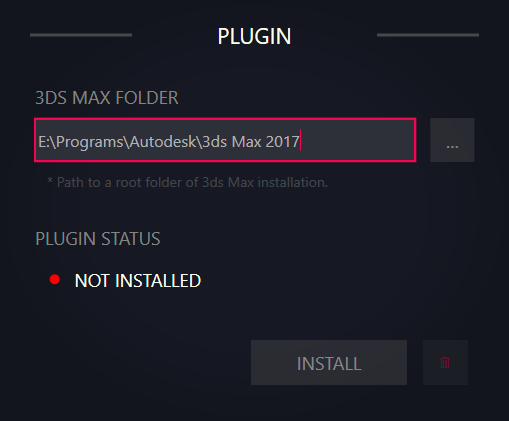
At this point, we need to let AnimKit know about your 3ds Max installation path. Click the ... button and follow to your 3ds Max path, where 3dsmax.exe is located. If the folder path is correct, AnimKit will let you know and the Install button will be available (we dare you to smash it!).
After a few moments, you should be notified about a successful installation, and the red “Not installed” status will turn into a greeny “Installed”.
You can remove the plugin from this window too.
Start your 3ds Max and you will see OFIO plugin for GTAV in utils tab.

2. Importing ped model and textures into 3ds Max.
Now we will talk about importing GTAV’s ped into 3ds Max and making a simple rig that we will use for creating animations. However, you can use this plugin for creating non-ped animations, too. 
You can animate anything that has a skeleton. We will be using peds just as an example.
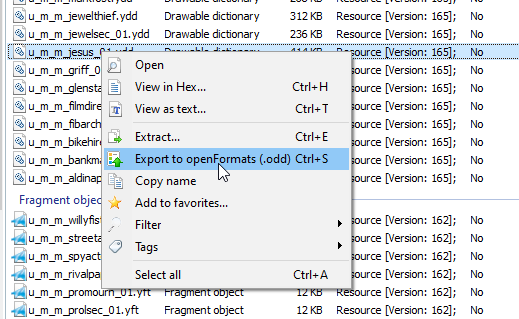
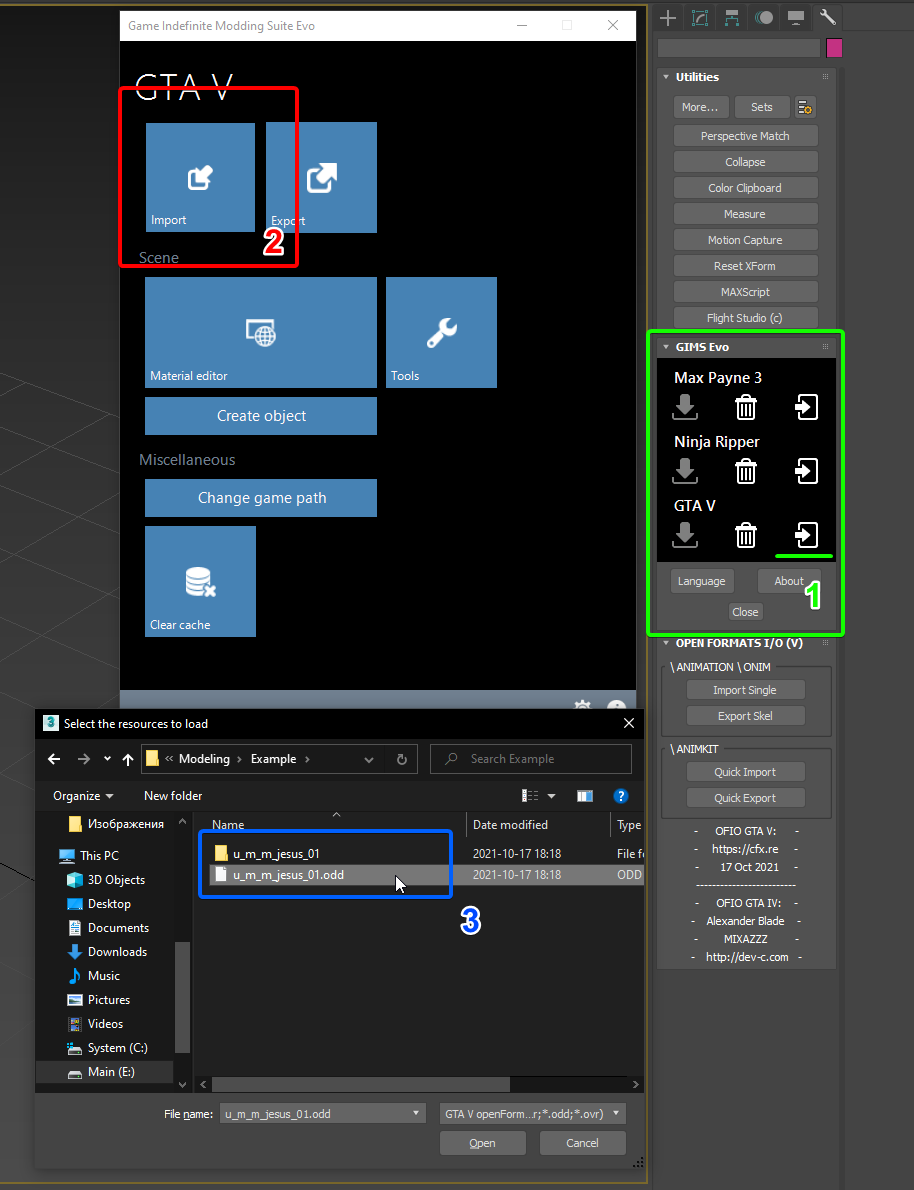
Start OpenIV and find the drawable dictionary (#dd file) of any ped model you wish to use. In our case, it will be u_m_m_jesus_01.ydd, you might remember it from Disquse’s “dab testing”. You need to export it as openFormats (right-click on any #dd file in Open IV files list and click Export to openFormats (.odd).) Export to any folder of your liking.
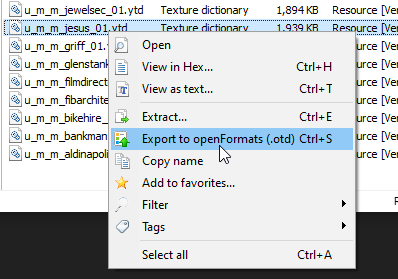
Do the same thing with texture dictionary (#td file) for this ped model. Usually, its name is the same as the drawable dictionary except for the file extension, and is located in the same archive. In our case it will be u_m_m_jesus_01.ytd, export it in the same folder where you exported the drawable dictionary before.
You might also want to export a full skeleton from fragments (#ft files), we will talk about it a bit later since in most cases using the skeleton from the drawable dictionary works fine.
That’s how our folder with exported assets should look like:

Now let’s import it in 3ds Max using GIMS Evo. Start 3ds Max, make sure you have an empty scene. Open GIMS main window using utils (1), press the “Import” button (2), and select the .odd file that we exported earlier (3). When it will ask for textures just click “ok”.
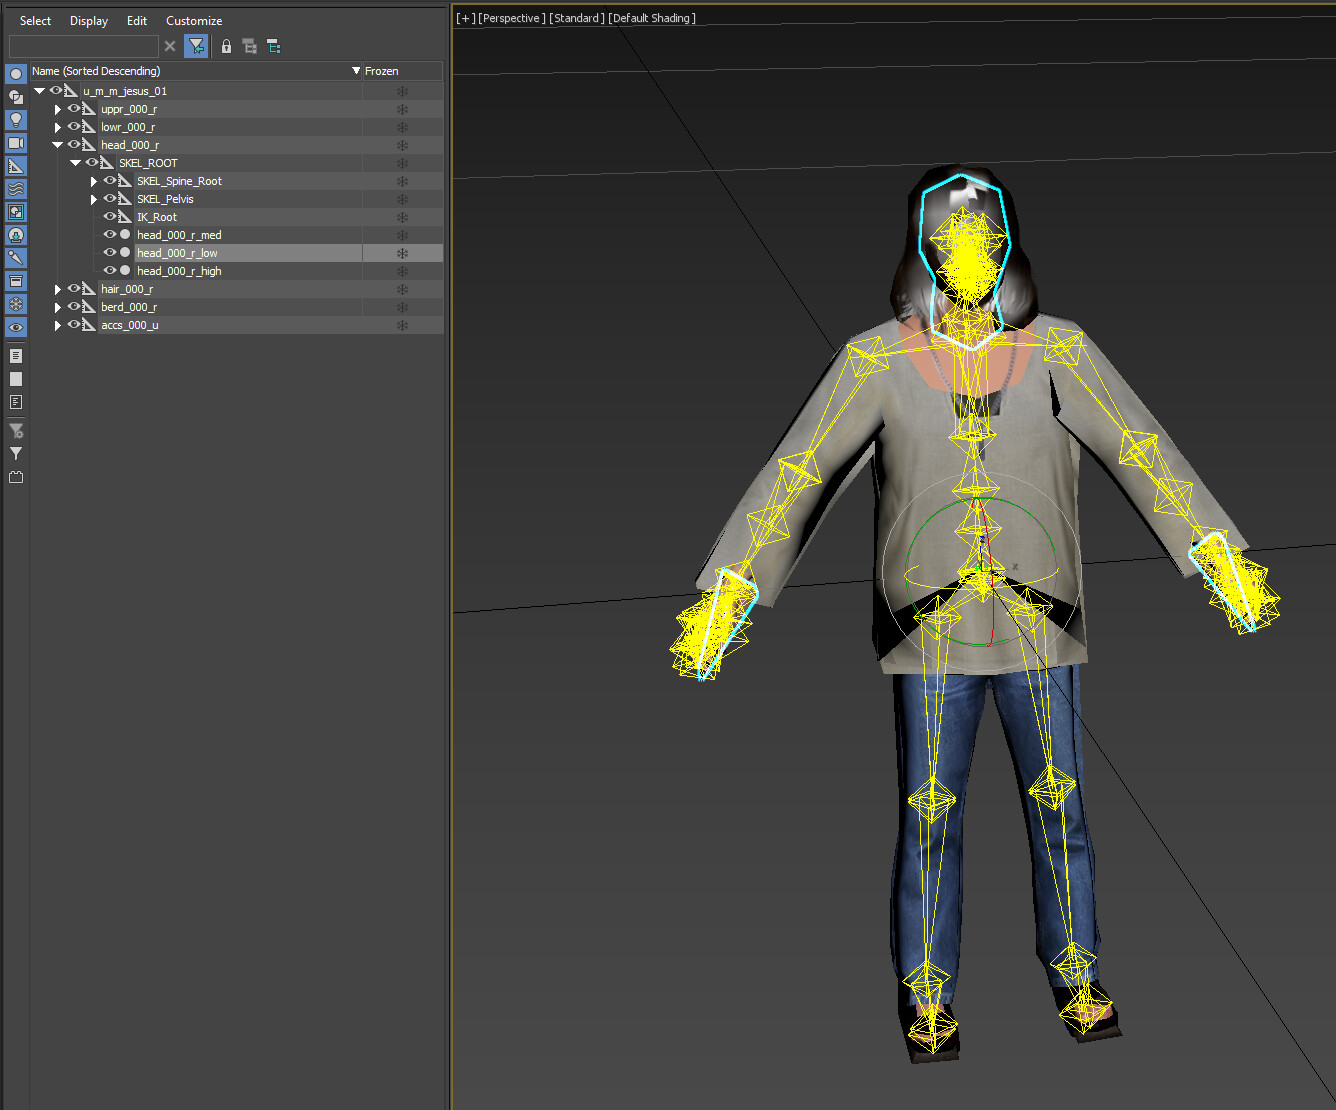
Wait a bit until GIMS imports everything and you will see our ped LODs in 3ds Max scene.
We’re done with this step, let’s create a usable rig now.
3. Making a simple rig from ped.
DISCLAIMER
Not all in-game models require you to create a rig. Peds are stored as drawable dictionaries and their skeleton is not properly imported in GIMS. We have to fix it manually. However, vehicles and objects models with skeletons will most likely be properly imported and you won’t have to redo a rig manually.
We’re working on a way to make native support for ped rigs.
Also, just like step 2, you will only have to do step 3 once and use it for multiple animations.
Now we have to create a usable ped rig. Currently, due to a bug/not finished code in GIMS, not all bones are rigged to drawable dictionary meshes.
First of all, we recommend you remove all non-high lods, we don’t really need them. You will have to do it for all parts of the ped model (uppr, lowr, head, hair, beard, acss in this case).
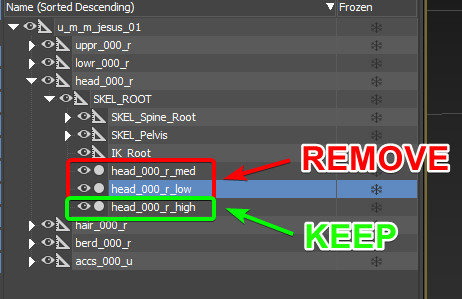
After you’re done, ped should look less lod-y.
Now we need to attach every ped’s part to head. Select head model from the list or use the scene.

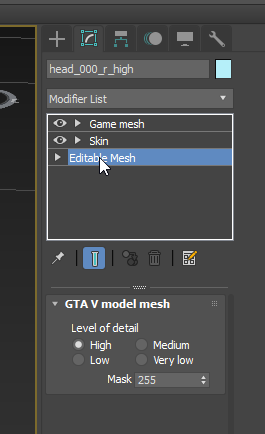
Select the “Editable Mesh” modifier. Press “yes” if it asks about anything, we don’t care.
Then click on Attach tool’s button from “Edit Geometry” tab.

Click on every single other part of the ped (can use the element list or scene), make sure everything is attached to head. If it asks you about materials after attaching, use “Match Material ID to Material” and check the “Condense Material and IDs” checkbox - this is the default settings and they should work well.
In the end, when you attached everything, select the head part and try to move it. If you attached everything correctly, you will see the whole ped moving with all its parts. Don’t forget to reset the ped position back to where it was 
Now we can remove all non-head elements and fake bones inside them.
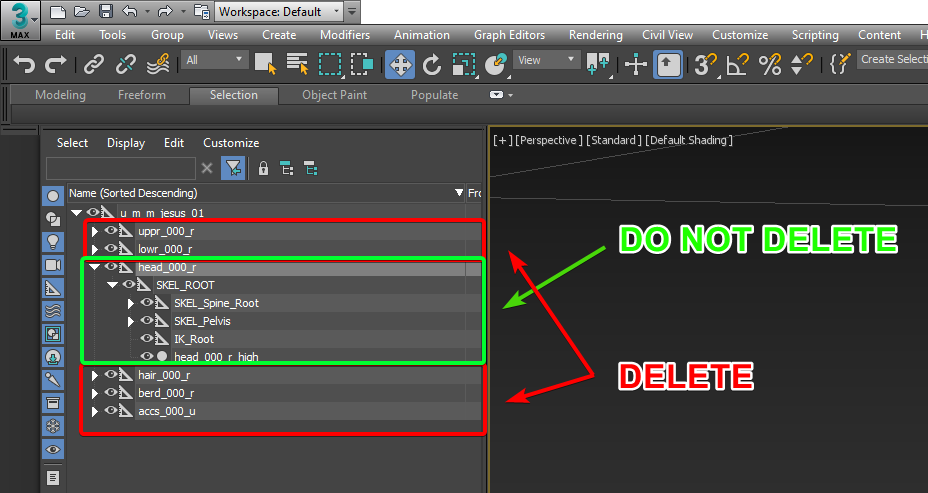
This is what we should see after this cleanup.

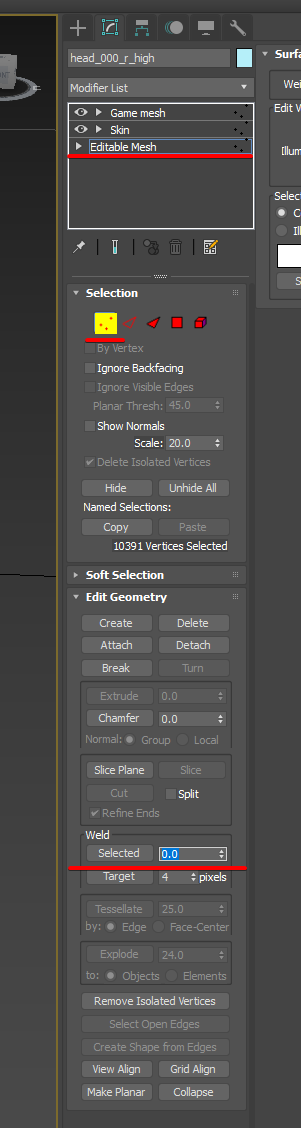
Also, that’s optional, but I will attach very close vertexes to each other to avoid “holes” during animating. Select the “head” model and “Editable Mesh” modifier. Chose vertices selection, press CTRL+A to select all vertices from the model. Now, look at the “Weld” panel, type “0.0” in input, and press the “Selected” button.
There we go, it should be good now.
At this point, I would recommend saving the scene as a .max file somewhere. 3ds Max likes to crash and we don’t really want to redo everything from scratch 
We’re almost done, the very last thing we have to do before start animating - attach bones to mesh. That’s what we’re going to do.
We need our “head” model to be aware of all bones. Select the “head” model and its “Skin” modifier. Press on the “Add” button for “Bones”.
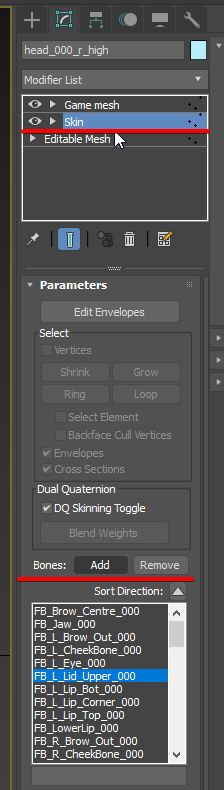
In a selection window, simply press CTRL+A to select all available bones and press “Select”.

Now we need to resolve bone weights. We might do it manually but that could take a lot of time. In our case, when we don’t really need 100% accuracy, we would be fine with built-in 3ds Max’s weight solvers. I’d prefer “Voxel” and Falloff set as 0.15, but you can experiment with it if you wish. Press on the “…” button and then on the “Apply” button.
Wait a bit while 3ds Max is doing its job, it might take a while. Sometimes it crashes, that’s why we did a save before!

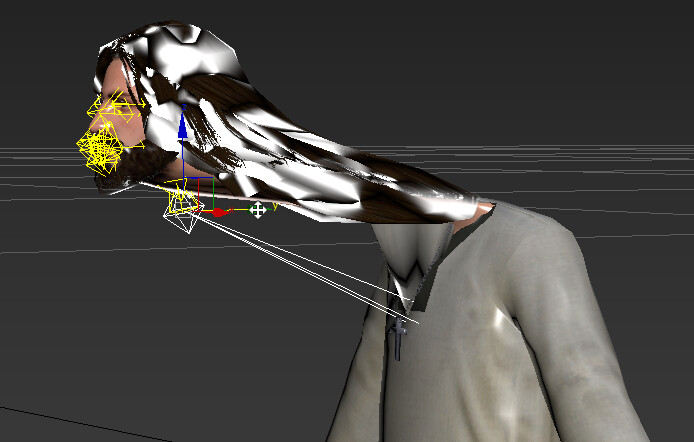
And now if you select any bone and try to move it, the ped’s model should be attached to the bone. For testing purposes, I moved the neck bone position.
Undo whatever experiments you did with bone positions/rotations and finally save the .max project again (and maybe back it up).
We’re done with rigging. And as said in the disclaimer, you won’t have to redo this ever again (except for different skeletons).
We’re now ready to animate! 
Creating a custom animation
We expect you to finish the “Preparing and creating a rig” part of the tutorial before reading this.
1. Creating a simple animation.
Now we can do a simple animation to test how it works. We will need the rig we previously created.
Disclaimer, we’re not experts in animation work, this part of the tutorial will be very basic, luckily there’s a big amount of tutorials around the 3ds Max community and you can use all the powers of 3ds Max to create amazing animations.
Make sure your timeline is set to 0 and turn on any of the keyframe set modes.
Auto Key will add keys automatically as soon as you change any bone.
Set Key will enable manual setting mode.

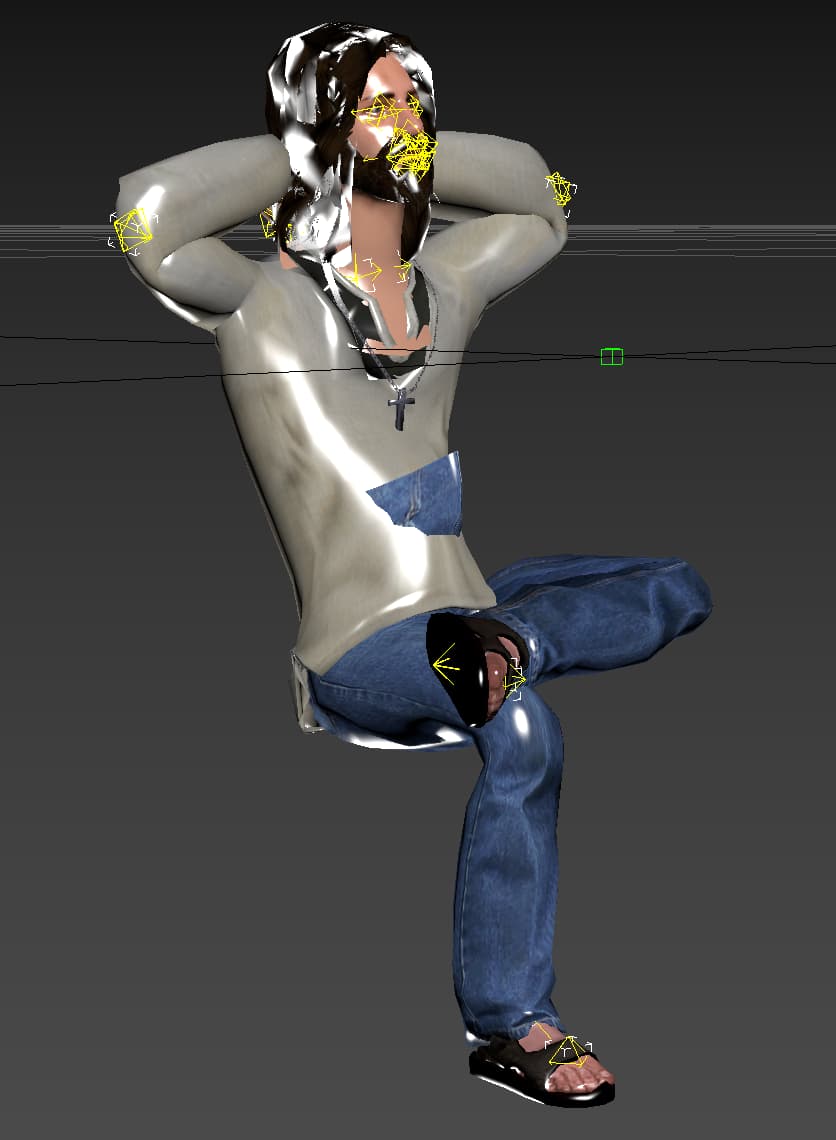
We’re going to use Set Key as an example. Let’s find the bone of the left hand and rotate it a bit.
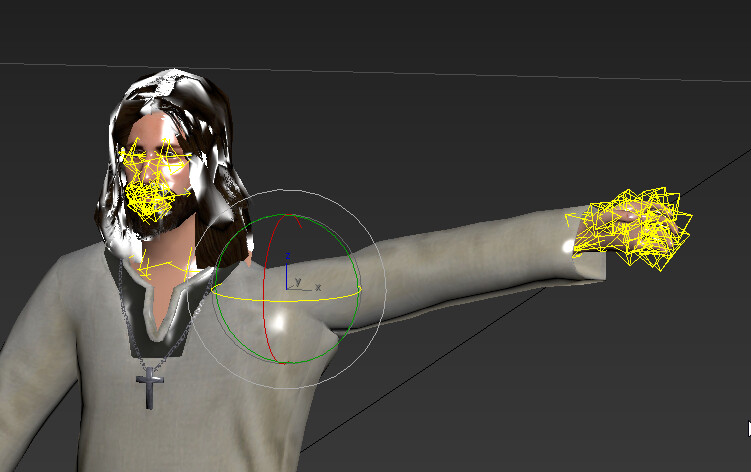
Now we can set a key using this big button.

A wild keyframe has appeared
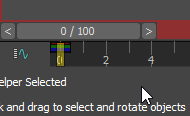
Now we move the timeline a bit (this horizontal slider), for example on 25 frames. Rotate the same bone again and set a new keyframe again.
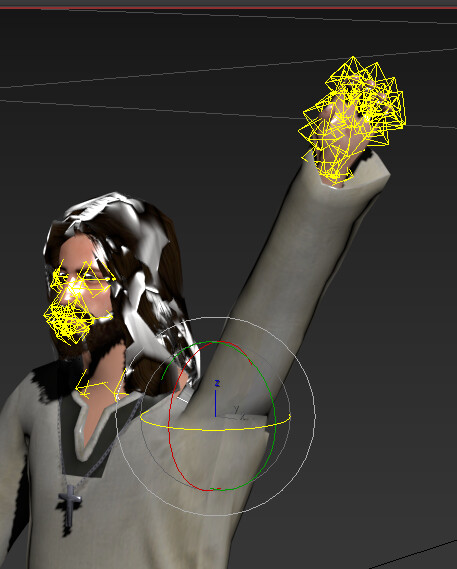
You can continue moving it more as you wish. We did more frames at 50 and 75 frames. We can preview our animation in 3ds Max using this button.

That’s how our animation looks like in 3ds Max:
ShareX GIF | Gfycat
This is an extremely simple example obviously, but the whole manual animating work is just keyframe setting and editing. You can do everything, from static poses to full-of-action moves. That’s a question of your skill and wish.
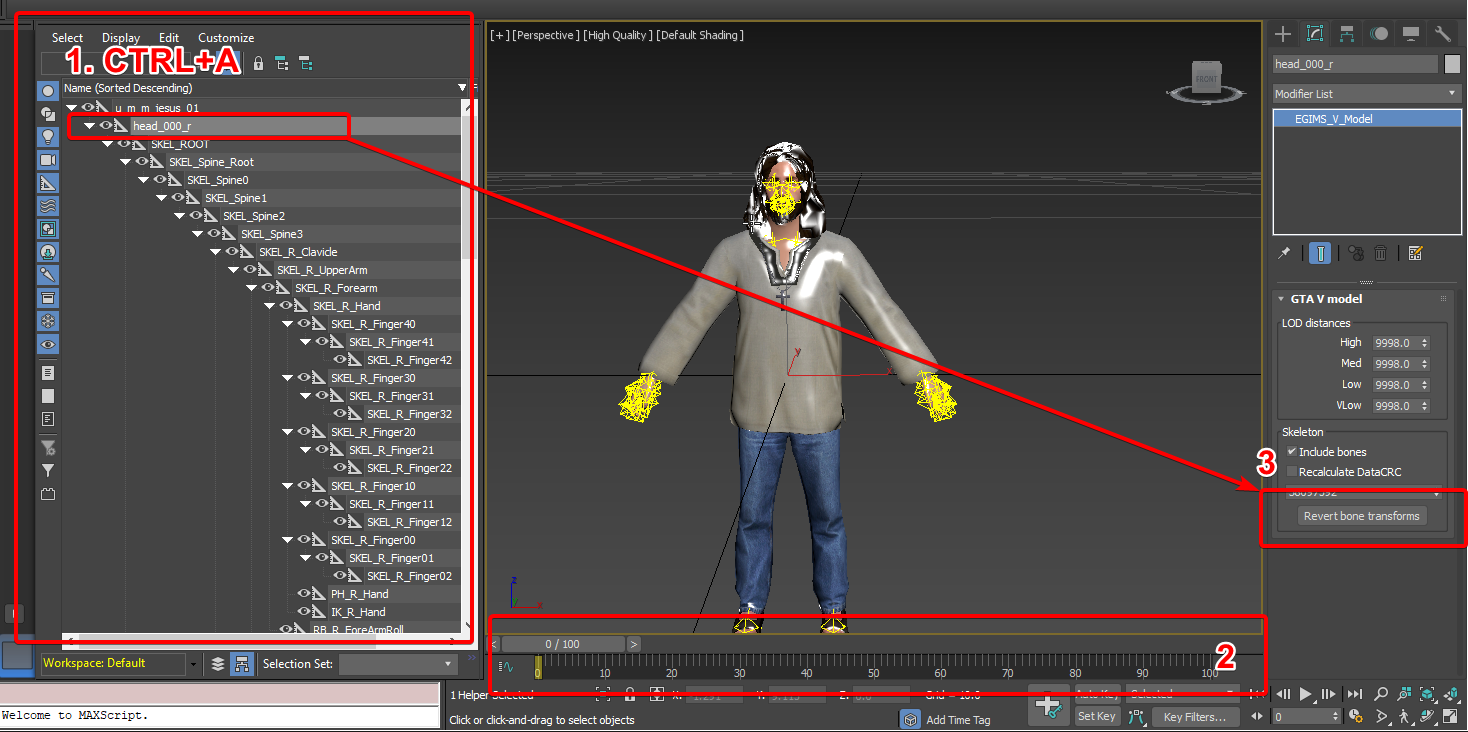
Don’t forget to save your animation, but don’t replace the original rig file, otherwise, you will have to reset bones positions. Long story short, to remove animations and reset bone positions, select all bones (1), remove their keyframes (2), select model, and click “Revert bone transforms” (3).
Now, let’s export our animation in the game.
2. Exporting animation as #cd file.
Let’s export your beautiful animation to the game.
The very first thing we need to do is export it from 3ds Max to the format that AnimKit can read (.onim files).
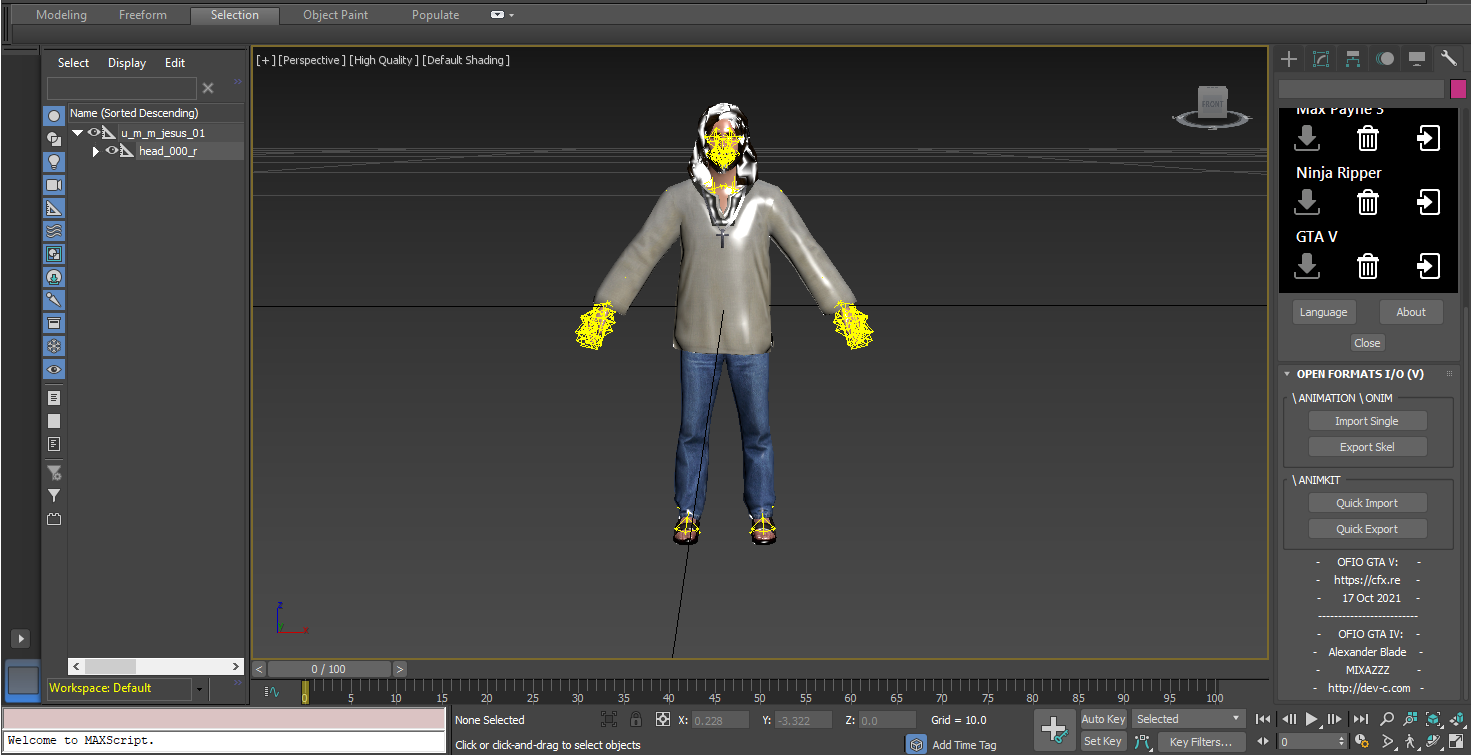
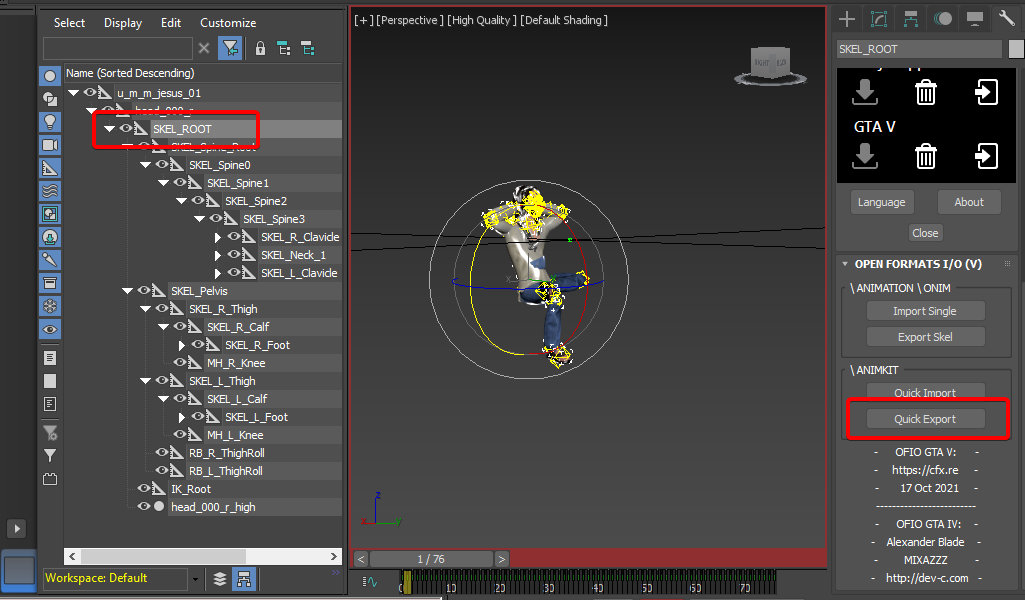
Our plugin requires you to select the root bone of the skeleton (SKEL_ROOT for peds, chassis for vehicles and etc) before exporting or importing animations data. Just select it like that.
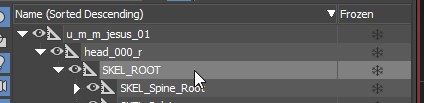
And then find the panel of our plugin and press the “Export Skel” button.

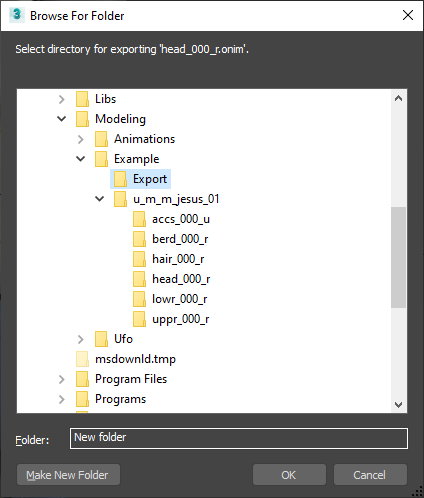
Select the folder where you want the animation to be exported. If will be named as parent object of root bone, so in our case a file name will be head_000_r (you can rename object if you wish).
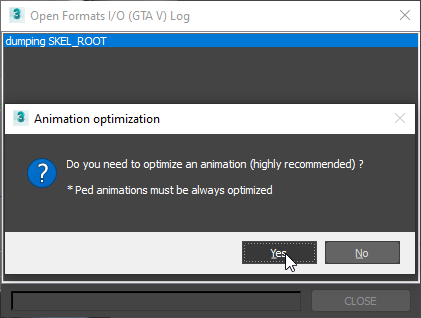
Press YES when the plugin asks you if you want to optimize an animation. We will discuss optimization a bit later, but if you want ped animations to look properly in the game, always use the optimization feature.
Wait a bit until it exports the animation data, it may take a while, depending on the length and complexity of the animation.
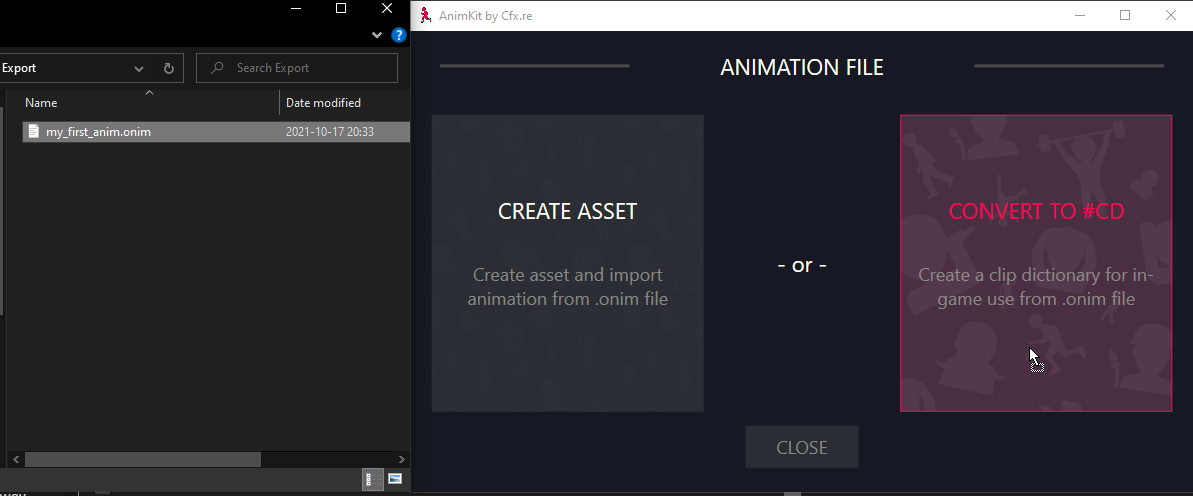
When you will see skel onim export succeed, you can close the export window and check if there’s our animation file in the folder we used as the export path. Let’s rename it to my_first_anim.

Back to AnimKit. For now, we won’t use all the power of AnimKit and simply create a game-ready .#cd file from .onim to test as fast as possible. Simply drag-n-drop the .onim file on AnimKit’s main window. You will see 2 options, use the “CONVERT TO #CD” one.
Select a folder where you want your animation to be exported. Now you should see a .ycd file in it.
Now, let’s stream our custom animation to our FiveM client and play it on our ped!
3. Streaming animation into the game and playing it.
We need to create a resource for your animation.
If you never worked with resources in FiveM, please read this. We won’t cover how to stream animations into a non-FiveM environment, but it’s possible.
You will need a resource manifest (fxmanifest.lua) and an empty stream folder in your resource’s directory in which we will copy our exported .ycd file to it. We can also rename it to fit GTA V naming convention for animations, let’s make it my@first@anim@dictionary.ycd just as an example.
Now let’s write a bit of code to play animation on our ped. Create an empty client.lua file and add it as a client_script in our fxmanifest.lua. That’s how everything should look like at this point:
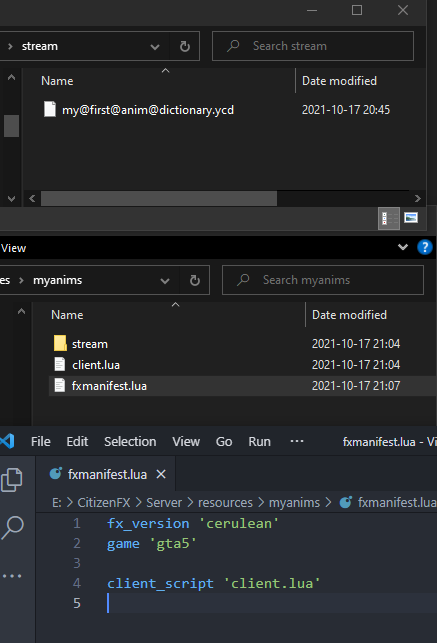
Here’s a simple snippet that will register the command playmyanim. If we use this command in chat, our animation should be played on our ped. We’re not going deep dive in scripting for now.
RegisterCommand('playmyanim', function()
  local dictName = 'my@first@anim@dictionary'
  local animName = 'my_first_anim'

  -- Request animation dictionary.
  RequestAnimDict(dictName)
  while not HasAnimDictLoaded(dictName) do
    Wait(1)
  end

  -- Play animation on player ped.
  local playerPed = PlayerPedId()
  TaskPlayAnim(playerPed, dictName, animName, 4.0, 4.0, -1, 1, 0.0)

  -- Unload animation dictionary.
  RemoveAnimDict(dictName)
end, false)
Now you can start your server, start this resource and connect.
Once you’re connected, use the /playmyanim command in chat.
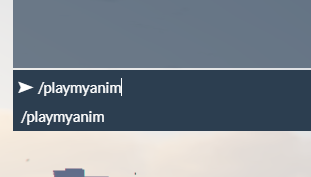
Now you should see your animation playing on your ped if you did everything correctly, congratulations! 
Editing in-game animations
Now let’s talk about editing exiting animations. Do note that you need to read the “Preparing and creating a rig” part of this tutorial if you missed it.
1. Importing animation as an asset for AnimKit.
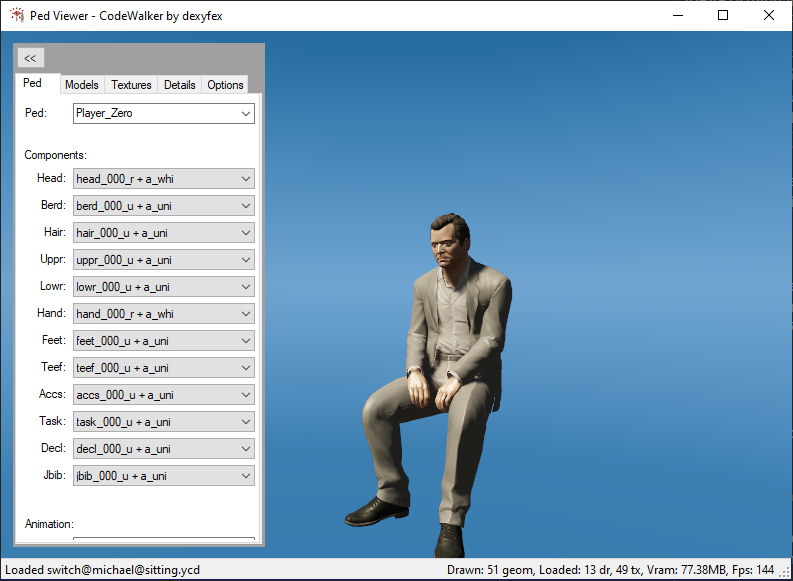
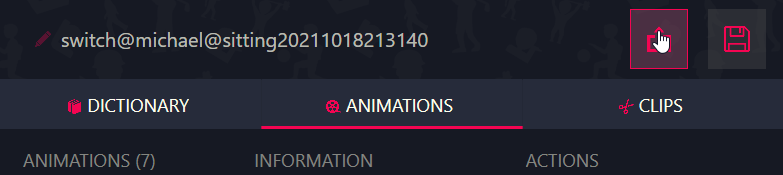
The very first thing we need to do is to find an animation we want to edit. Let’s say we want to edit the “switch@michael@sitting” clip dictionary, specifically, its idle animation. This is a very casual and popular sitting animation.
Don’t forget that you can use CodeWalker’s awesome “ped viewer” feature to preview animations before exporting them. Here’s our sitting animation:
A little note before we start, it is also possible to edit other kinds of animations, this animation is created specifically for peds and we going to use ped’s skeleton, but it’s possible to edit objects or vehicle animations as well.
Ok, let’s start. We will use CodeWalker to find “switch@michael@sitting.ycd”, once you find it, just drag-n-drop it from CodeWalker’s files list to AnimKit’s main window, you will see 2 options, we need to use the “Create asset” one. Find a place where your asset will be stored and press OK.

Wait a bit until AnimKit imports everything as an asset. And you will see such a window:
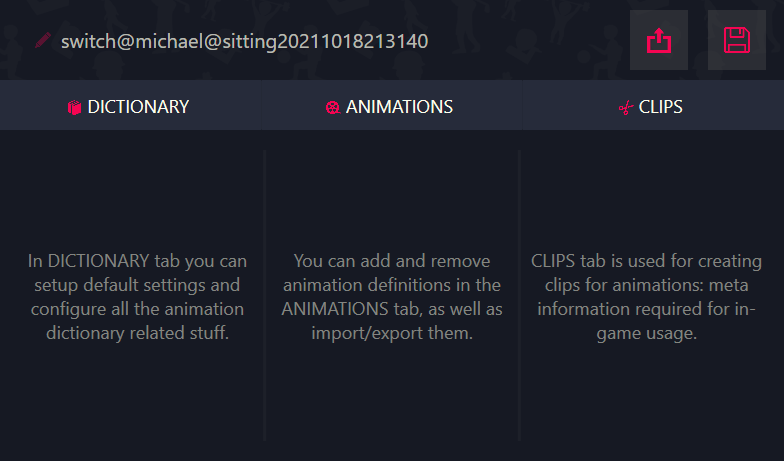
This is an asset window with all the data, created from the mp_arresting animation. We will dive deep into AnimKit’s functionality a bit later.
2. Finding animation for a specific clip and exporting it into 3ds Max.
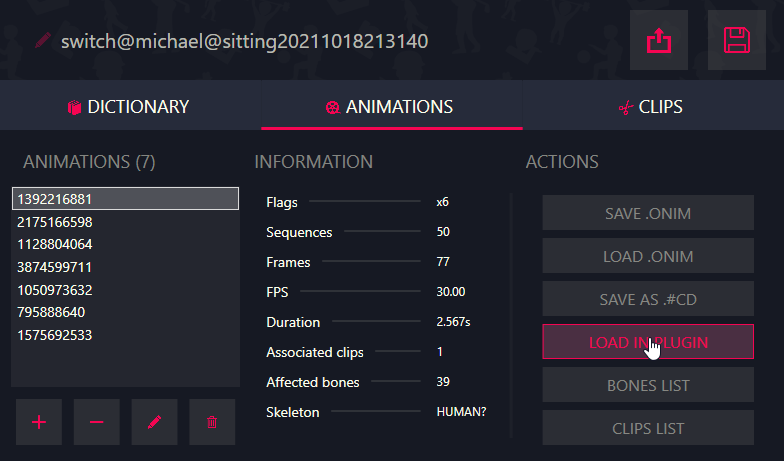
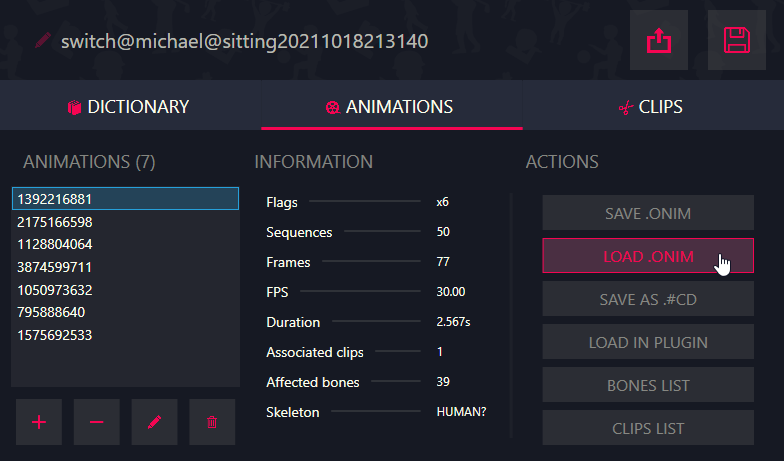
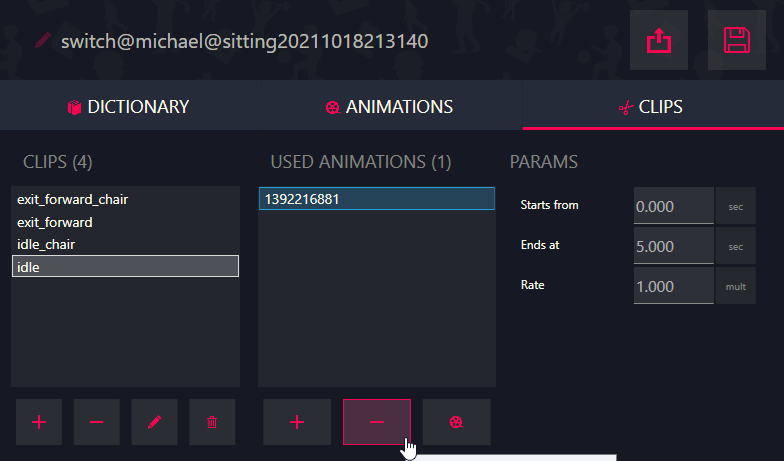
Since clip dictionary (#cd files) actually store both animations and clips, we need to find an animation that is used in the idle clip that we need. Let’s head to the “CLIPS” tab. Luckily, this clip dictionary is kinda small so we can find the idle animation quickly.
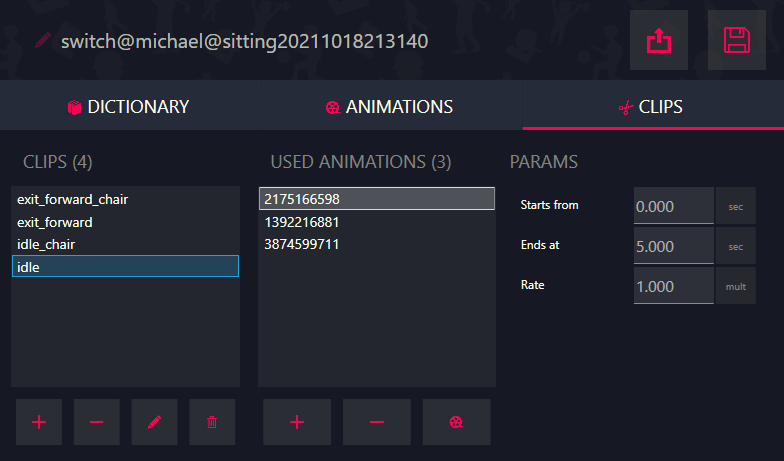
We can see that this specific clip is using 3 animations. Long story short, sometimes R* animate some specific parts of ped separately, especially they like to split fingers from the main animation (for optimization I guess). We don’t really want to edit fingers, so we will stick with the main body animation.
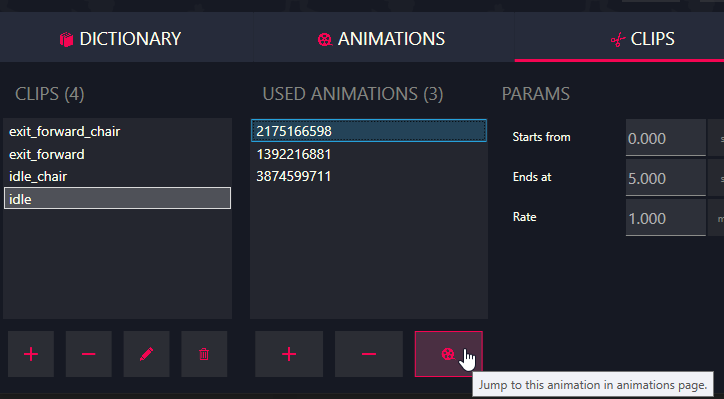
There we can see 3 animations, let’s use this tiny button to jump to this animation on the “ANIMATIONS” tab to get a bit more details, including which bones were used.
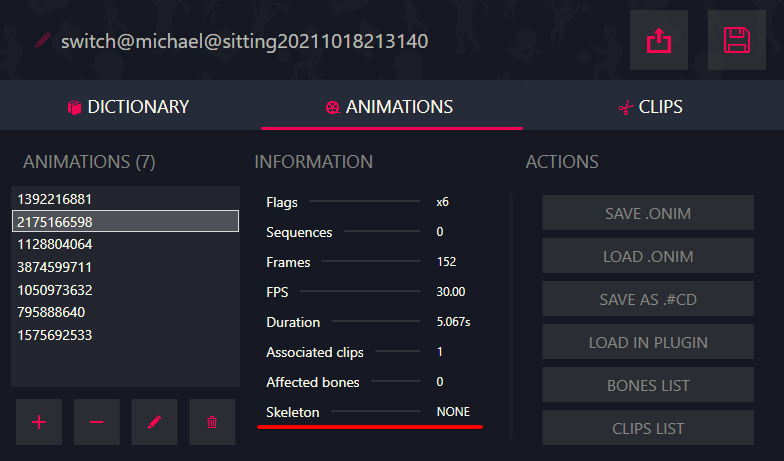
The very first animation has a predicted skeleton marked as “NONE”, meaning that it neither has no supported animation tracks nor is used for something we can’t predict for now.
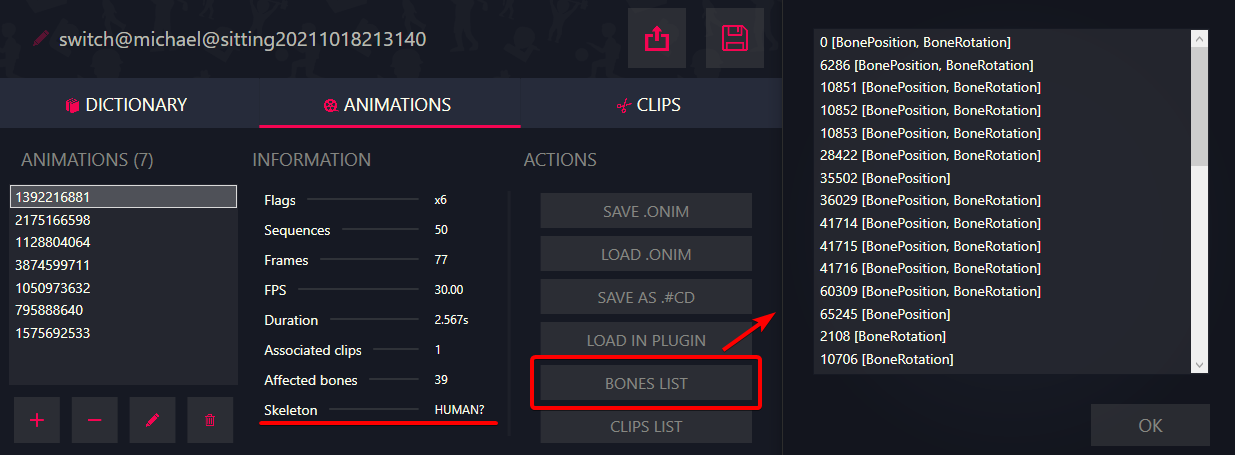
We can use the “BONES LIST” button to ensure if there are any ped body bones included, since the prediction method just guesses the used skeleton, we can’t be sure about the correctness of the prediction. Such clips may cause crashes sometimes, so if you encounter a crash as soon as you try to play the animation, try to check if there’s any such clip. We’re will add all the non-supported tracks later.
Anyway, let’s see the second animation. It’s predicted as a “HUMAN” skeleton, so exactly what we need.
And the third animation is predicted as “FINGERS”, which makes sense.
Now let’s start 3ds Max and load our prepared ped’s rig so we can apply animation on it. If you don’t have one or don’t know what I’m talking about, see the “Preparing and creating a rig” part of the tutorial, you will need that anyway.
Here’s our rig.
To apply animation on a rig in 3ds Max, select the correct animation in AnimKit and press the “LOAD IN PLUGIN” button.
AnimKit just exported this animation to temp path so we can quickly import it in 3ds Max without having to search for it manually.
Now select the root bone (SKEL_ROOT for peds) of your rig and press the “Quick Import” button in the plugin’s window.
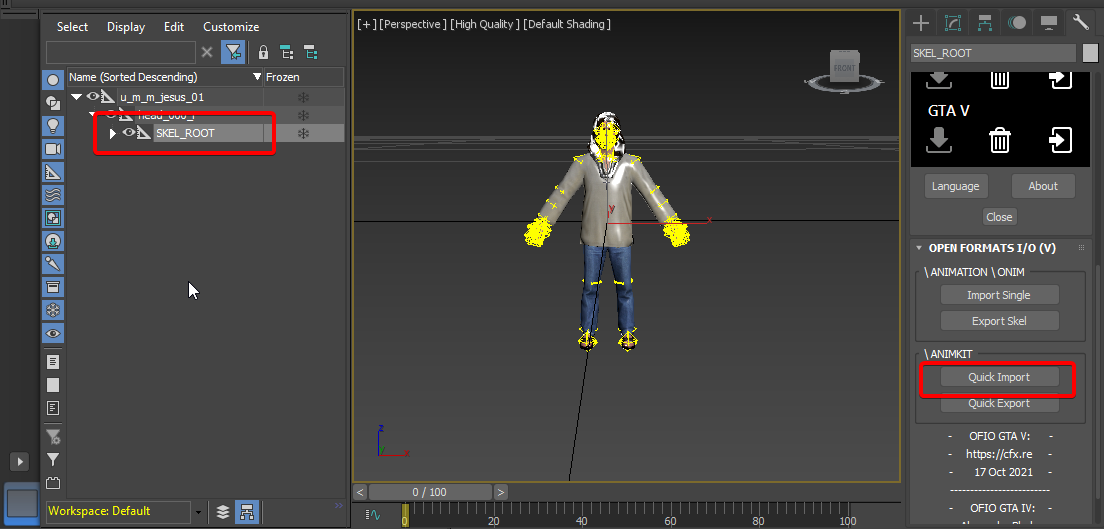
After some time you will see a “succeeded” message. You can close the importing window now, this is what you will see after importing.
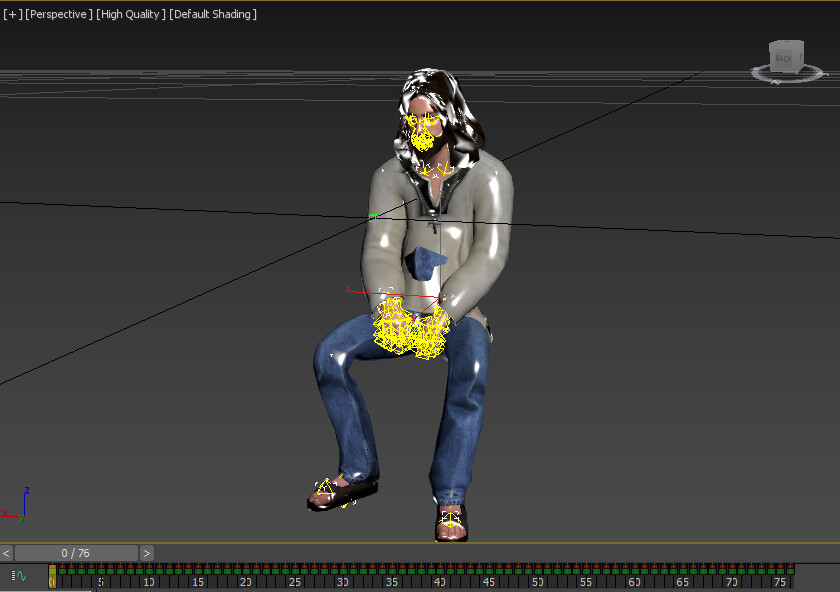
Our rig, of course, is not perfect and some parts of the ped look a bit weird, don’t be afraid, this will look fine in-game. This animation itself is not an animation but some specific pose, however, should be good for demonstration anyway. Let’s make our ped to sit a bit more imposingly.
3. Animating rig and exporting it back to the game.
We won’t show the process of animating since a bit of example was shown in the “Creating a custom animation” part of the tutorial.
That’s what we got in the end. We also added a bit of motion, we will check it in the game!
Now, let’s export it. If you haven’t closed AnimKit’s project yet, you can click the “Quick Export” button and it will automatically export animation from 3ds Max and import it in AnimKit, don’t forget to select the root bone (SKEL_ROOT in our case).
If it won’t work for some reason or you have closed the project before. Export it using the “Export Skel” button on the same panel (a bit more info about it can be found in the “Creating a custom animation” tutorial). Open project in AnimKit, select animation you want to replace in the “ANIMATIONS” tab, use the “LOAD ONIM” button.
Also, we would like to remove fingers and the other animation that is used in this clip. We don’t need the fingers animation from the original animation, so go to “CLIPS” and remove every animation except the “HUMAN” one.
That’s it, now we’re ready to test our animation. Let’s press this big button meaning “Export” and save it somewhere.
Since we’ve not changed the dictionary name on the “DICTIONARY” tab, it used the original dictionary name, let’s rename the file to switch@michael@sitting_cool.ycd and drop it into the stream folder of our resource to actually replace the in-game animation.
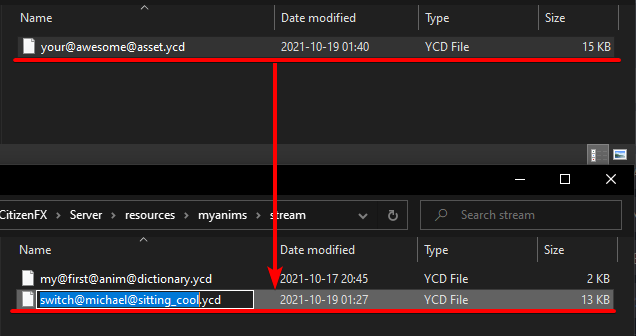
Beware that replacing some specific clip dictionaries (#cd files) with some clips or animations stripped might cause crashes. If you want to add clip dictionary and not replace it, simply rename the file to some unique name not already used by the game. That’s what we’re going to do, there’s no reason to replace this specific clip dictionary, we just used it as a boilerplate for our animation.
We used the same resource from earlier in our tutorial. Now let’s start our server, join it and check our animation. Simply replace dictName and animName variables in our /playmyanim command.
That’s how the animation looks in-game:
ShareX GIF | Gfycat
Congratulations, we just edited an animation and added it into the game
Deep dive into AnimKit
Let’s look at every single functionality of AnimKit.
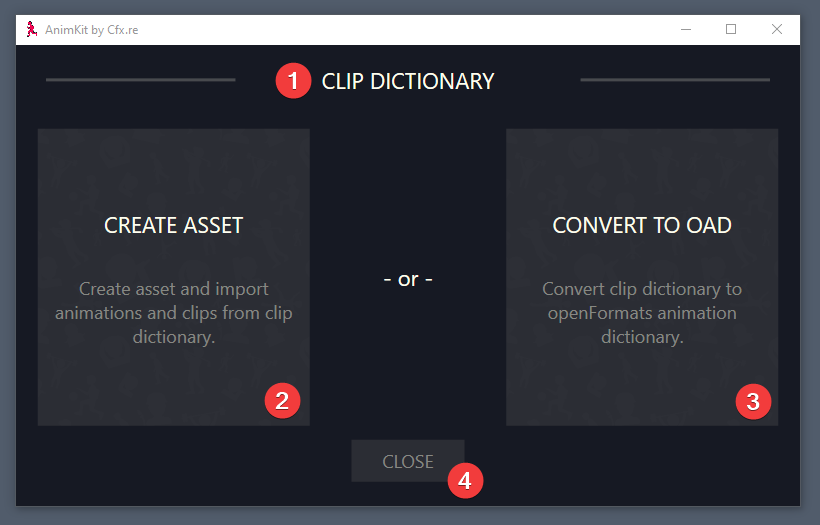
1. Main menu window.

- Opens a window where you can create a new asset from scratch.
- Open existing assets from your storage.
- Manage our 3ds Max plugin named as simply as “AnimKit.Plugin”.
- Link to our public repository page.
- Opens little “About” window.
- The whole window is a drag-n-drop area where you can drop any of the supported formats (.#cd, .onim, .oad).
- Recent asset list sorted by latest change date, you can scroll it btw.
- Short information about recent asset items (count of animations and clips).
- Date of last change of recent asset item.
- Recent asset item title.
- “Remove” button if you want to forget about a specific asset.
If you drag-n-drop any file on the main menu window, the quick actions panel will appear.
- Quick action title. You might see different text here regarding which kind of file you dropped.
- Left action panel, title, and description might change depending on the file type. Move the file right on it to choose this action.
- Right action panel, same as previous.
- A close button if you want to close this panel.
Using quick actions you can:
- [File type] Action description.
- [#.CD] Quickly create asset from raw clip dictionary file (.#cd).
- [#.CD] Convert .#CD file to openFormats animation dictionary (.oad).
- [OAD] Quickly create asset from openFormats animation dicrionary (.oad).
- [OAD] Convert openFormats .oad to raw clip dictionary file (.#cd).
- [ONIM] Quickly create asset and add animation file (.onim).
- [ONIM] Quickly convert animation file (.onim) to raw clip dictionary (#.cd).
2. Asset creation window.
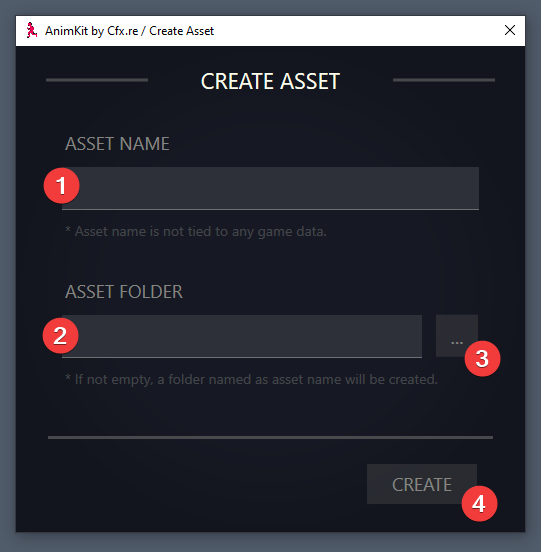
- Asset name. As said, it’s used only for readability, you will see this name in the recent list in the future.
- Asset folder path. You can type manually where you want your assets to be stored.
- Browse button. If you don’t want to type a path manually, you can use the folder browser.
- Once everything is ready, hit this button to create your asset.
3. Asset editing window.
This is where you will spend most of the time working on assets. You can open multiple windows for different assets if you wish. You can see a tab-based menu here. If nothing is selected, it will show a little help window, explaining some details about tabs.
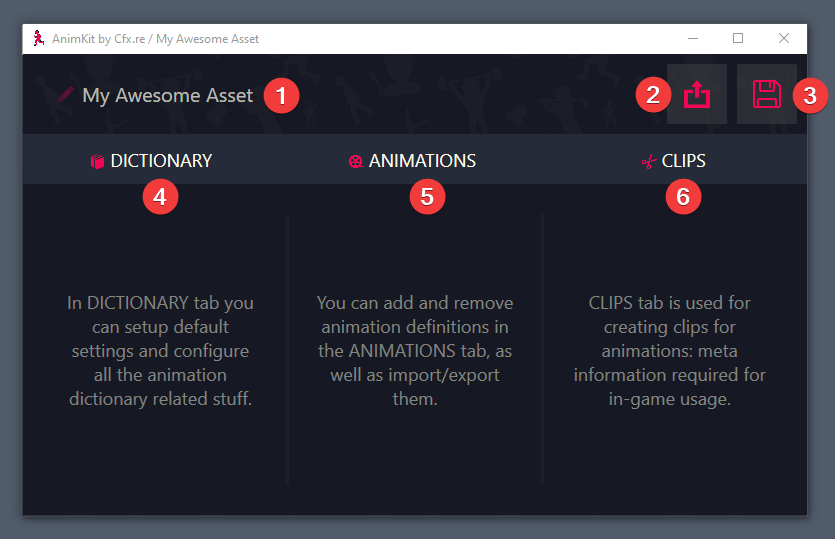
- Asset name. Click to change.
- Export button. Create a game-ready raw clip dictionary (.#cd file) from the current asset.
- Save button. The asset should be saved automatically, but if you want to make sure, click it.
- Dictionary tab. As said, in the dictionary tab, you can set up default settings and configure all the animation-dictionary-related stuff.
- Animations tab. As said, you can add and remove animation definitions in the animations tab, as well as import/export them.
- Clips tab. As said, the clips tab is used for creating clips for animations: meta-informations are required for in-game usage.
Dictionary tab.
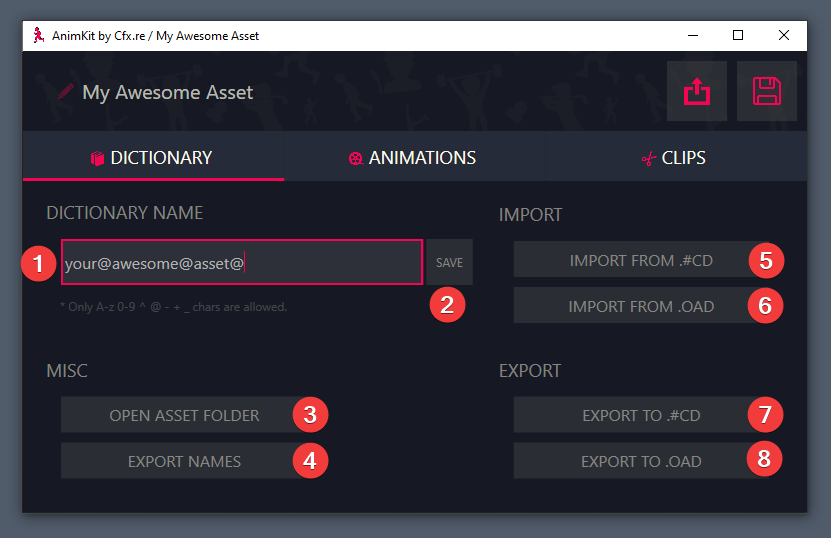
- Dictionary name input. This name will be used when exporting assets as raw clip dictionary (.#cd file).
- If you changed the dictionary name, a wild “save” button will appear.
- Button that will open the asset root folder.
- Button that will generate a
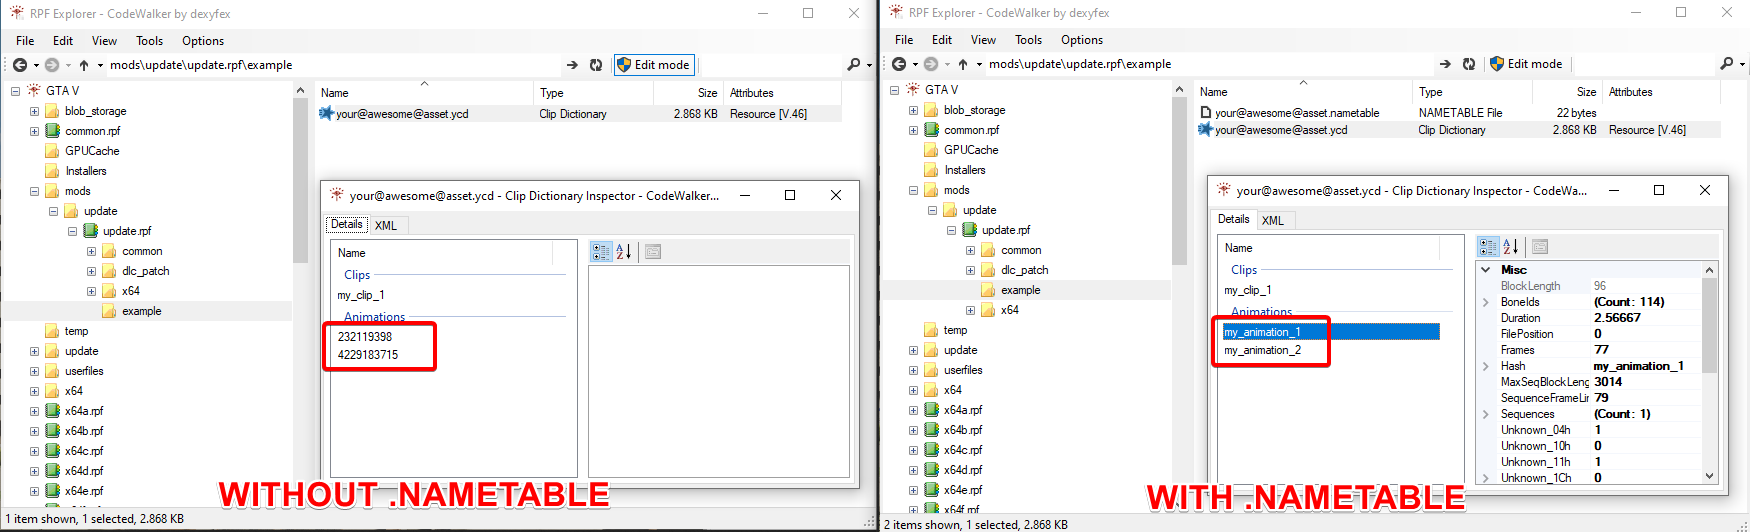
.nametablefile with all known animation names. Read about name tables in “Generating and using .nametable file”. - Import assets (with animations and clips) from raw clip dictionary file (.#cd).
- Import assets (with animations only) from openFormats animation dictionary.
- Export asset (with animations and clips) to raw clip dictionary file (.#cd).
- Export asset (with animations only) to openFormats animation dictionary.
Animations tab.

- Title of the animations list with the number of items.
- List of animations. Select animation to see information and actions panels. You can also drag-n-drop .onim files here.
- Add an animation (.onim file) to the list.
- Remove the selected animation from the list (you can’t undo this).
- Rename the selected animation.
- Remove all animations (you can’t undo this).
- Number of used flags in animation (hover value to see more details).
- Number of sequences in the animation.
- Number of frames in the animation.
- FPS of the animation.
- Duration (in seconds).
- Associated clips where selected animation is used.
- How many bones the selected animation has used. Use the “Bones list” button to see which bones were used.
- Predicted skeleton type. As said earlier, this is just a guess and it can’t be 100% accurate.
- Save selected animation as .onim file (for example, to import in 3ds Max manually).
- Load .onim file as a replacement for selected animation (for example, after editing animation in 3ds Max).
- Save a single animation as a raw clip dictionary. A clip named after the animation’s name will be generated, covering full animation length.
- Quickly load the selected animation in the plugin. After clicking you will have to press “Quick Import” in 3ds Max plugin. After editing you can click “Quick Export” and animation will be loaded back if the asset window is opened.
- List of bones that selected animation is using.
- List of clips that used selected animation. Click on the list item to jump on the selected clip in the clips tab.
Clips tab.
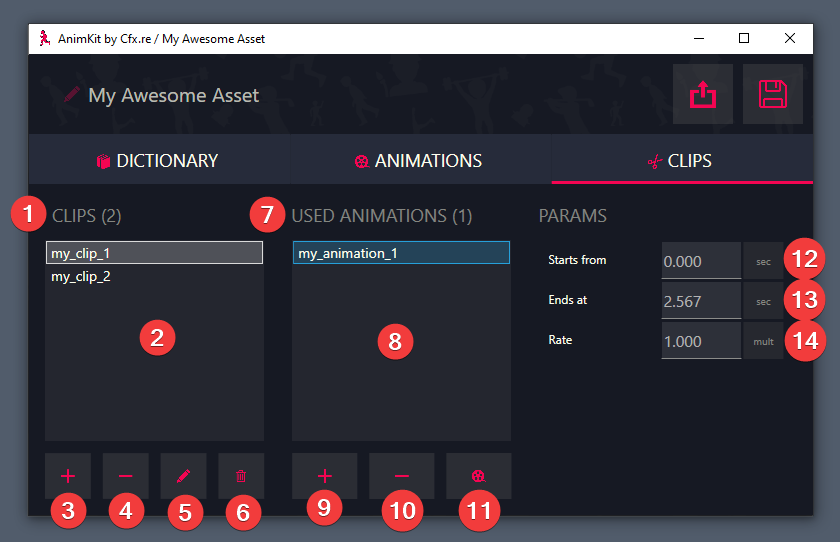
- Title of clips list with the number of items.
- List of clips. Select clip to see list of used animations and params panel.
- Add a new clip with a specified name.
- Remove selected clip (you can’t undo this).
- Rename the selected clip.
- Remove all clips (you can’t undo this).
- Title of animations that are used in the selected clip.
- Used animations list. Select animation to see the params panel.
- Add associated animation to the clip. A window with a list of animations from the animations tab will appear.
- Remove selected animation from the clip.
- Jump to selected animation in the animations tab.
- From what second of animation clip will start playing.
- On what second of animation clip will end playing.
- Animation rate value (modifier).
4. Plugin management window.
This is where you can install or update our 3ds Max plugin. Make sure you use an updated version.

- Input with a path to 3ds Max installation root (where
3dsmax.exeis located). - Folder browser for people who don’t want to type paths manually.
- 3ds Max plugin status and current version.
- Install/Update plugin button. If you specified a 3ds Max path and AnimKit has not detected plugin installation, you will see the “Install” button. Click it to install the plugin. If the plugin is installed but outdated, the “Update” button will become active.
- Uninstall button, which you can use to uninstall our 3ds Max plugin.
Understanding clips and animations
In RAGE, there are at least 2 known format types that store animation/clip data. Animation Dictionary (.#ad) and Clip Dictionary (.#cd). Animation Dictionary was used in GTA IV and Red Dead Redemption 1. Since Max Payne 3 Rockstar was using Clip Dictionaries instead. In Red Dead Redemption 2 they introduced both, but that’s not our case. Long story short, clip dictionary format (.#cd) contains both clips metadata and animations data.
“Animation data” store everything that the game will use to animate skeleton/uv/etc: bone transforms, rotations, track types and etc. Animations are not dependent on other animations and do not depend on clips.
“Clip metadata” is meta information that stores which part of actual animation data will be played in the game, its speed, properties like events, sounds, and so on. A clip should be linked to one or more animations. A single clip can use multiple animations at the same time, the game will mix tracks and play them all simultaneously. For example, Rockstar developers kinda often split fingers and facial data into separate animations, and then link them all to a single clip. You can also reuse the same animation but with different timings. Clips allow you to define when you want to start the animation and when want to finish it. When playing animations using TASK_PLAY_ANIM (and etc) natives you actually specify the clip name, not the animation name.